Understanding Pods, Namespace, Deployment and ReplicaSet in Kubernetes
Introduction#
In the previous blog we have successfully setup our kubernetes cluster with the help of minikube, and now it’s time to learn some kubernetes objects, so that we can manage our deployment easily.
We are going to learn about :
- Pods – The smallest deployable unit in Kubernetes
- Namespaces – How Kubernetes organizes resources
- Deployments – The easiest way to manage applications
- ReplicaSets – Ensuring your app runs at the right scale
Let’s dive in and explore how these components work together to power modern applications!
1. What is a Pod in Kubernetes?#
A Pod is the smallest and most basic unit in Kubernetes. Think of it as a wrapper for one or more containers that work together as a single unit. It represents a single instance of a running process in your cluster.
- A Pod can run one or multiple containers, and all of them share the same storage and network resources.
- Since all containers inside a Pod are deployed on the same node, they can communicate easily using
localhost. - Pods are temporary they can be created, replaced, or removed automatically, depending on how your cluster is configured.
Key Features of Pods:#
- Each Pod runs one or more containers, grouped together logically.
- Containers inside a Pod share networking (same IP) and storage.
- Pods are ephemeral, meaning they can be replaced or recreated dynamically.
In short, Pods are the foundation of how Kubernetes manages and runs containerized applications.

Example of Pod Definition (YAML)#
This Pod definition in Kubernetes creates a single instance named "my-app", running a container with the nginx web server. The spec section defines the container's name (nginx-container), the Docker image to be used (nginx), and the port 80, which allows the container to handle web traffic. Unlike a Deployment, this Pod is not managed automatically if it fails, Kubernetes will not restart it unless configured separately. This is useful for basic testing or running single-instance applications.
How to create a Pod?#
Output:
Check running Pods#
Output:
Basic kubectl Commands for Managing Pods#
Create a Pod#
List Pods#
- Default Namespace:
- Specific Namespace:
Get Pod Details#
- Describe a Specific Pod:
- Retrieve Logs from a Pod:
Interact with a Pod#
- Open a Shell Session Inside a Pod:(Works if the container supports it.)
Delete a Pod#
Create a Pod from a YAML File#
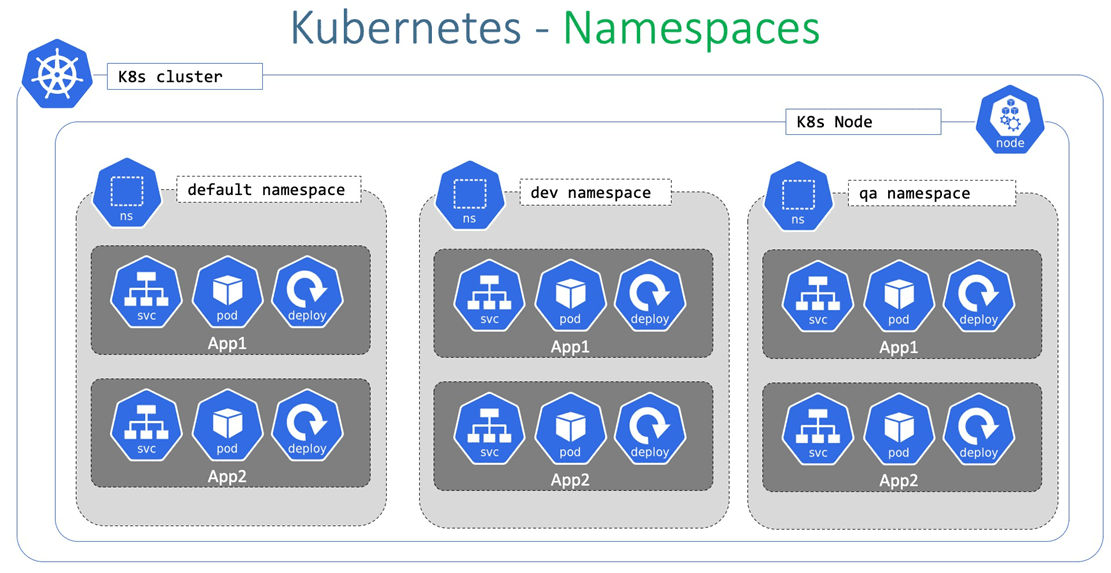
2. What is a Namespace in Kubernetes?#
A Namespace is a way to logically separate resources in a Kubernetes cluster. Think of it as separate folders for different teams, applications, or environments (e.g., dev, staging, production).
Key Features of Namespaces:#
- Allow multiple teams to work in the same cluster without conflicts.
- Provide resource isolation and better access control.
- Help organize workloads efficiently.
Built-in Kubernetes Namespaces:#
default– Used when no namespace is specified.kube-system– Contains internal Kubernetes components.kube-public– Publicly accessible resources.kube-node-lease– Holds node heartbeat information.
How to create a Namespace?#
View all namespaces:
Output:
Run a Pod in a specific namespace:
Managing Namespaces in Kubernetes#
List Namespaces#
- Get all namespaces:
Create and Delete Namespaces#
- Create a namespace:
- Delete a namespace:
Work with Pods in a Namespace#
- List Pods in a specific namespace:
- List Pods across all namespaces:
Set the Current Namespace#
- Change the active namespace for the current context:
Get Namespace Details#
- Describe a namespace:
- Edit a namespace:
Get All Resources Across All Namespaces#
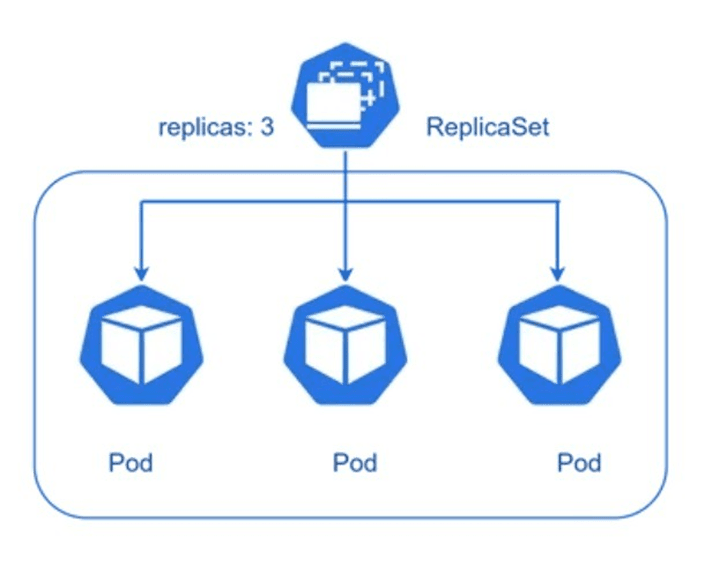
3. What is ReplicaSet in Kubernets?#
We have one Pod running your containerized application which is good, but what if you want multiple replica of that pods and also you want to manage the lifecycle of that pods? Here the replicaSet comes into the picture.
A ReplicaSet in Kubernetes ensures that a specific number of identical Pods are always running in your cluster. It helps maintain high availability by automatically managing the lifecycle of Pods.
- If a Pod fails or gets terminated, the ReplicaSet will immediately create a new one to replace it.
- It works using label selectors, which define which Pods belong to the ReplicaSet.
- By ensuring the correct number of replicas, a ReplicaSet helps maintain fault tolerance and scalability.
Key Features of ReplicaSets:#
- Maintains the desired number of running Pods.
- Uses label selectors to identify which Pods it manages.
- Ensures high availability of applications.
In simple terms, a ReplicaSet is like an auto-repair system for your Pods, making sure your application runs smoothly without manual intervention.
Example of a ReplicaSet (YAML)#
Here we have specified 3 replicas; this will create 3 nginx containers within 3 Pods. Also, in the selector, we have specified matchLabels as app: my-app, which is the same as the label defined in the template.metadata.labels section. This ensures that the ReplicaSet manages only the Pods with the label app: my-app, maintaining the desired number of replicas.
Create a ReplicaSet:
Check running ReplicaSets:
Output:
Delete a ReplicaSet:
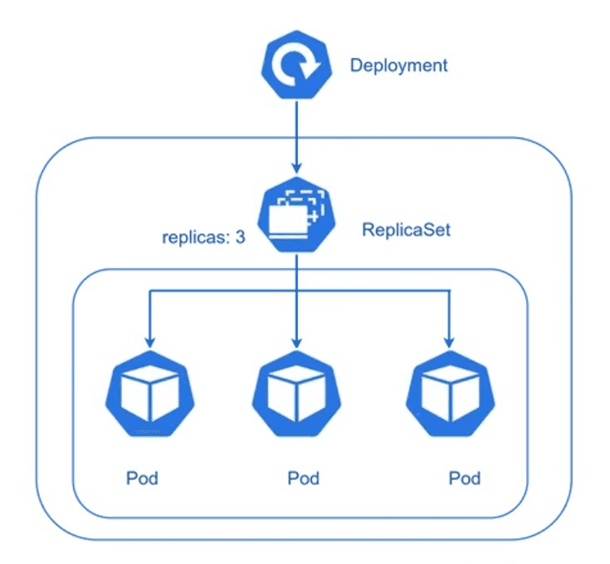
4. What is Deployment in Kubernetes?#
A Deployment is a higher-level abstraction that provides declarative updates for Pods and ReplicaSets. It simplifies the management of application workloads by handling:
- Defining the Desired State – Specify details such as container images, the number of replicas, and update strategies.
- Managing ReplicaSets and Pods – Automates the creation, scaling, and replacement of Pods as needed.
- Rolling Updates & Rollbacks – Ensures seamless updates without downtime and allows easy rollback to a previous version if needed.
This makes Deployments an essential tool for maintaining application availability and scalability.
Example of a Deployment (YAML)#
This Deployment in Kubernetes ensures that three instances (replicas) of a Pod are always running, each containing a container running the nginx web server. The selector ensures that only Pods labeled app: my-app are managed by this Deployment, and the template defines how each Pod should be created, specifying the container name, image (nginx), and exposed port 80.
To ensure smooth updates without downtime, a rolling update strategy is defined. The maxSurge: 1 setting allows Kubernetes to temporarily create one extra Pod during an update, ensuring that the desired number of running Pods is maintained. The maxUnavailable: 1 setting ensures that at most one Pod is unavailable at any given time during the update process. This approach gradually replaces old Pods with new ones, ensuring continuous application availability. Additionally, if something goes wrong during an update, Kubernetes allows rollbacks to a previous stable version, making deployments safer and more reliable.
Deploy an application:
Check Deployments:
Output:
Scale Deployment to 5 replicas:
Manage Deployments in Kubernetes#
- Create a Deployment:
- Scale a Deployment:
- Update a Deployment (Change Container Image):
- Rollback to Previous Revision:
- Check Rollout History:
- Rollback to a Specific Revision:
Conclusion#
In this blog, we explored four fundamental Kubernetes components:
Pods – The basic unit that runs containers.
Namespaces – Helps organize Kubernetes resources efficiently.
ReplicaSets – Ensures high availability by maintaining the desired number of Pods.
Deployments – Manage updates, scaling, and fault tolerance.
Understanding these building blocks is essential for working with Kubernetes. Now that you have a solid grasp of these concepts, you can start deploying applications, managing workloads, and scaling efficiently in a Kubernetes cluster!