OAuth2 Client Authentication Part 1
Introduction :#
OAuth2 Client Authentication is a process by which a client application (such as a web app or mobile app) proves its identity to an OAuth2 authorization server when requesting access tokens. It ensures that the client requesting access is authorized to do so, which is crucial for maintaining the security and integrity of the OAuth2 flow.
OAuth2 Client Authentication ensures:#
- Security: Only legitimate clients can access resources.
- For example, it prevents unauthorized apps from posting on your social media account.
- Authorization: Confirms the client app has proper permissions.
- For instance, it verifies a weather app is allowed to access weather data.
- Token Exchange: Validates that a client can exchange an authorization code for an access token.
- For example, it ensures a third-party app is legitimate before granting access to a user’s profile information.
OAuth2 Client Authentication is used in:#
- Authorization Code Flow: When a client exchanges an authorization code for an access token, it must authenticate itself to the authorization server.
- Example: When you log in, the fitness app gets an authorization code from Google. To turn this code into an access token (which lets the app fetch your profile info), the app must prove it's allowed to do so. This is where client authentication comes in.
- Client Credentials Flow: When a client requests an access token directly using its own credentials (client ID and secret), often for machine-to-machine communication.
- Example: The weather app directly requests an access token from the server using its own client ID and secret (like a username and password for the app). This is common for server-to-server communication, where no user is directly involved.
- Token Introspection: When verifying the validity of an access token, client authentication ensures the request is from a legitimate source.
- Example: The shopping app sends the token to the authorization server to verify it's still active. The server checks if the request is from a legitimate app before confirming the token's validity.
How It Works:#
Here we talking about the OAuth2 Client Authentication. Here we will see how to authenticate our application with the help of Google, Facebook, GitHub and many more such clients with the help of Spring Security. Here we are going to take a help of Google and similar process can be followed for GitHub, Facebook etc if you want so. Let’s understand how it work.
Add Dependency
Google Cloud Console
- Go to the Google Cloud Console.
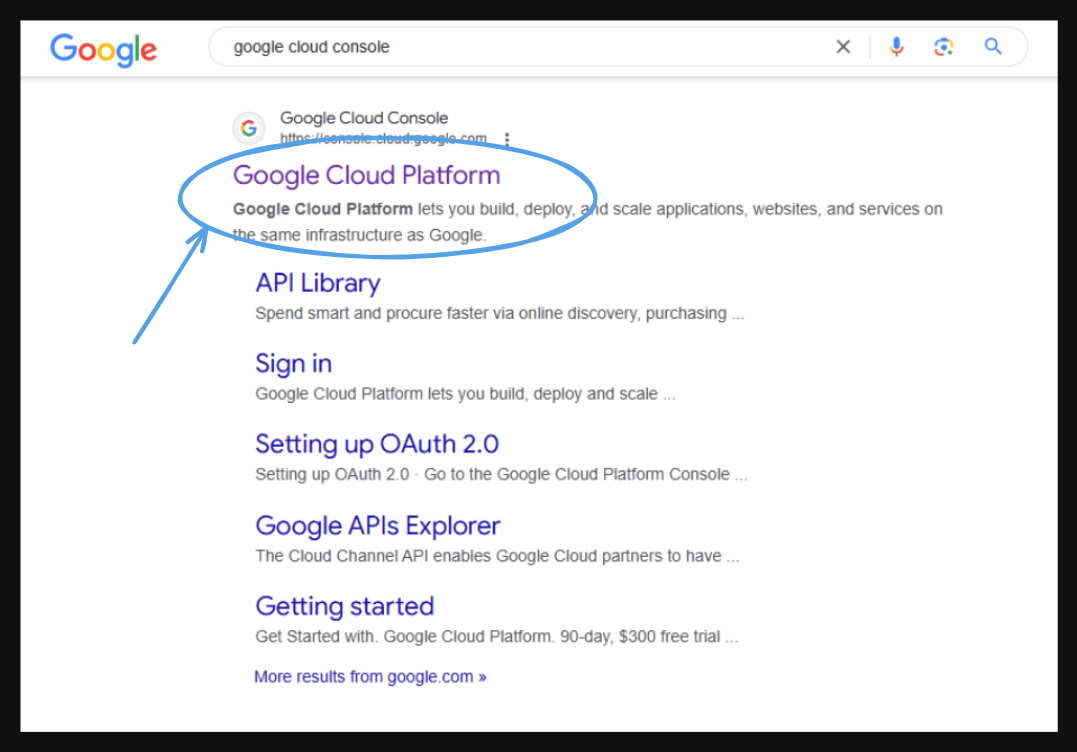
And you will first have to create your Google developer account if you don’t have one.
- Create your own project.
If you already have a project, go to 'My First Project' and select it.
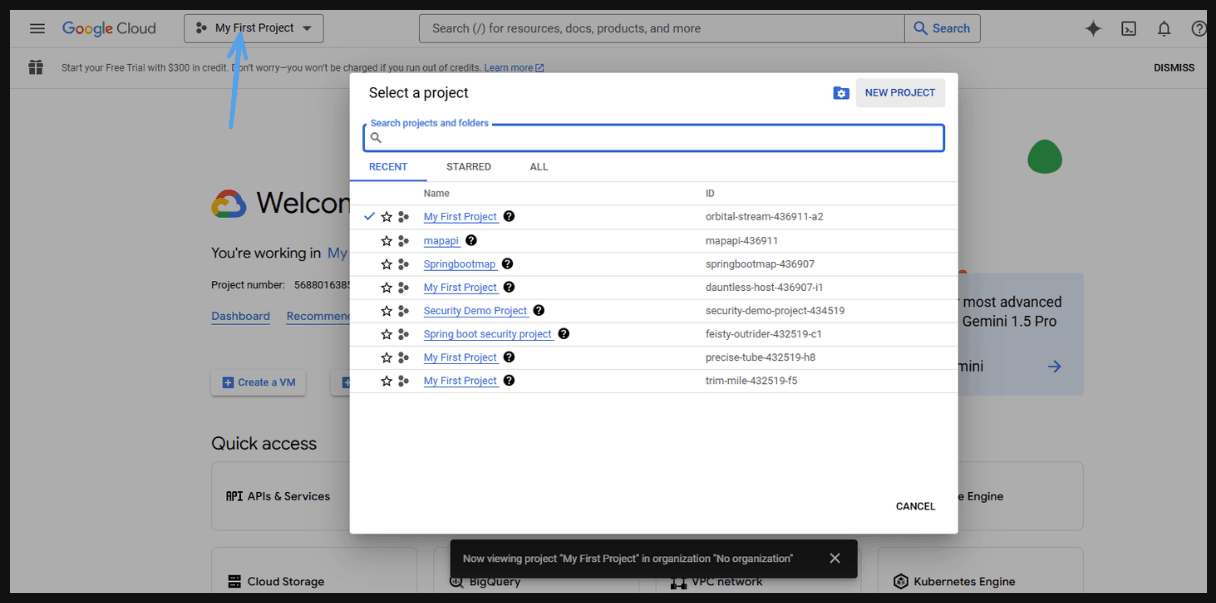
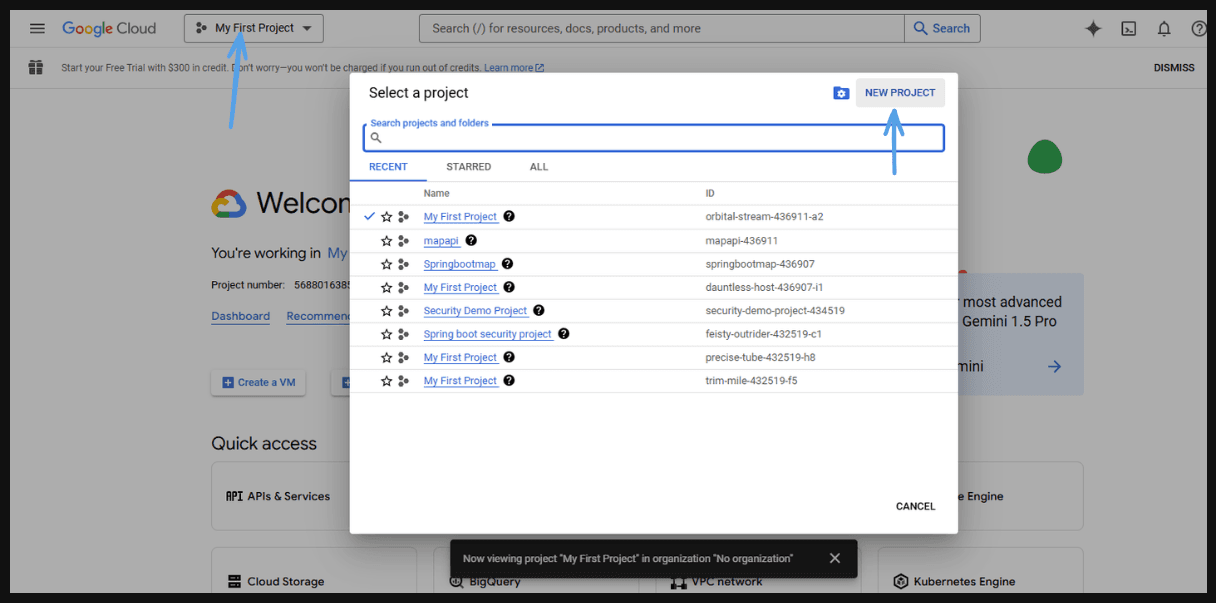
- If you don’t have a project yet, click on 'New Project'.
- Enter the name of your project, and click 'Create'.
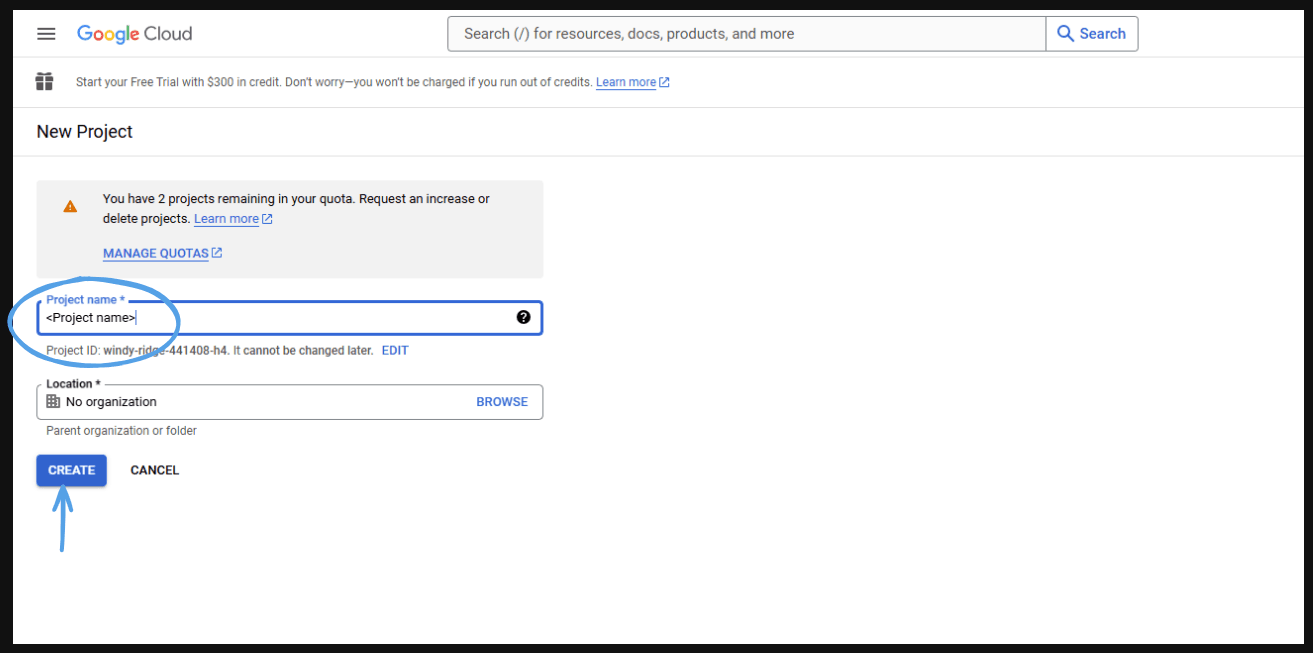
- Finally, it will create a project.
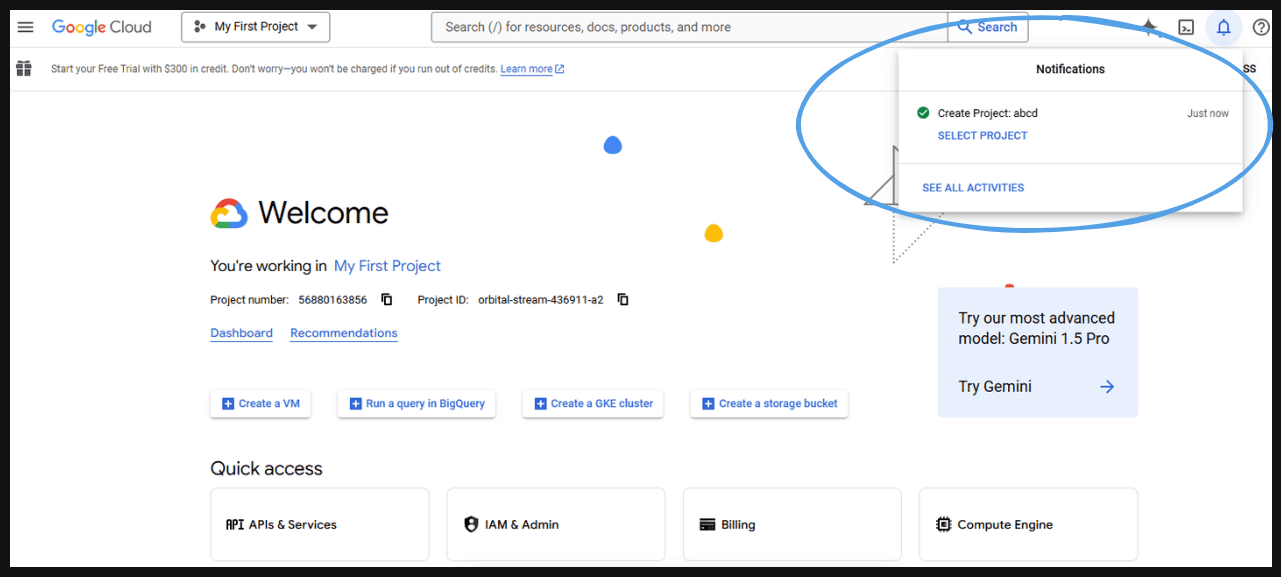
- You can go to the project you created.
Create Credentials
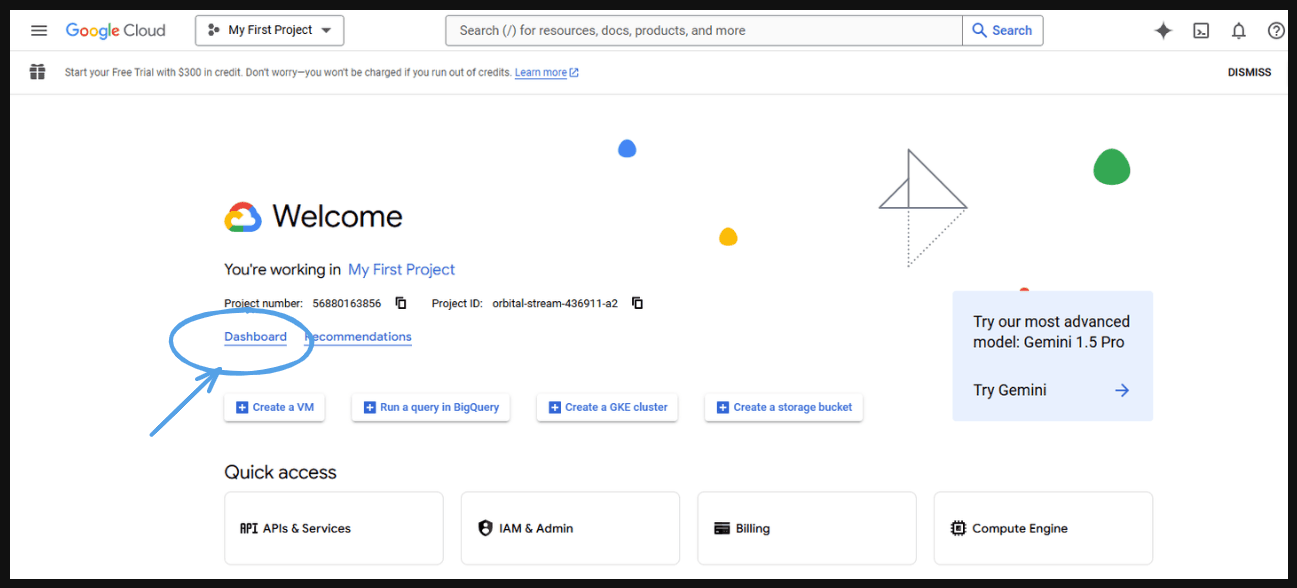
- Go to ‘Dashboard’
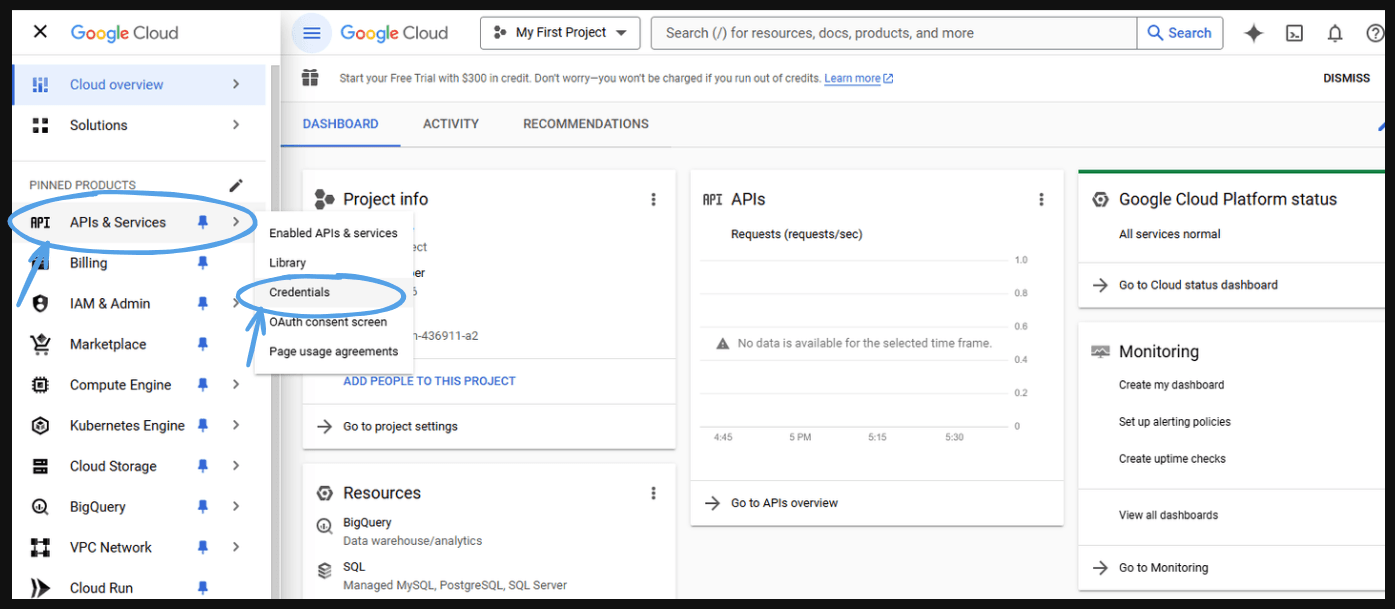
- Go to ‘Apis & Services’ and after that go to the ‘Credentials’.
- This will take you to the next screen. Then, go to ‘Create Credentials’ and select ‘OAuth client ID.’
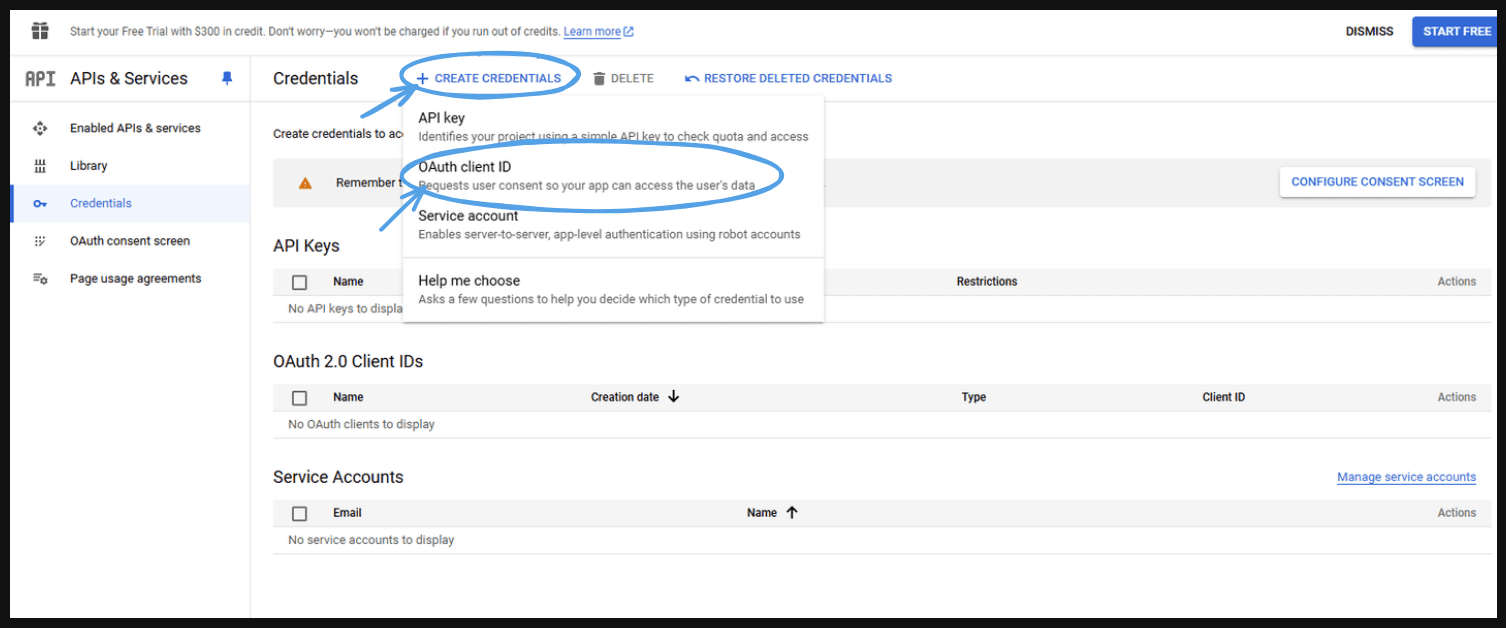
- To create an OAuth client ID, you must first configure your consent screen.
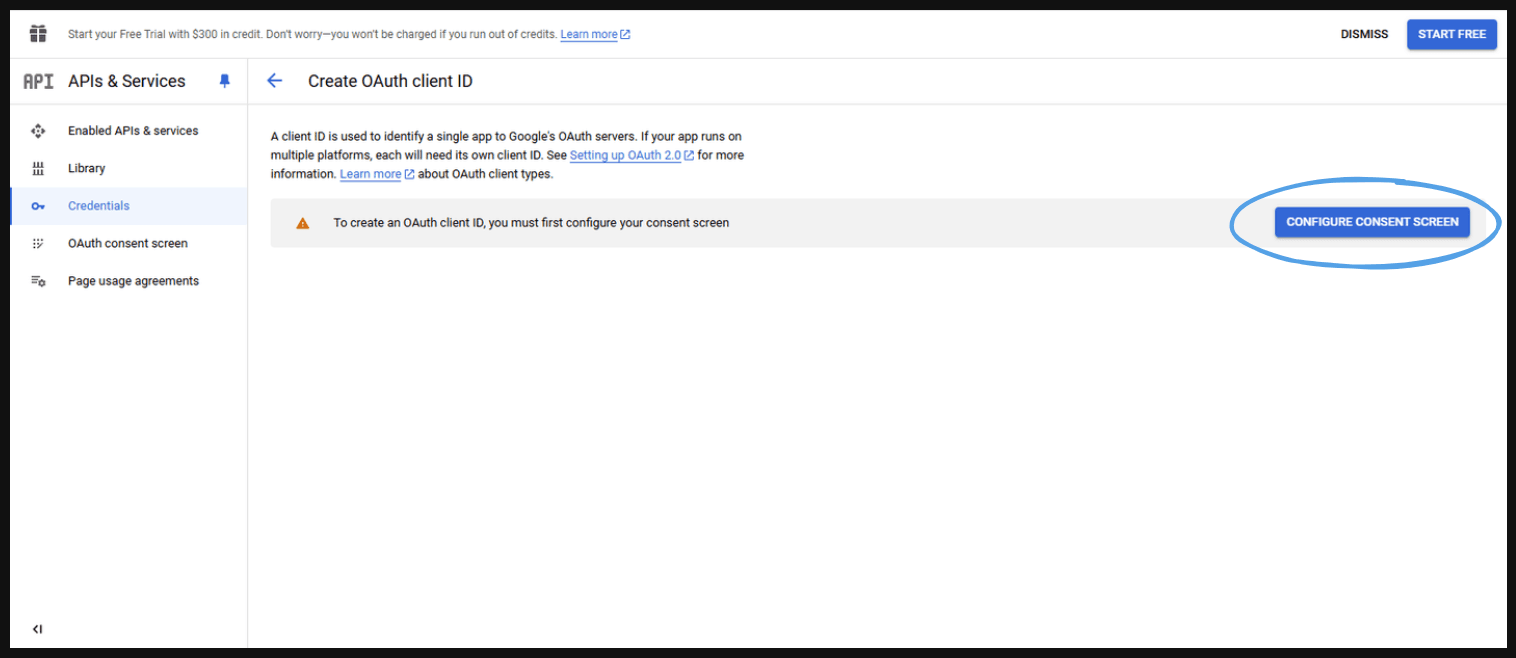
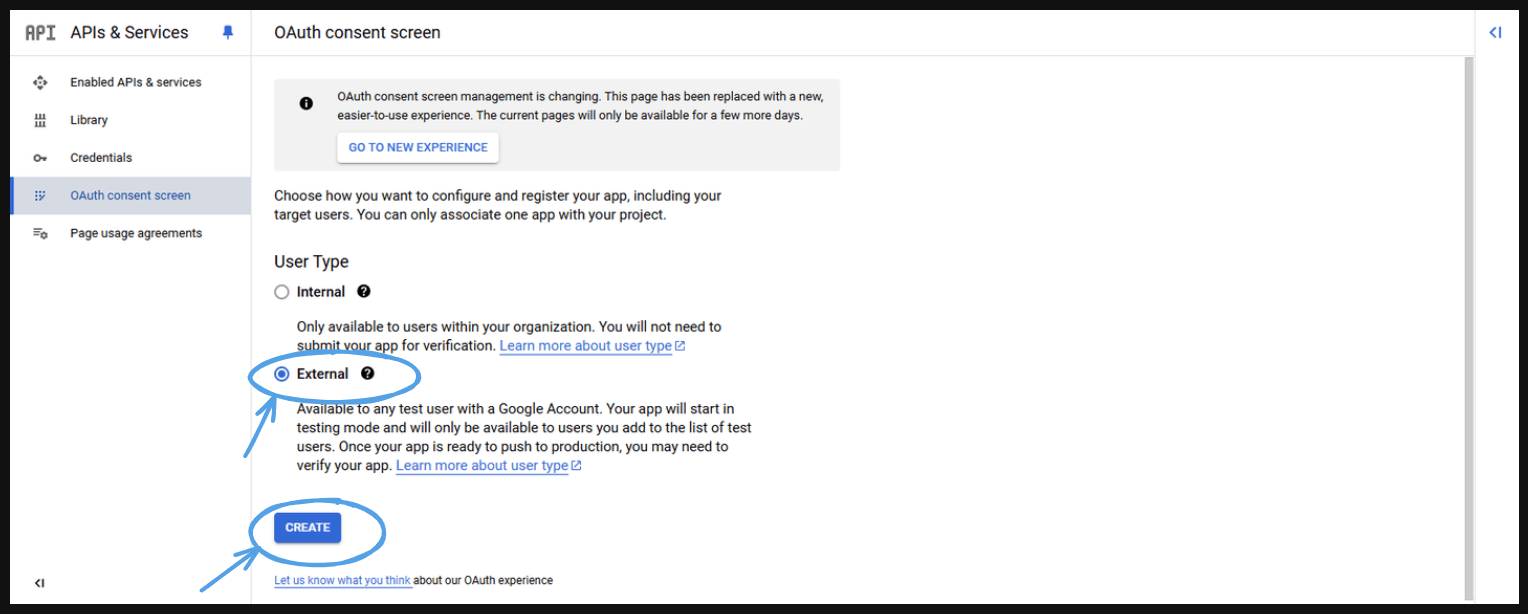
- Configure Consent Screen is a screen that is presented to your users so that they can consent to all the permissions you are trying to get from their authorization servers so from a user type you are going to external type here.
Example: Imagine you're building a travel app that integrates with Google Maps to provide personalized trip planning. When a user signs up, they are redirected to a Google consent screen. This screen asks the user to allow your app to access their location and calendar. The user sees this screen, reviews the permissions, and then decides whether to grant or deny access.
Select ‘External’ and click ‘Create.’
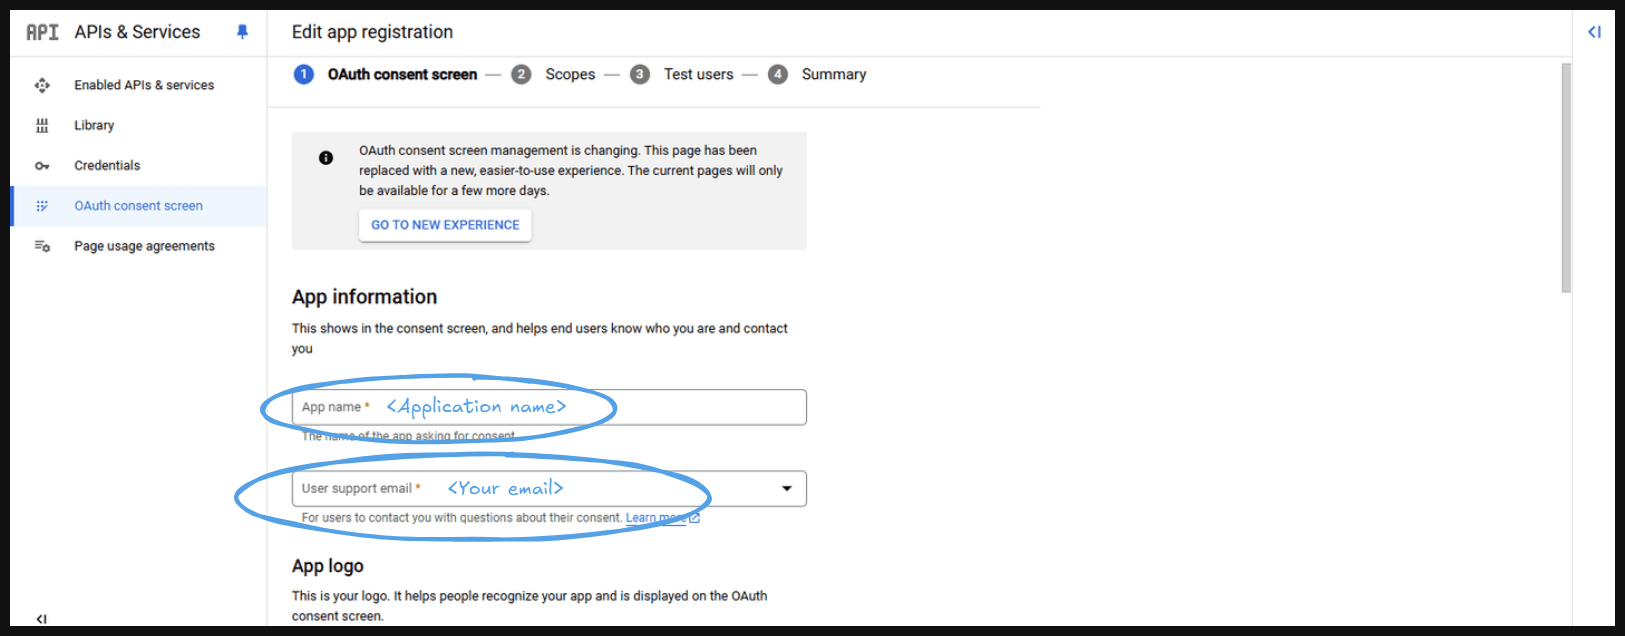
- After that provide your ‘Application name’, and 'Email'.
- Scroll down and enter the 'Developer contact' email with the same email address.
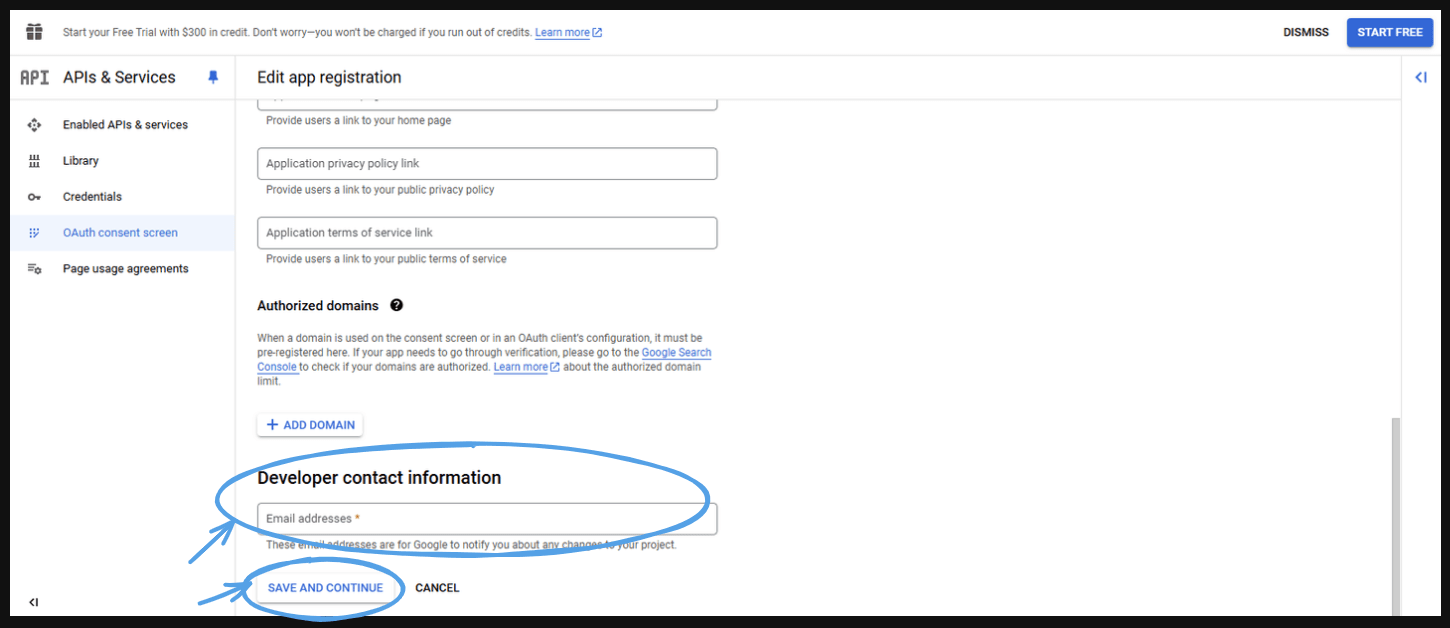
- This will take you to the next screen.
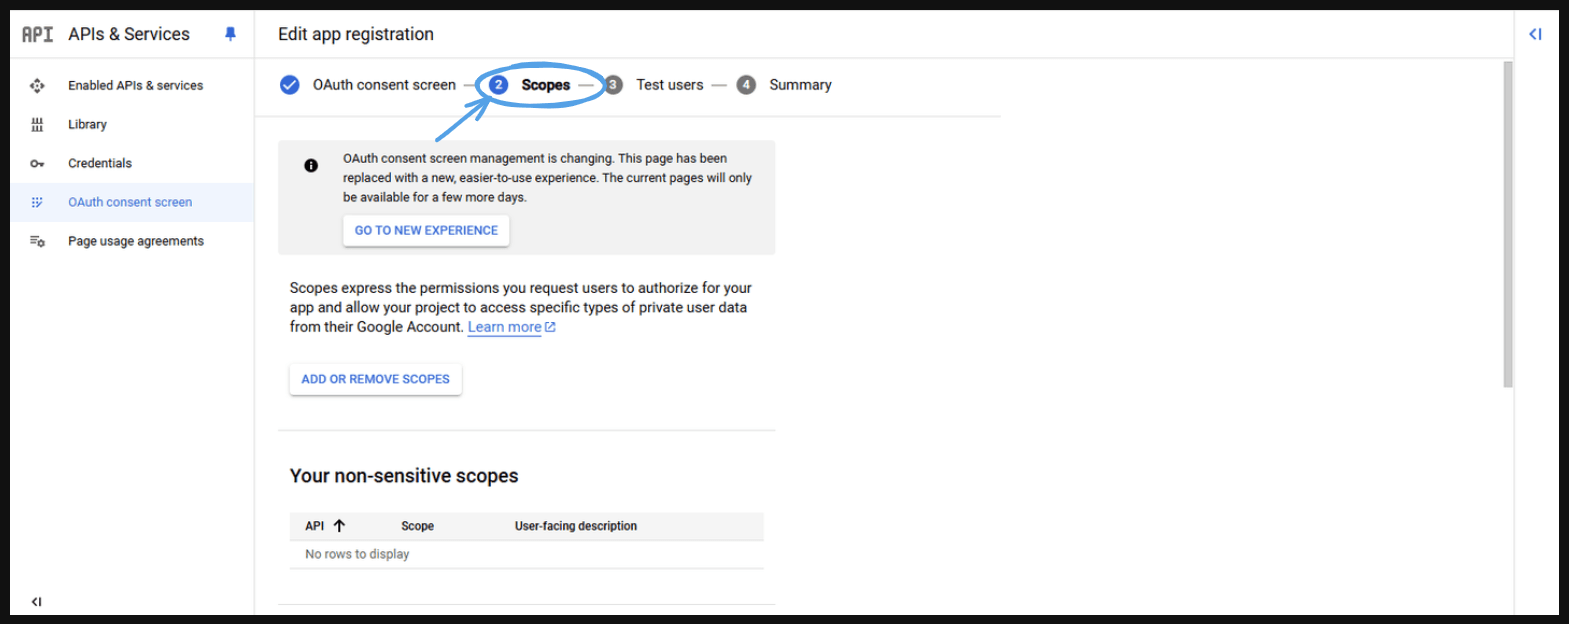
- Next Screen (Scopes): Here we can define the scopes. Scopes are basically the permissions that we want to get from the authorization servers. There are multiple type of scoops.
- non-sensitive scopes grant access to basic, low-risk user data that doesn't significantly impact the user's privacy or security.
- Example:
profile: Access to basic profile information, such as the user's name, profile picture, and gender.email: Access to the user's email address.
- Example:
- sensitive scopes grant access to more critical or private user data that could have significant implications for the user's privacy or security.
- Example:
calendar: Access to the user's calendar, which might include private appointments and schedules.contacts: Access to the user's contact list, including personal and professional contacts.
- Example:
- non-sensitive scopes grant access to basic, low-risk user data that doesn't significantly impact the user's privacy or security.
- Example: If you're building a photo-sharing app and want to allow users to upload photos to their Google Drive, you would request the
"drive.file"scope. This scope grants your app permission to read and write files to the user's Google Drive, but only the files your app has created.
- Importance of Scopes
Using scopes ensures that applications only request the minimum permissions necessary for their functionality, enhancing user trust and security. Users can see exactly what data or features an app wants to access, giving them control over their information.
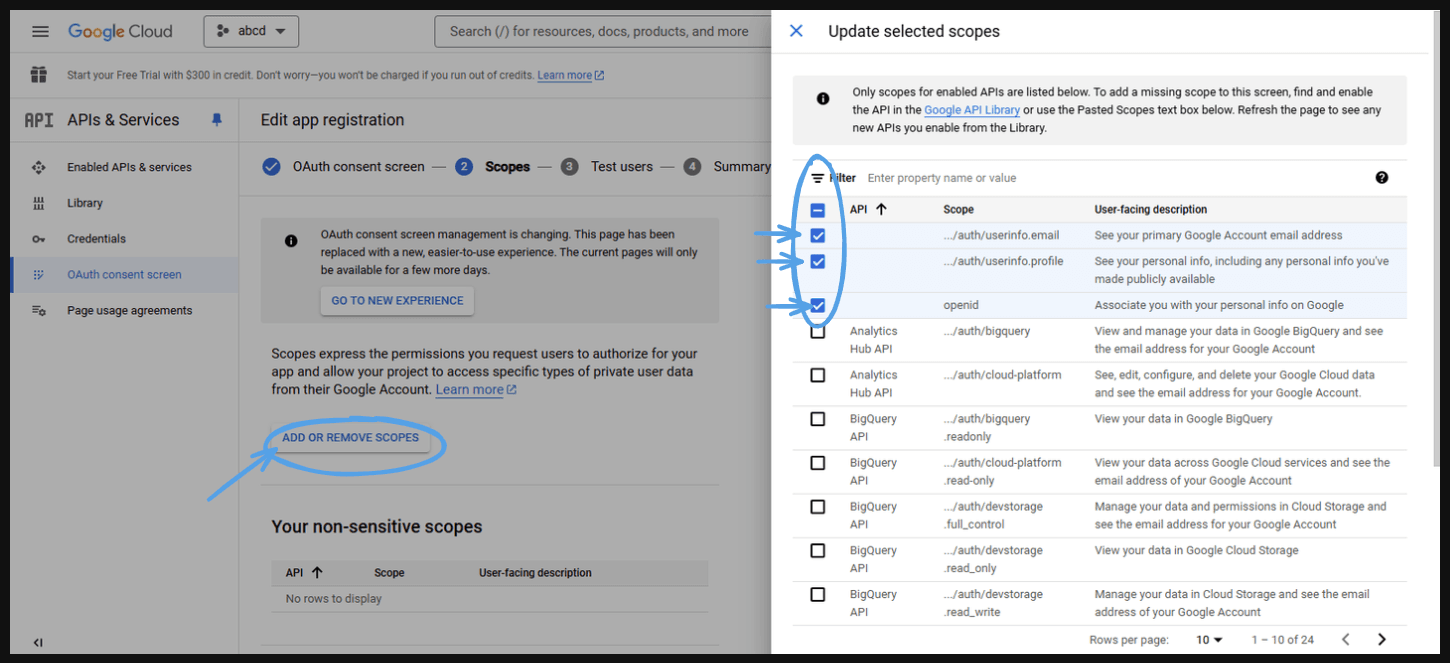
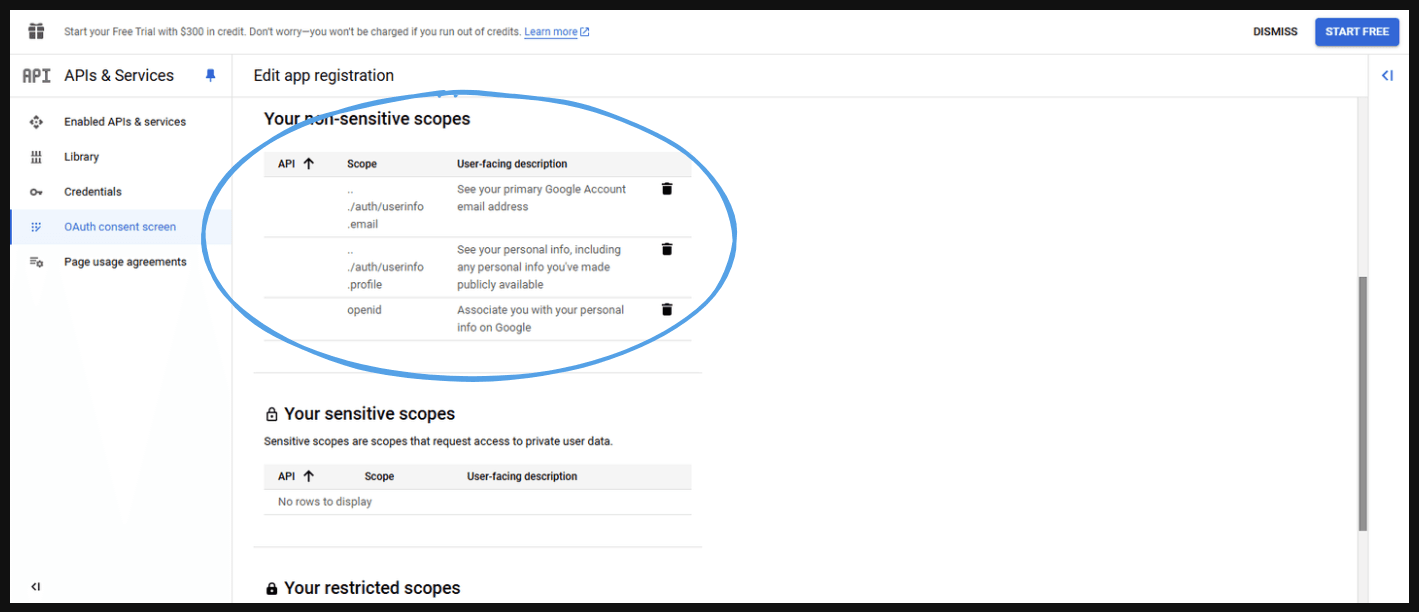
Here, we actually just want the non sensitive scopes so just to add that.
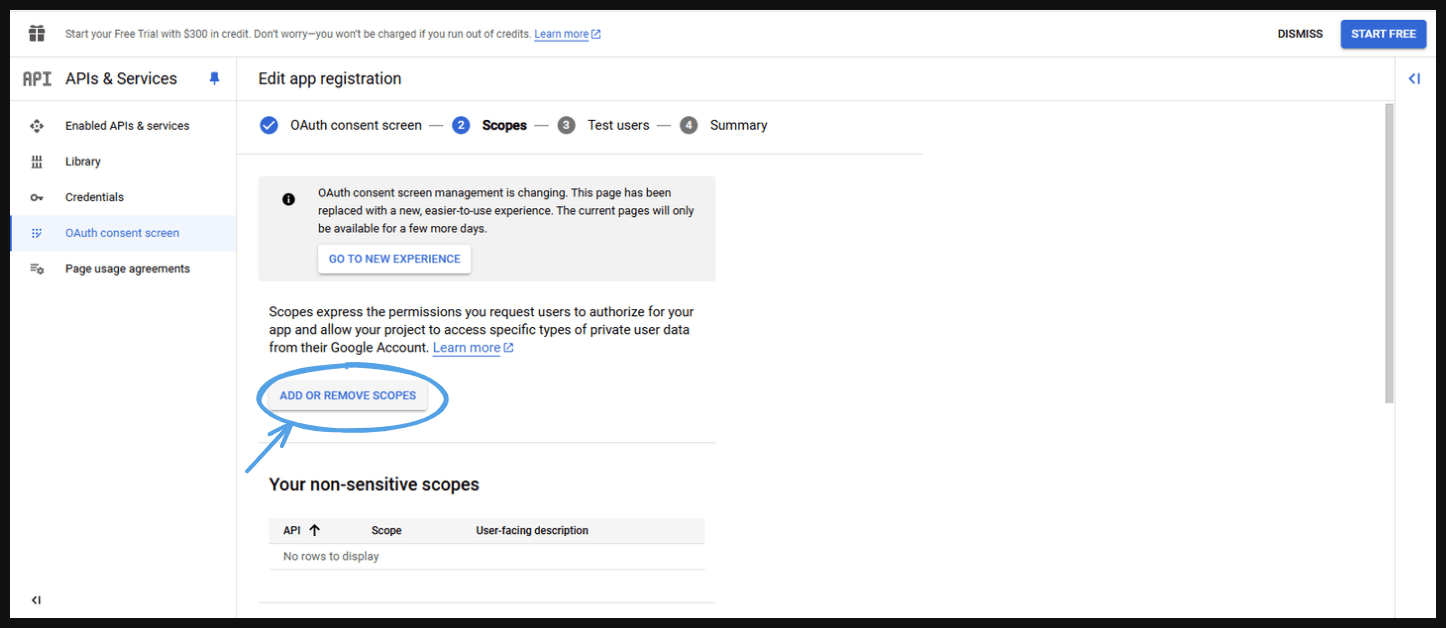
- Go to ‘Add or Remove Scopes’
- Select them.
- Scroll down and press ‘Update’ .
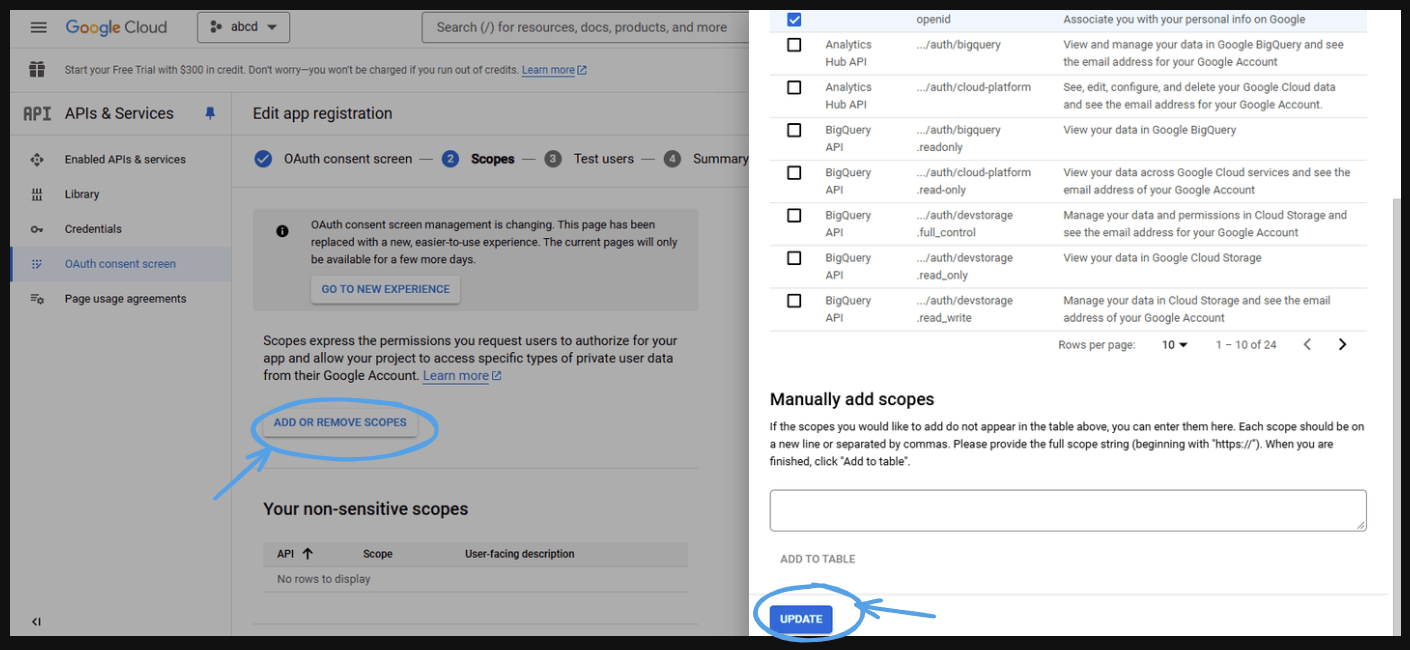
- Final look.
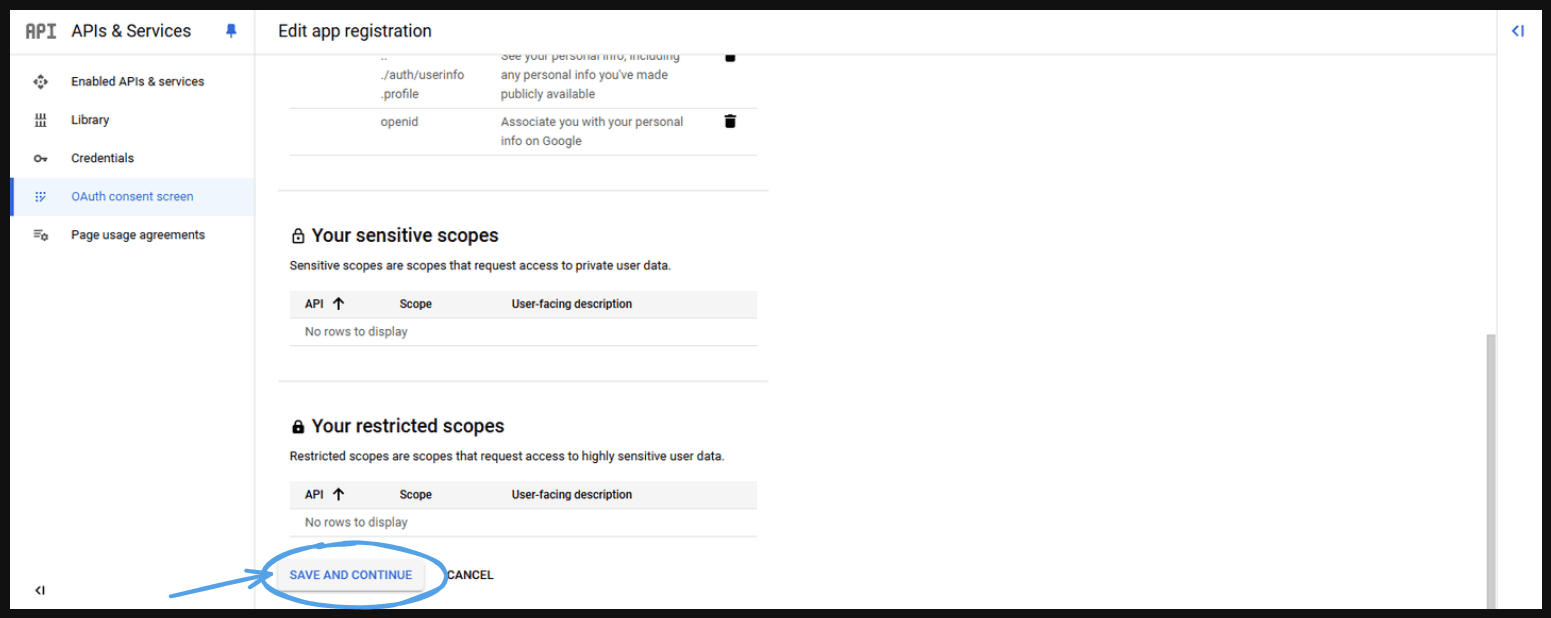
- Scroll down and press ‘Save and Continue’.
- It will take you to the next page.
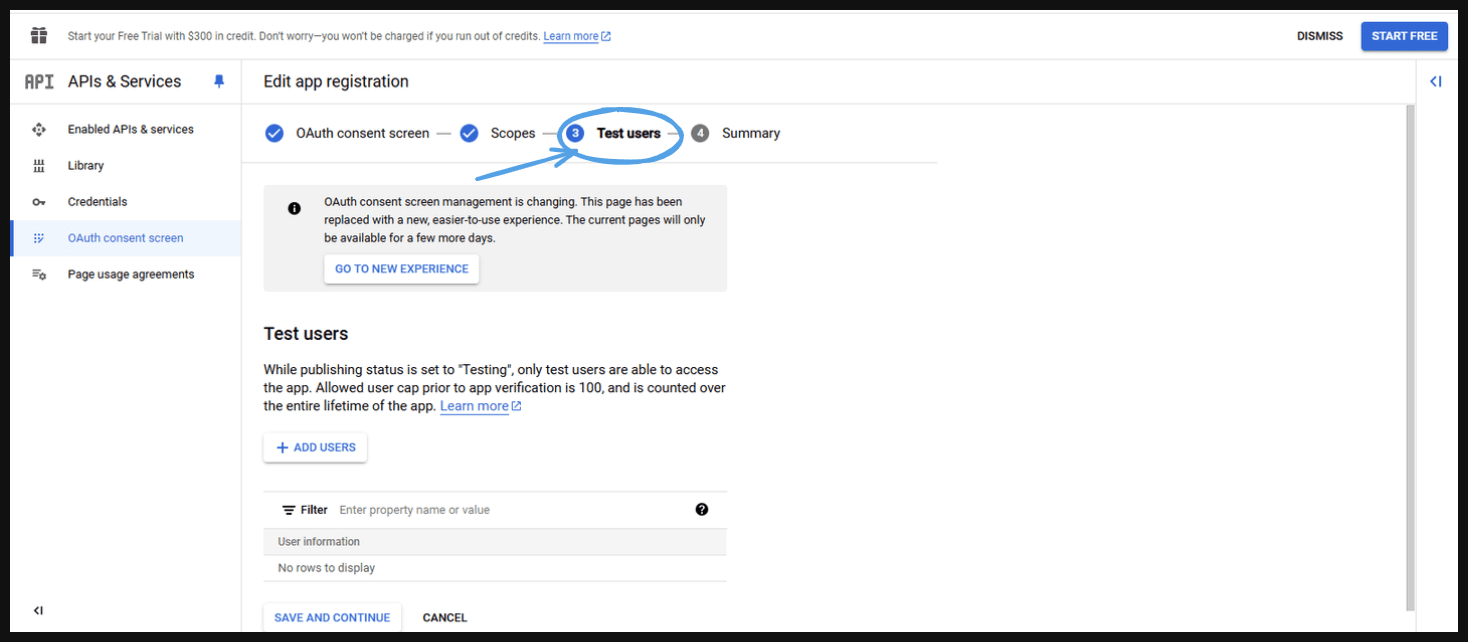
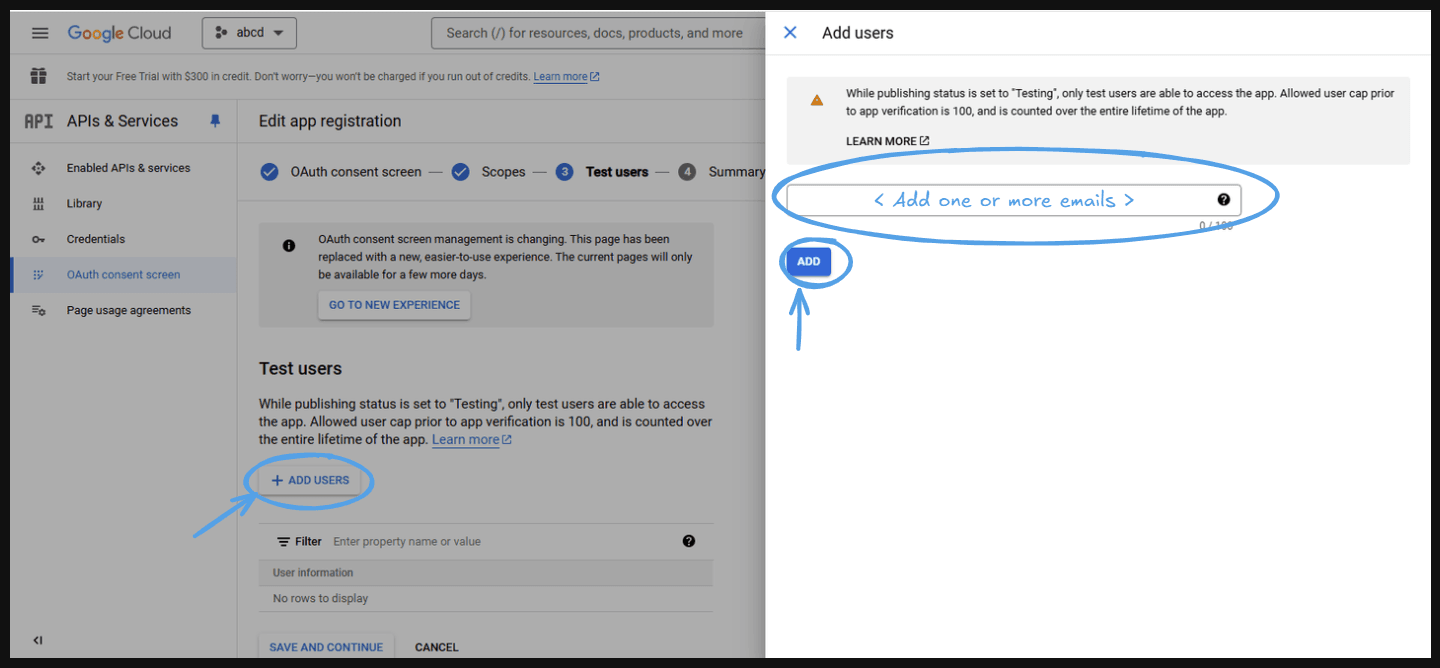
- Test User: You can add some testing users basically these are the testing users for this application. This application currently work if it is not sent to a published mode. Basically, you will get 100 testing users when your app is in testing mode and you can ship it to production mode anytime.
Example: Let’s say you’re developing a new photo-sharing app that integrates with Google Photos. Before releasing it to the public, you want to ensure that the OAuth2 flow works correctly, including requesting access to users' photos and displaying the consent screen.
- Go to ‘Add users’ .
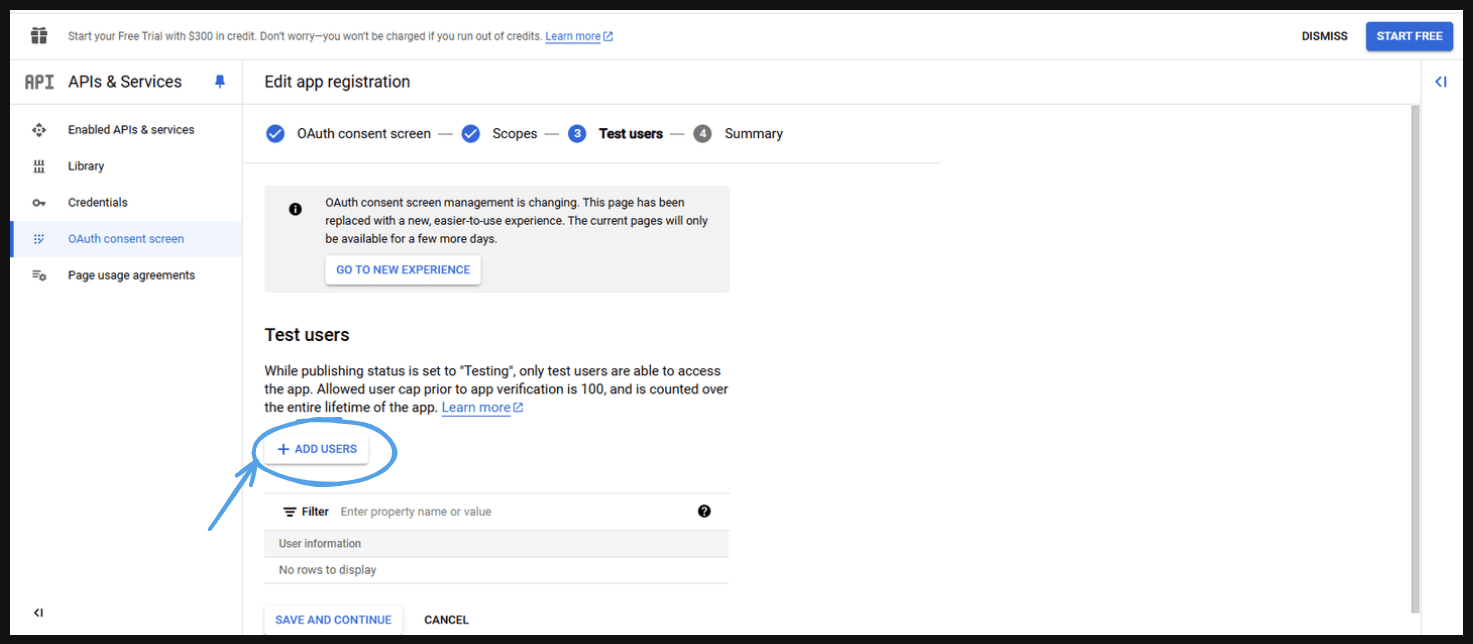
- Add one or more emails and press ‘Add’ .
- This will take you to the next page, where you can see all the emails you provided in 'User information.' Click ‘Save and Continue.’
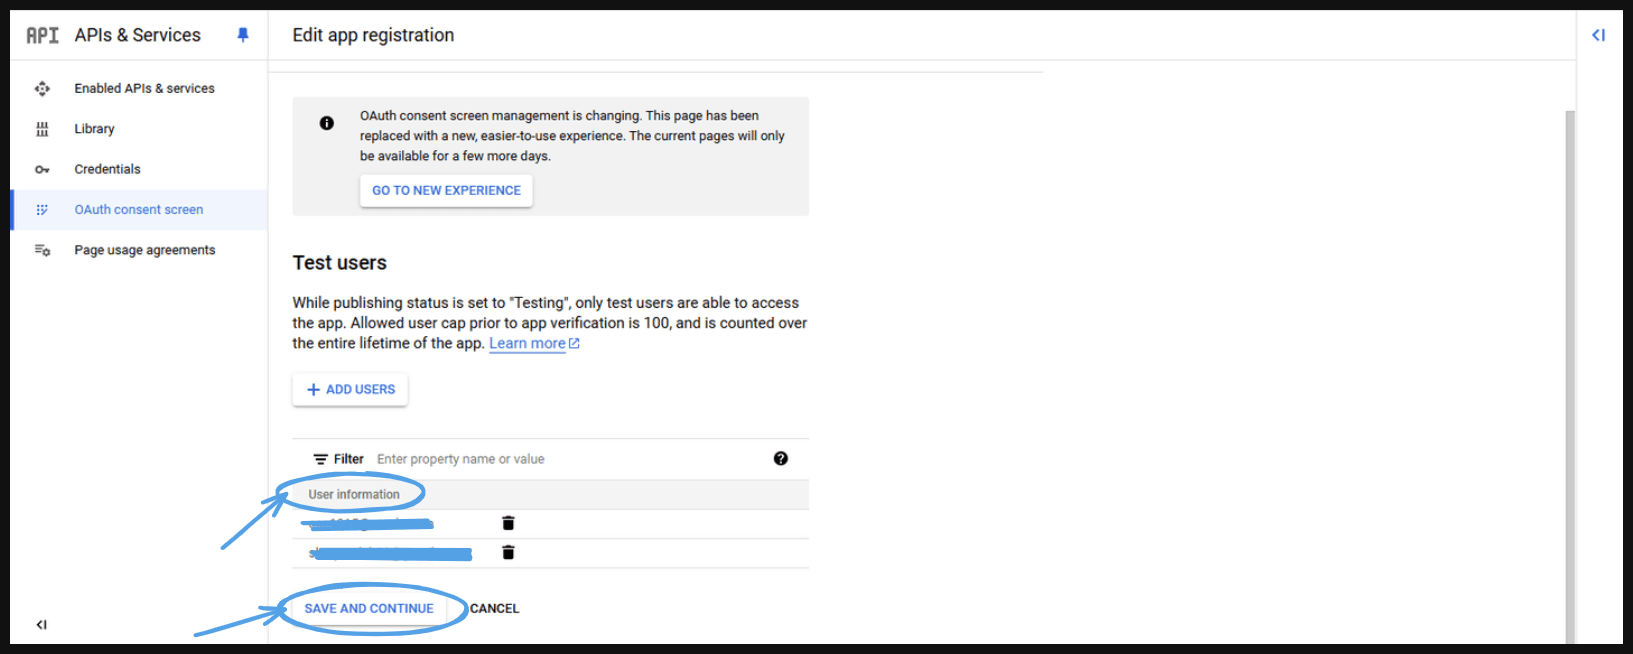
- This will take you to the next page.
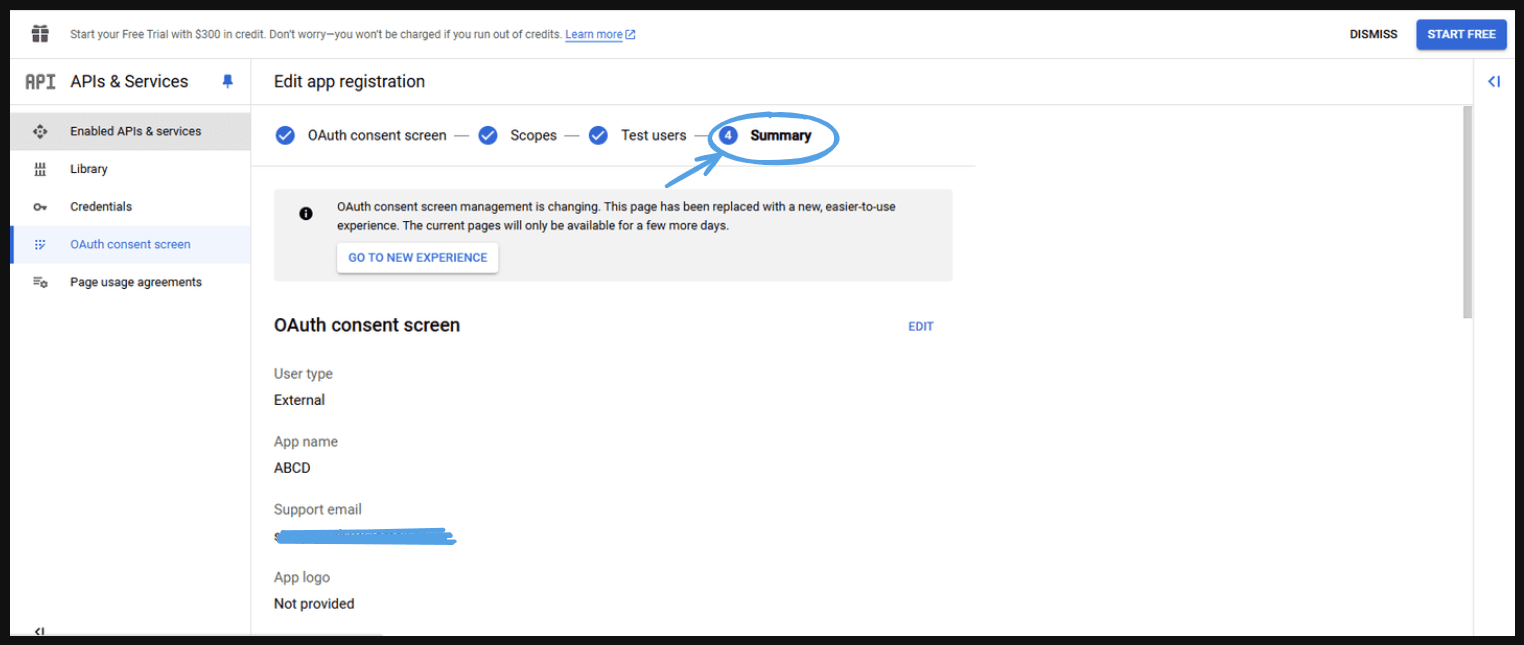
- Summary: After that confirm all the information and press ‘Back to dashboard’.
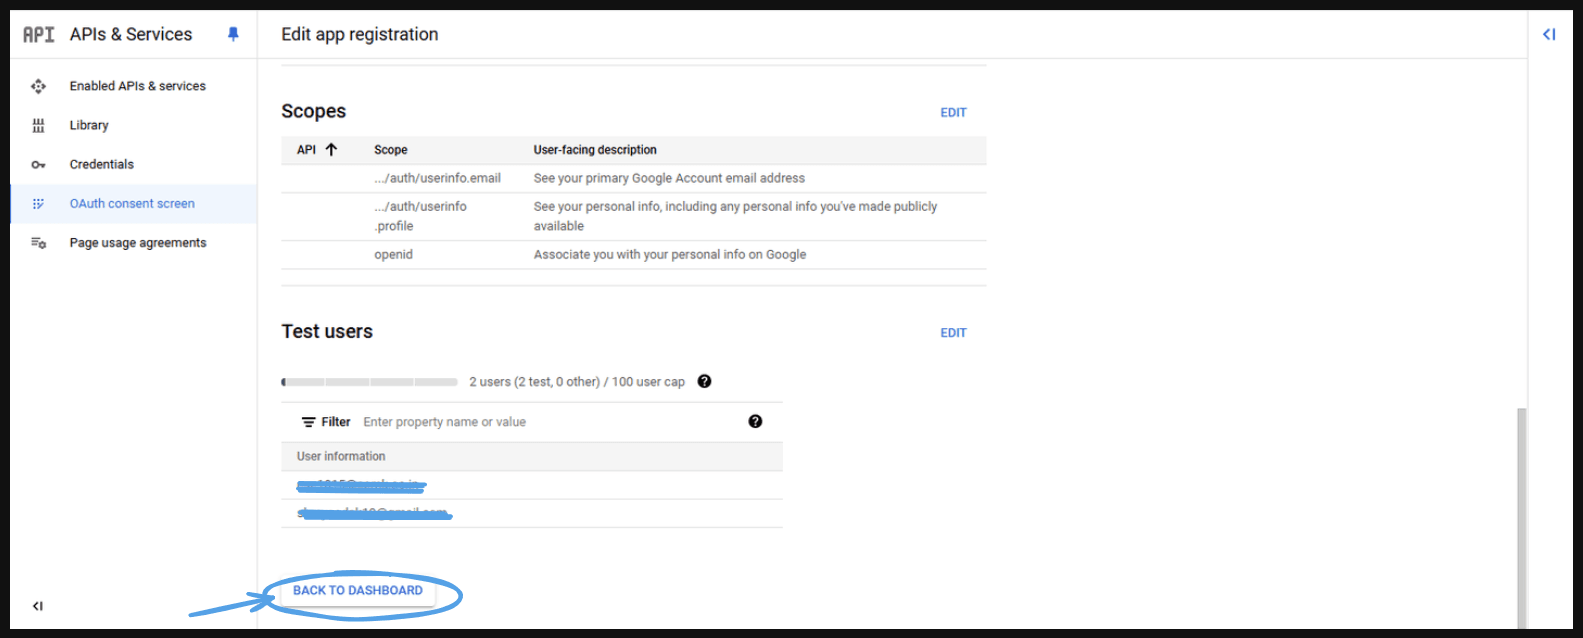
- This will take you to next page.
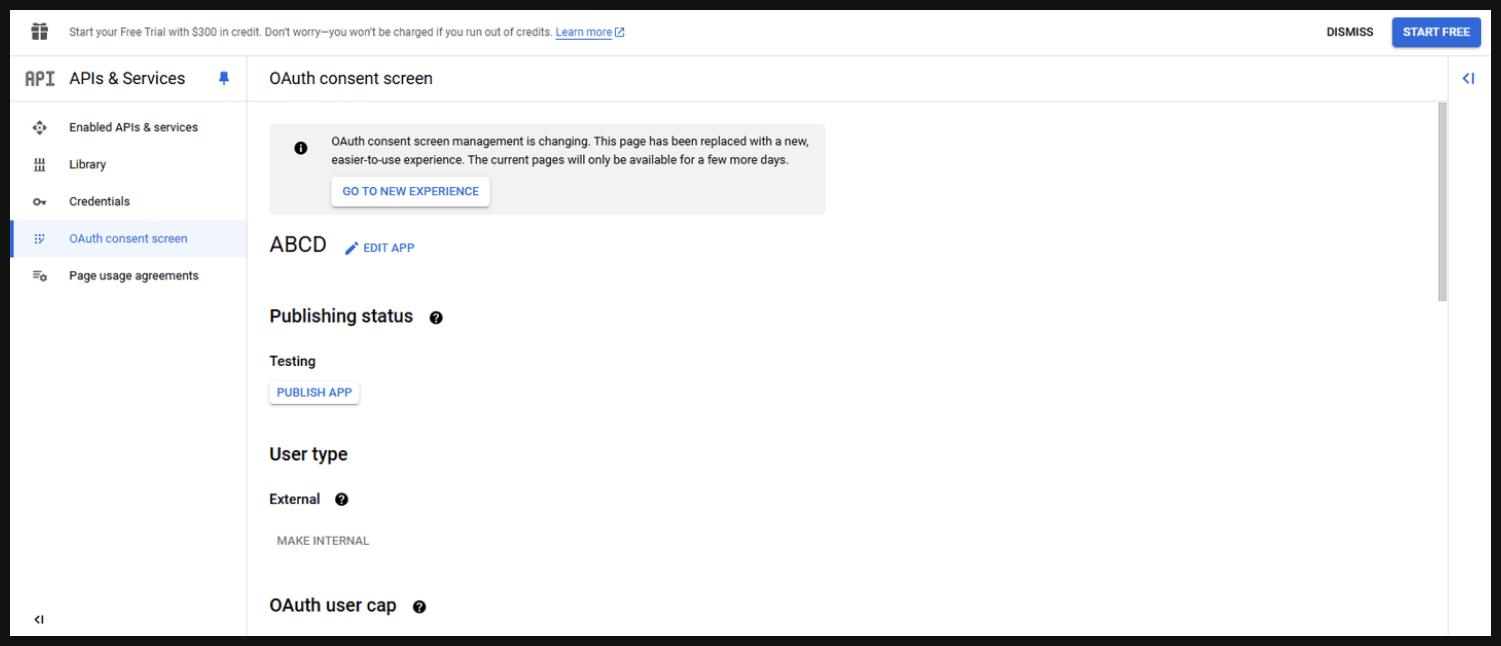
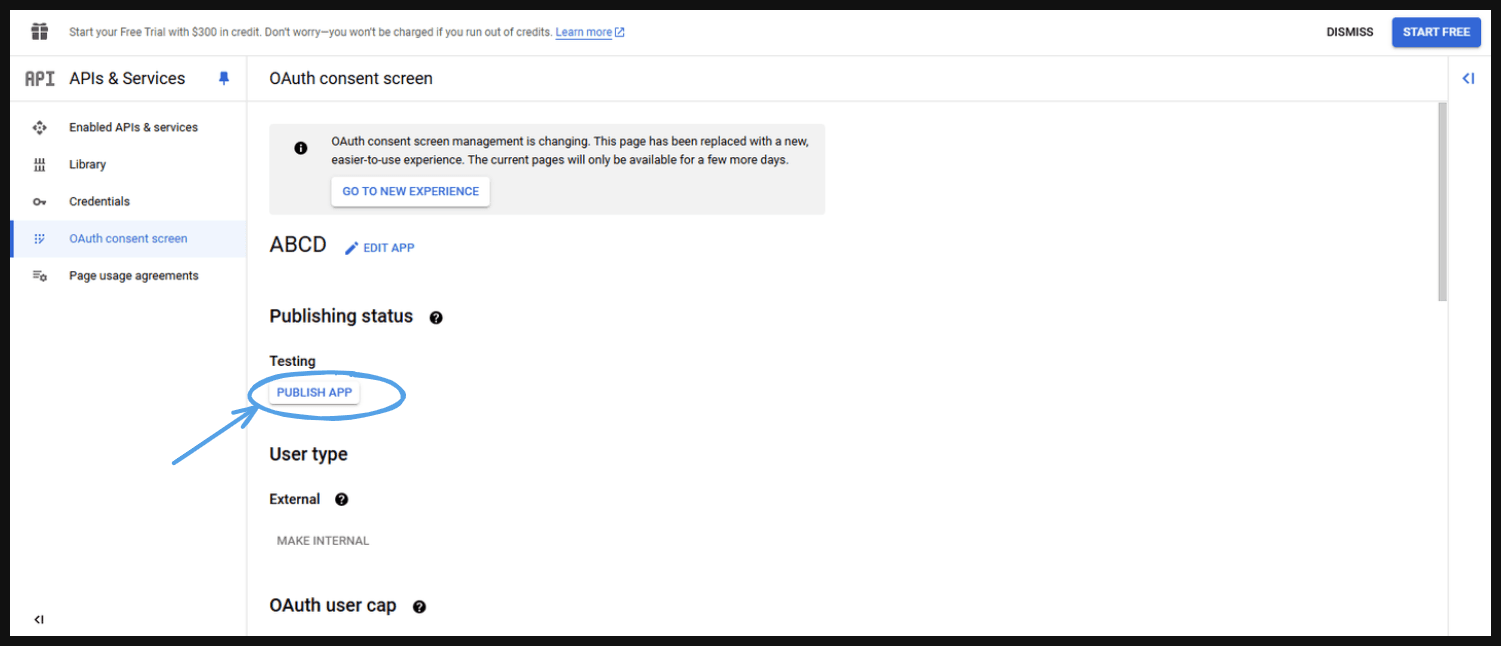
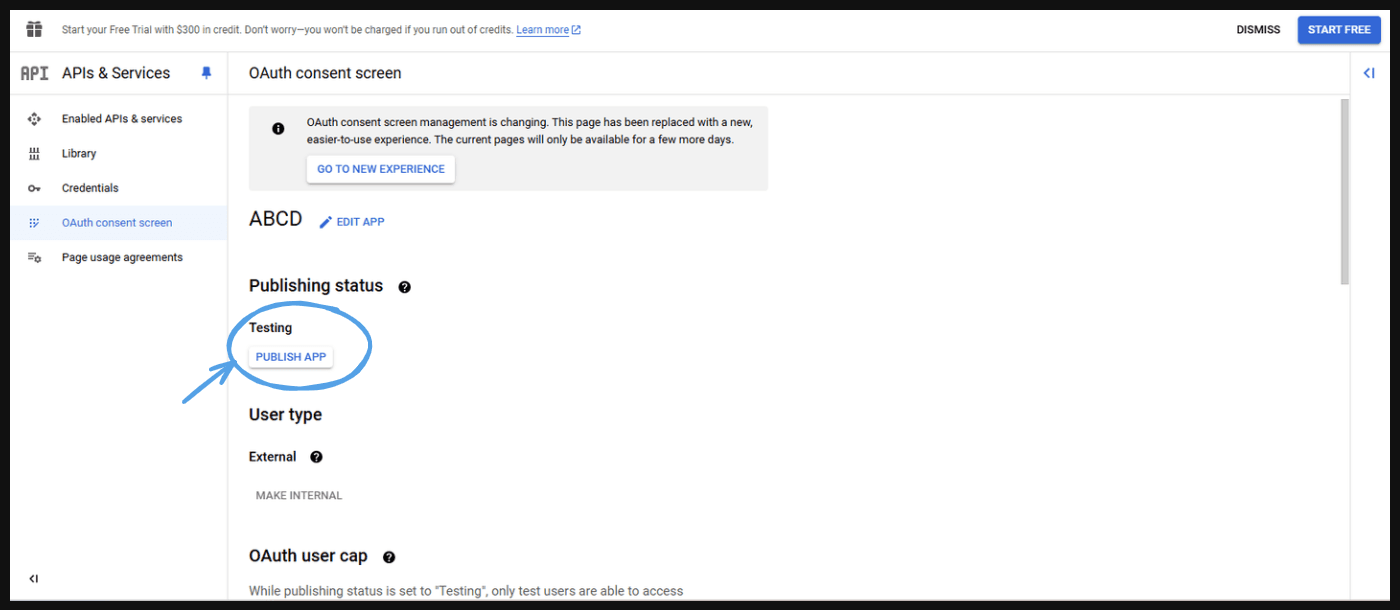
- Here you can see Publishing status is set to testing for now we can click Publish app button this will publish this app to the Google.
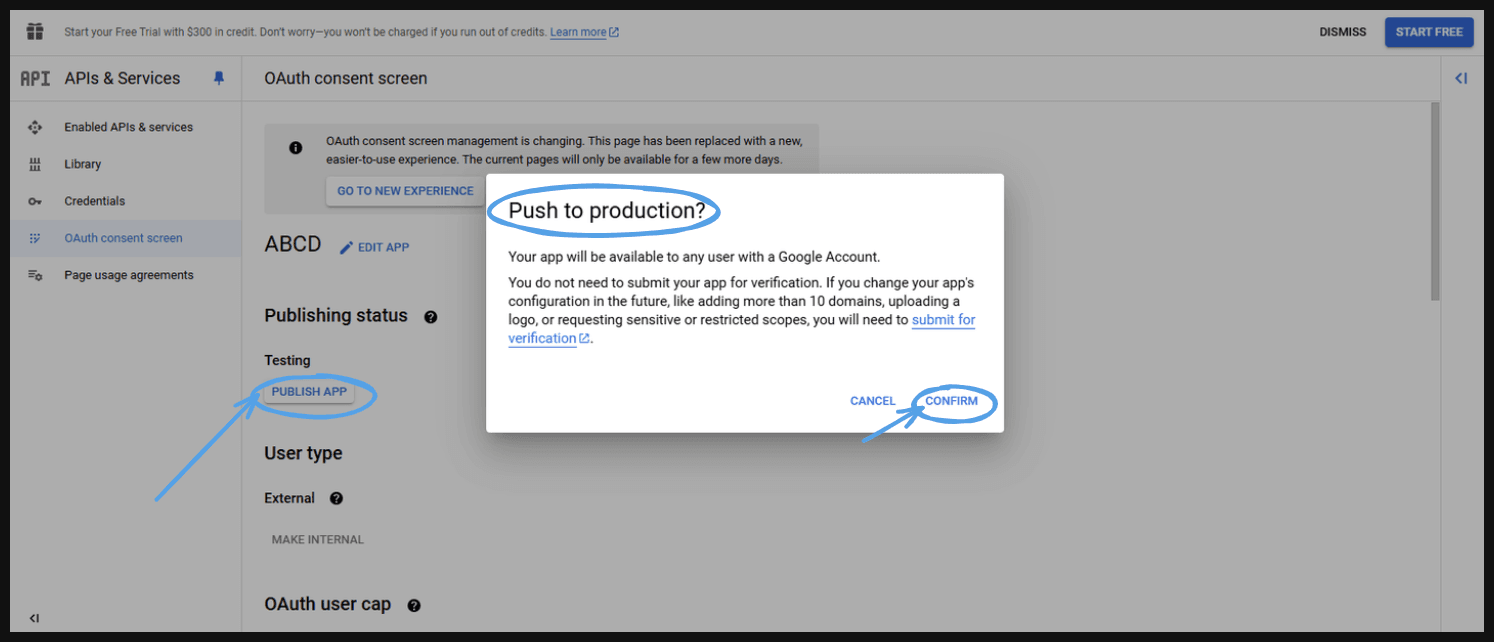
- This will take you to next page ‘Push to production’ and press ‘CONFIRM’.
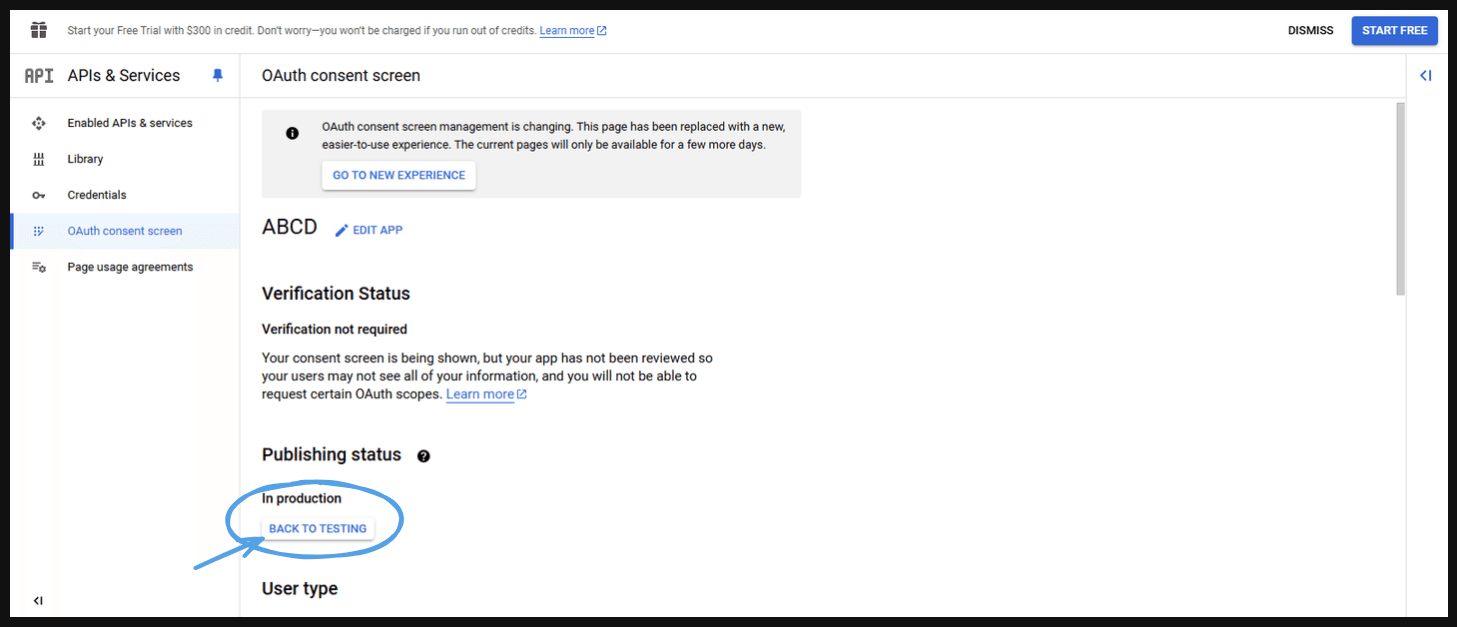
- Go to the ‘In production’ here you can see anyone can now log in with the help of this application.
- This will take you to next page and press ‘CONFIRM’.
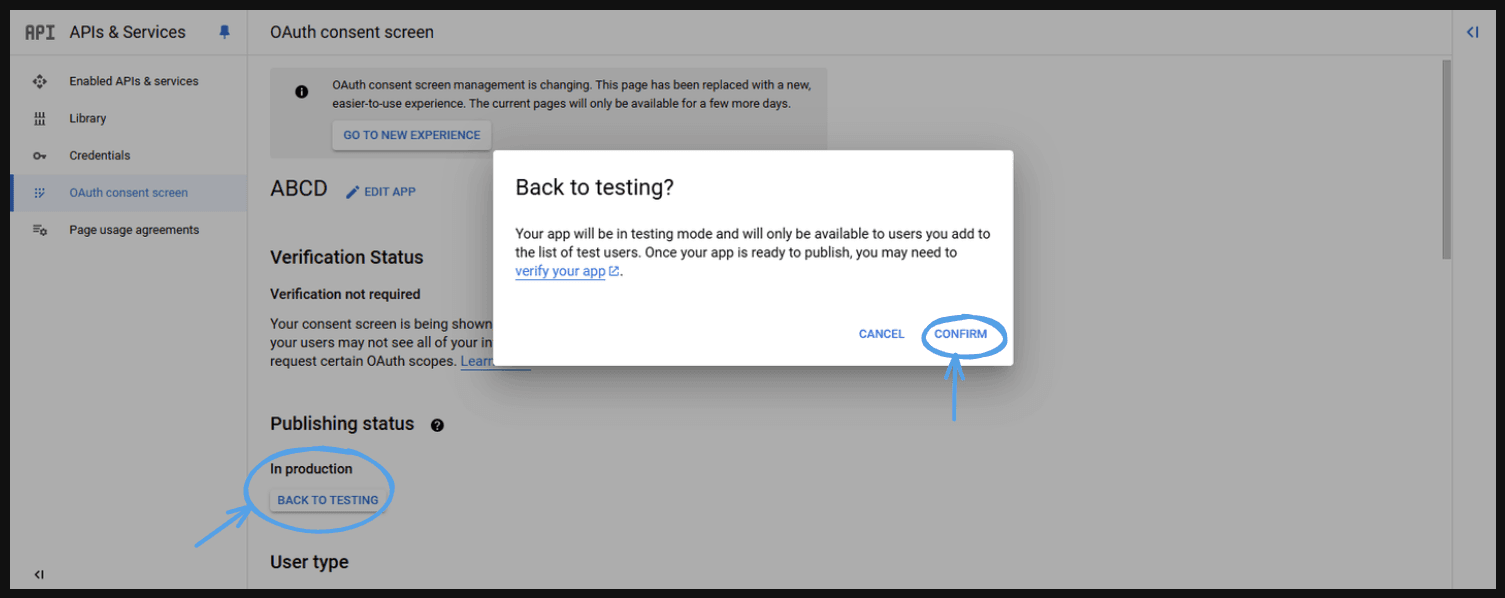
- This will take you to the next page. Here you can go back to testing if you want the testing users to access your application then click on ‘Go to testing’ or if you want to publish your app you can click on the ‘Publish app’ button as well.
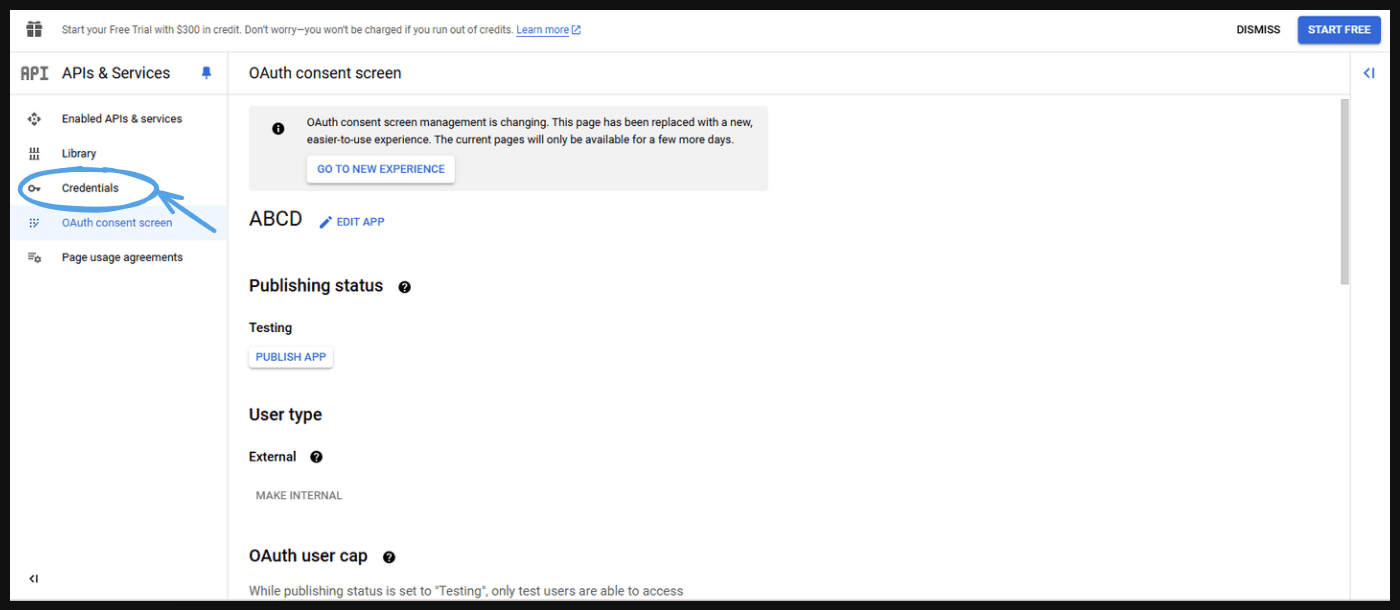
- Go to ‘Credentials’ .
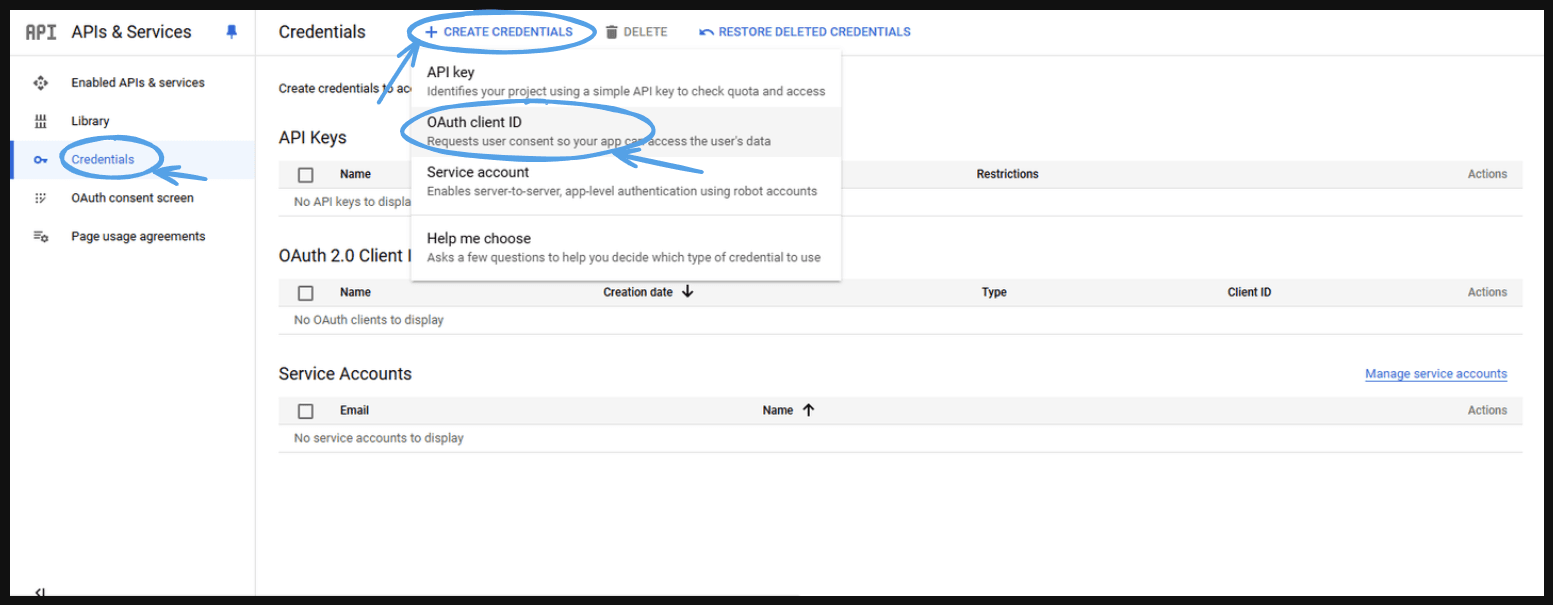
- Go to ‘Create credentials’ and go to ‘OAuth client id’.
- Select the ‘Application type’ and provide the ‘name’ (any name).

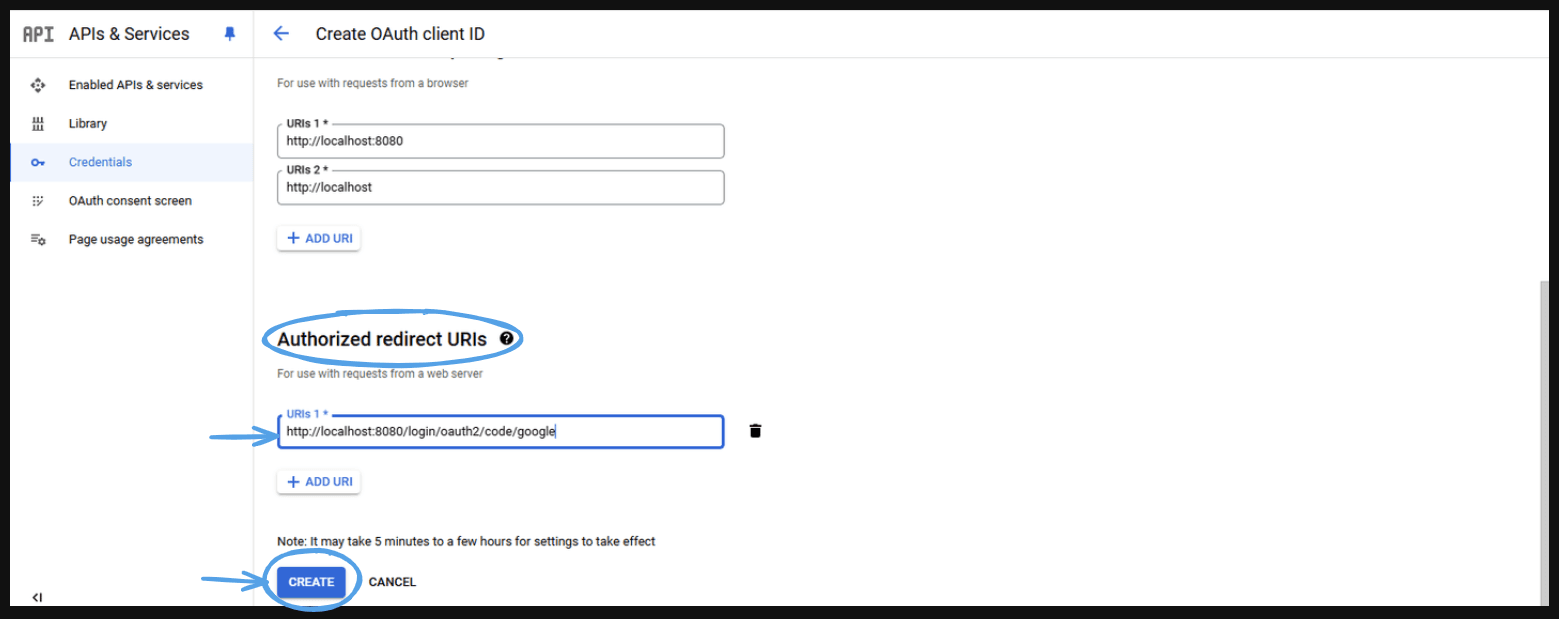
- After that we will have to provide the origins(Authorized JavaScript origins) and the redirect(Authorized redirect URIs) URIs.
- Authorized JavaScript origins are the origins (domains) from which your application is allowed to make requests to the OAuth server. These are the URLs that are allowed to interact with your OAuth provider (like Google) using client-side JavaScript. These origins are specified to prevent Cross-Site Request Forgery (CSRF) and to ensure that only your authorized web pages can make OAuth requests.
Example of Authorized JavaScript Originshttp://localhost:3000(for local development)https://www.example.com(for production environment)https://subdomain.example.com(if your app is served from a subdomain)Authorized redirect URIs are URLs to which the OAuth 2.0 authorization server sends the user after they have authenticated and authorized the application. These URIs are an important part of the OAuth 2.0 flow, ensuring that tokens and other sensitive information are only sent to trusted URLs that are part of your application.
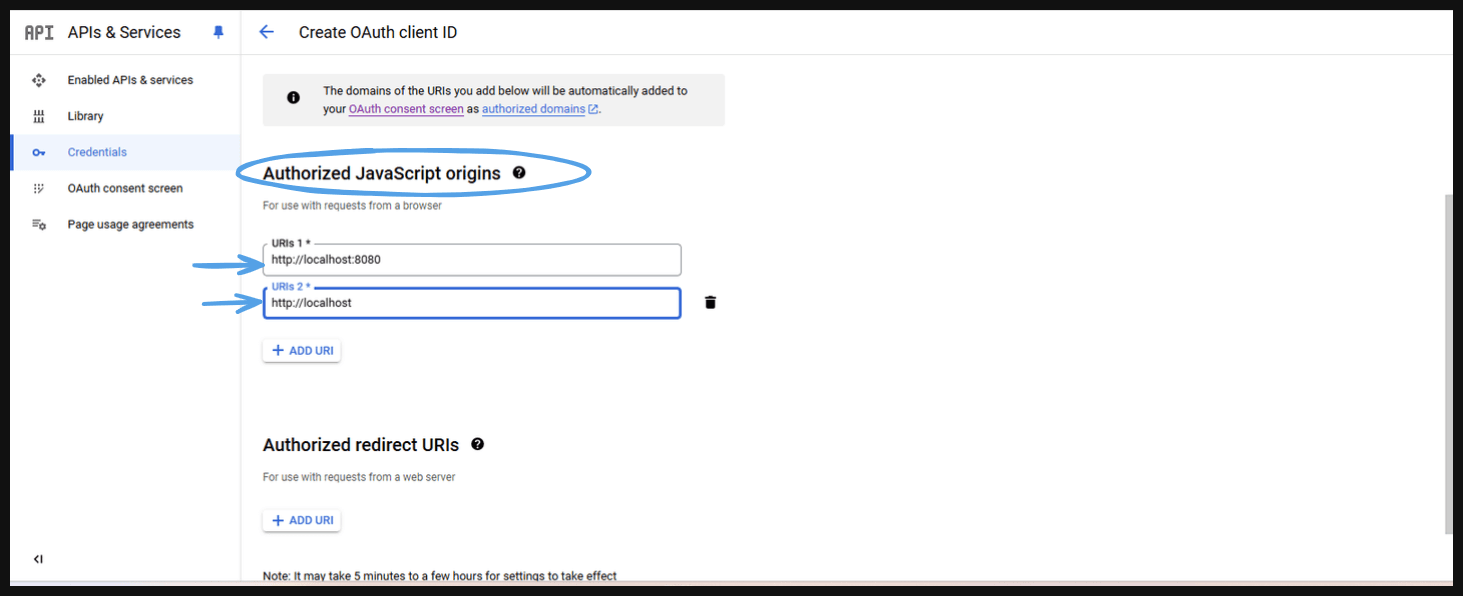
- Authorized redirect URIs are URLs to which the OAuth 2.0 authorization server sends the user after they have authenticated and authorized the application. These URIs are an important part of the OAuth 2.0 flow, ensuring that tokens and other sensitive information are only sent to trusted URLs that are part of your application.
Example of Authorized Redirect URIs- For Local Development:
http://localhost:8080/oauth2/callbackhttp://localhost:3000/auth/google/callback
- For Production:
https://www.example.com/oauth2/callbackhttps://www.example.com/auth/google/callback
- For Local Development:
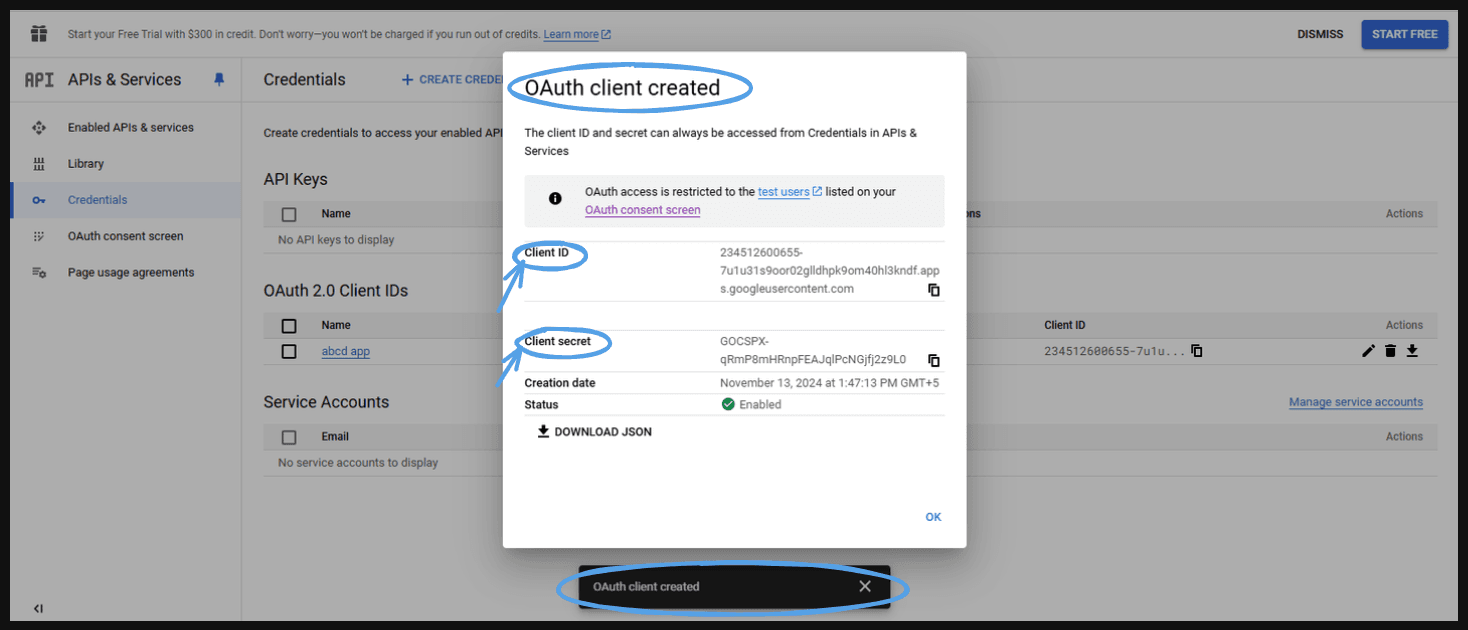
This will take you to this page. Here, you can see your ‘Client id’ and ‘Client secret’.
Conclusion#
This article explains OAuth2 Client Authentication, covering how client apps authenticate with an OAuth2 server for secure resource access. It guides setting up OAuth2 in Spring Security with platforms like Google, GitHub, and Facebook, including credential configuration, consent screens, scopes, and authorized URIs. Practical examples of Authorization Code Flow and Client Credentials Flow are provided to ensure secure token exchanges and user authorization.