Microservice Advance: Authentication in the API Gateway using custom Gateway Filters
Introduction#
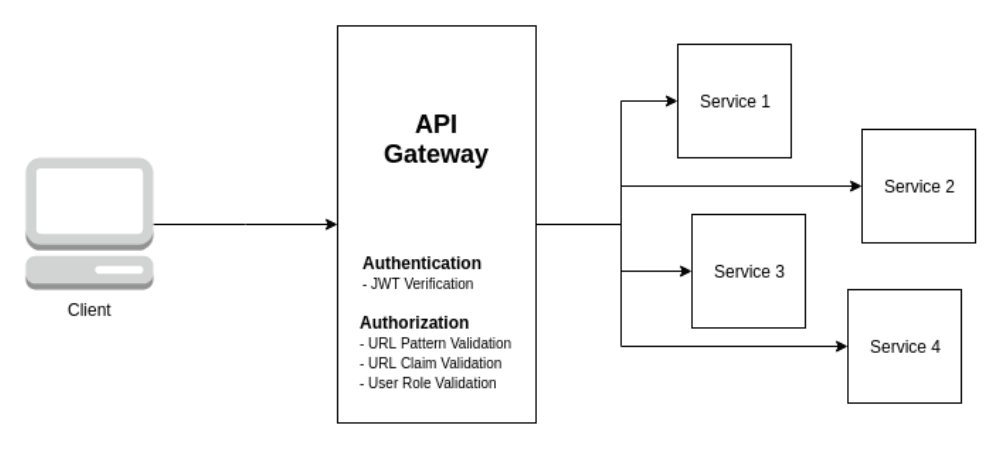
In a microservices architecture, efficient management of authentication and security is essential. The common practice is to do the authentication at the API Gateway, ensuring that only authorized requests are passed to the backend services. This approach centralizes the security logic, decreases duplicative authentication checks among microservices, and leads to performance optimization.
This article discusses implementing an API Gateway authentication with custom Gateway Filters in Spring Cloud Gateway.
Key points of discussion will be:#
- Role of API Gateway in Microservices.
- Ways to do authentication at the gateway.
- Creating custom gateway filters for request validation.
- Integrate with JWT to enable secure authentication.
Upon finishing this guide, you'll be comfortable working with a secure API Gateway that provides authentication and secures microservices from unauthorized access.
Real Time Analogy#
With a security checkpoint, an API gateway acts just like a gated community: it serves as the sole authentication mechanism between a user and a microservice. Pre-filters validate requests such as visitor ID checks before routing them to the appropriate service and modifying headers. On the other hand, post-filters are those which modify responses such as logging exit times or enforcing policies. This centralized approach ensures effective security, scalability, and even seamless request handling in a microservices architecture.
API Gateway Authentication: What is API Gateway Authentication?#
API Gateway authentication is a centralized security element that authenticates all incoming requests before they are routed to backend microservices. This enhances security, scalability, and performance in a microservices architecture since it is sure that only authenticated and authorized users can access secure resources.
How does API Gateway Authentication function?#
- Clients authenticate themselves only once at the API Gateway using JWT, OAuth2, API keys, or any other authentication mechanism.
- The API Gateway accepts the given credentials and extracts user identity information.
- The authenticated request is forwarded to the proper microservice, along with user credentials or a token for the latter's serialization.
Why Use API Gateway for Authentication?#
- Centralized Security: A more secure option centralizes a security layer and cuts on the framework.
- Improved Performance: It cuts redundant authentication checks among the services, allowing a performance boost.
- Scalability and Load Balancing: this is an effective solution for directing traffic to specific microservices and spreading requests fairly evenly between them.
- Integration with JWT & OAuth2: It supports the booming technologies of today that guarantee secure application development.
Implementing API Gateway Authentication with Custom Filters#
Custom Class:
To enable JWT built-in classes, methods all, we need to add the required dependencies.
Jwt Service Class:
We need a service class to generate tokens and extract the user ID from them. For further details you can check out https://www.codingshuttle.com/spring-boot-hand-book/jwt-creation-and-verification/.
Api-Gateway yml file:
StripPrefix=2 is a route-specific filter that removes the first two segments of the URL path before forwarding the request. Global filters, such as authentication and logging, are automatically applied to all routes and do not require additional configuration.
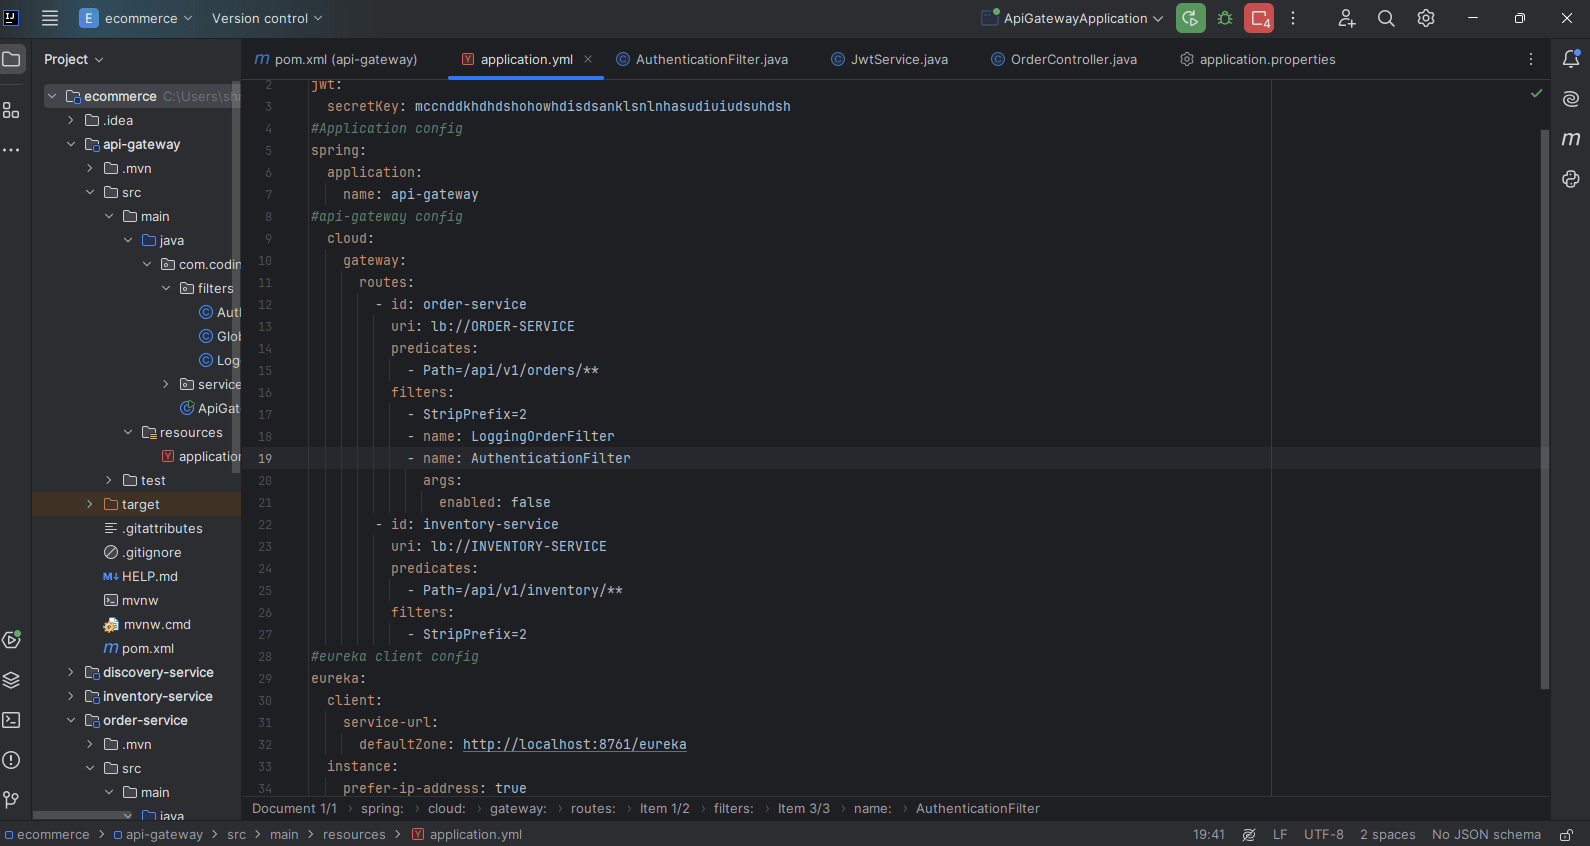
Here I applied this authentication using jwt inside order-service route which I also configured inside api-gateway.
Order Service Controller:
Output#
- Run all services:
After running all services (the sequence is 1. Run Eureka Server (Discovery Service) 2. Run other clients services. 3. Last run gateway service on default port 8080)
- Wait for all registered client services inside Eureka:
if your services are not fully registered before another service tries to communicate with them, you may encounter a "Service Unavailable" exception.
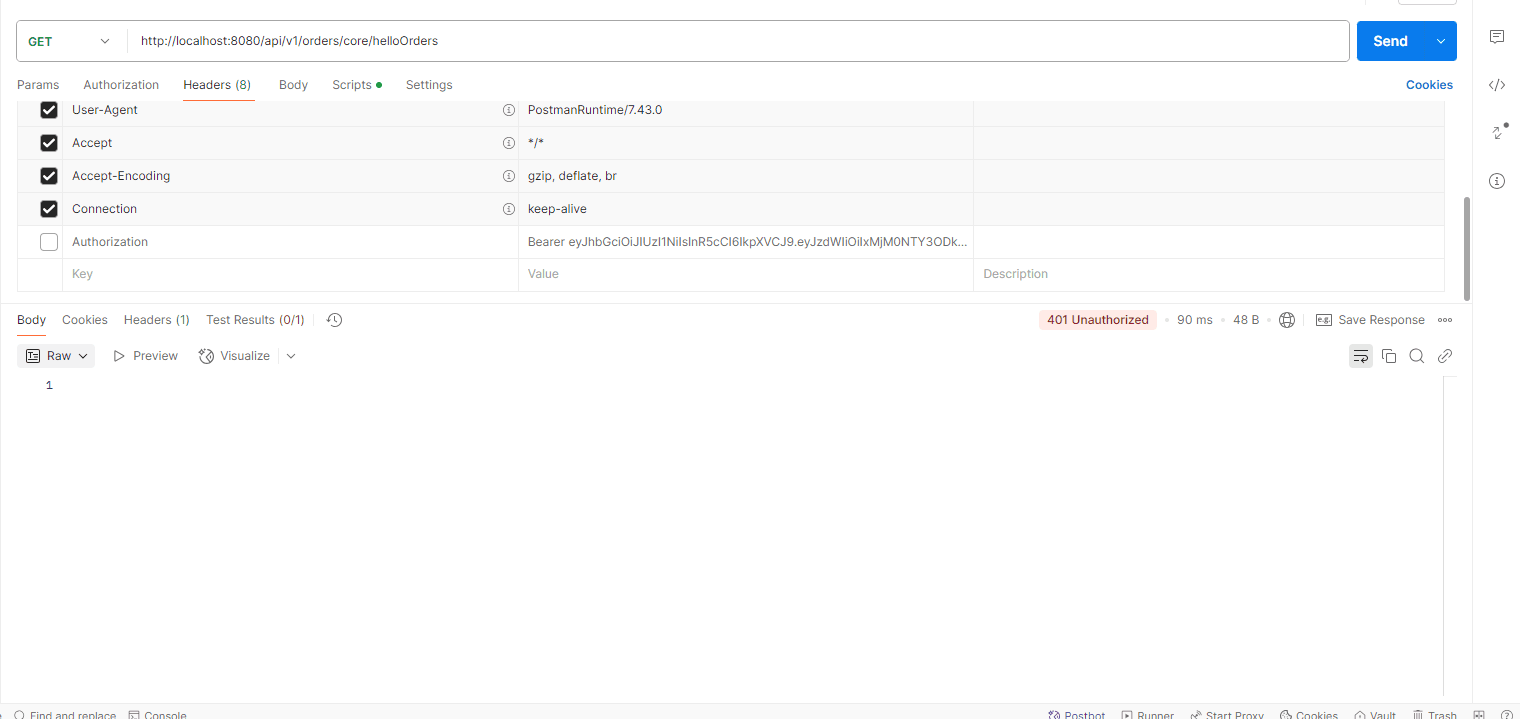
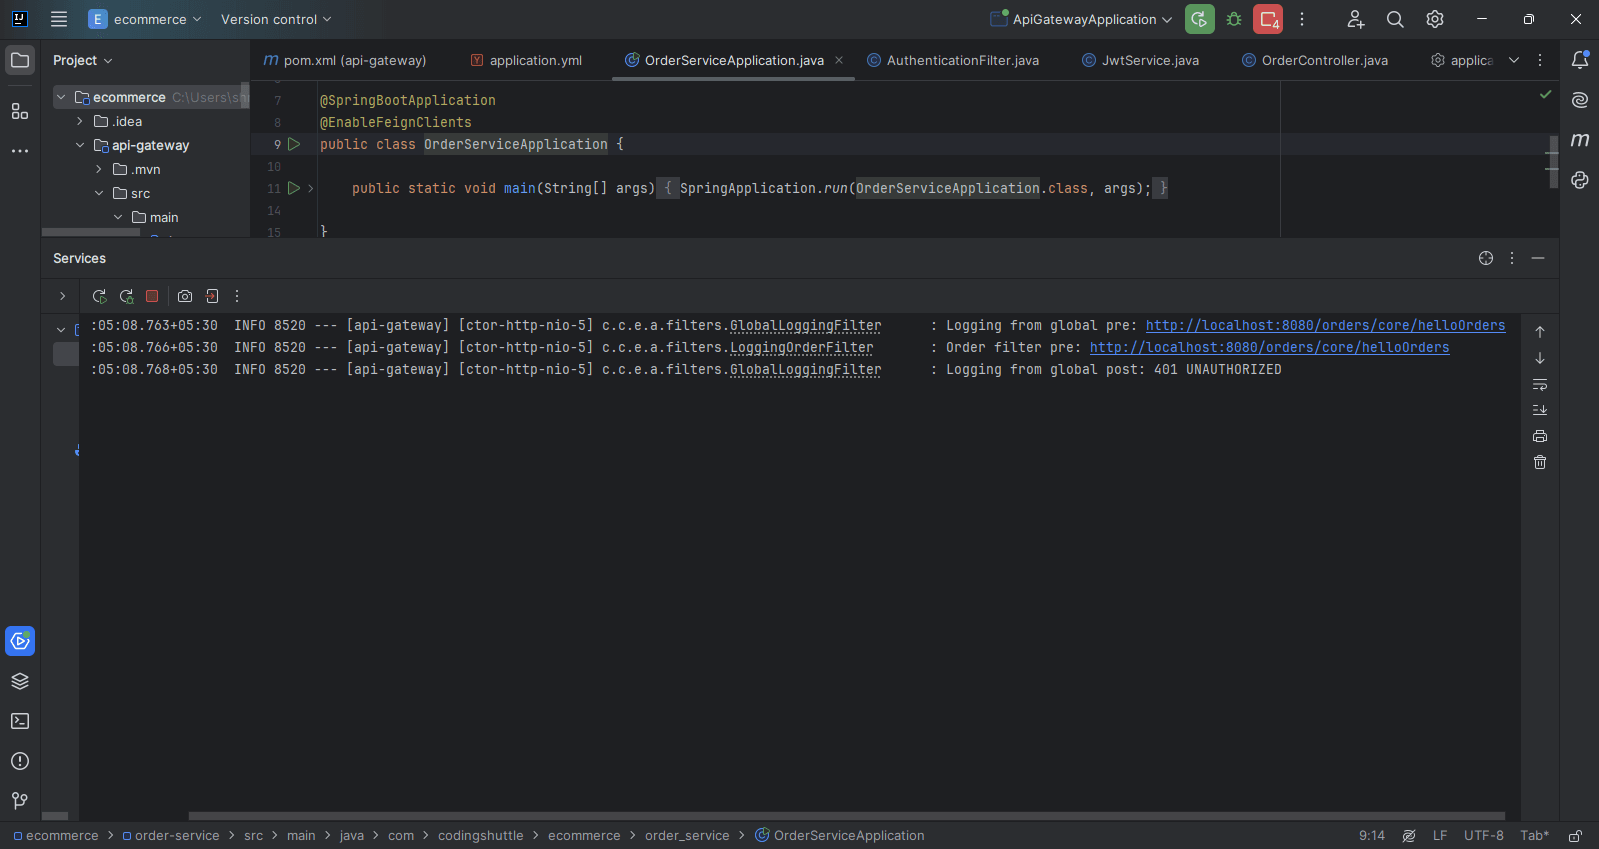
- Hit the url http://localhost:8080/api/v1/orders/core/helloOrders in the Browser or Postman with the request body: (without passing headers / without authenticate the route)
After starting Eureka and all client services, test the API using a browser (for GET requests) or Postman (for all requests). If you are trying to fetch other services you can easily fetch it. Here, we are trying to fetch inventory service data by using api-gateway (port=8080). /api/v1 ignored because of using StripPrefix=2 .
Getting “401 UNAUTHORIZED”.
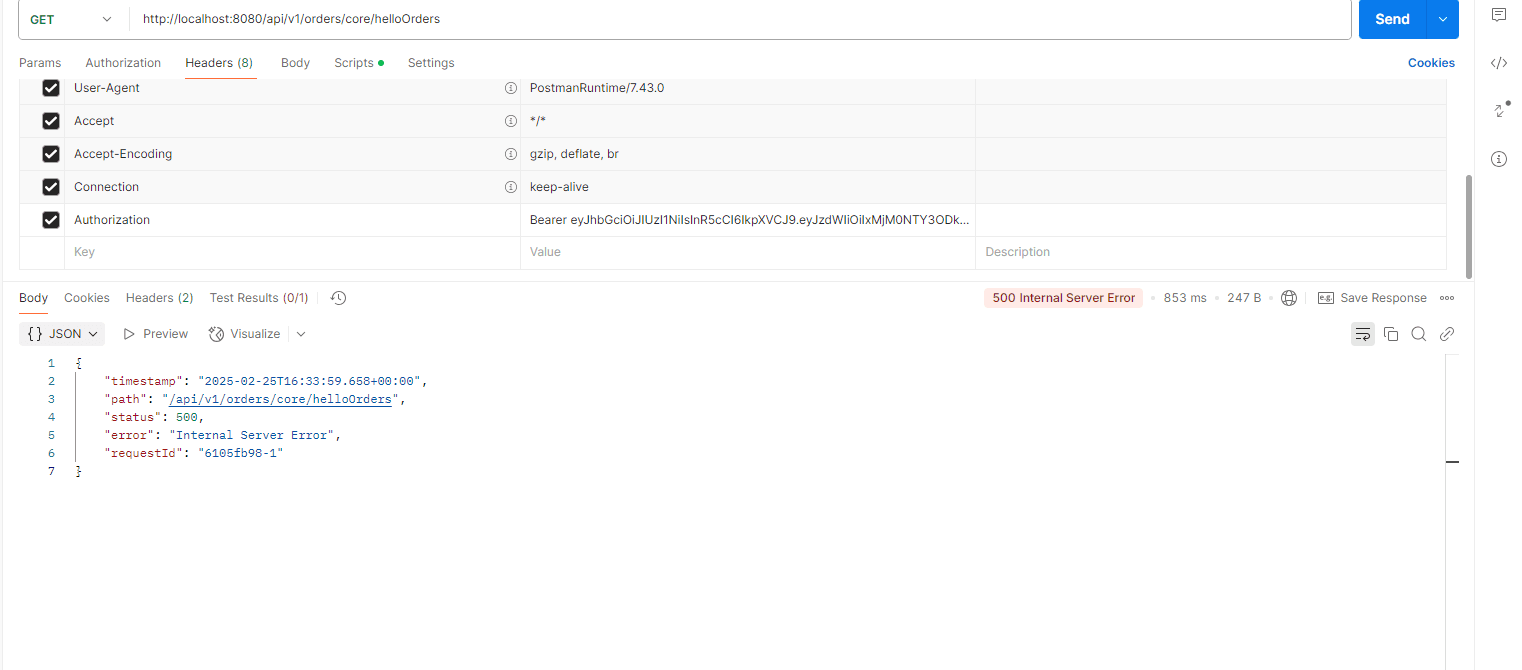
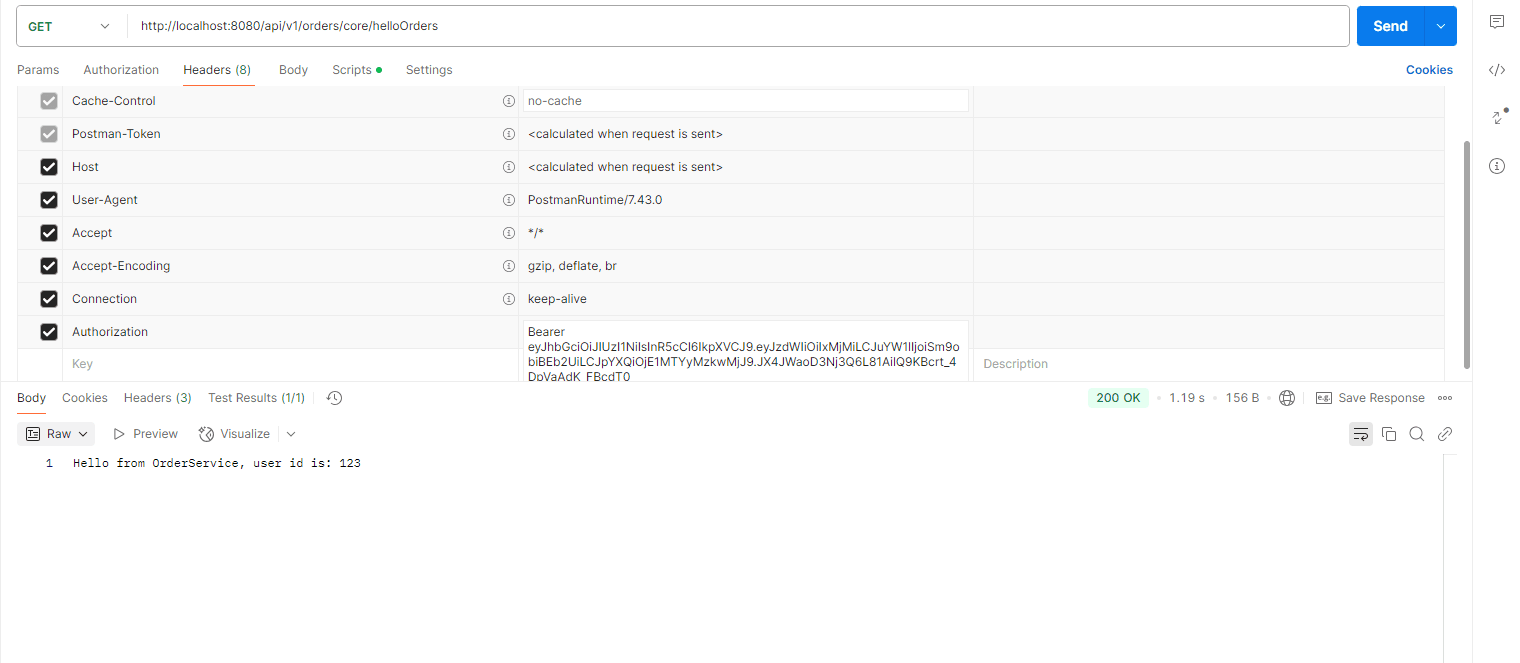
- Hit the url http://localhost:8080/api/v1/orders/core/helloOrders in the Browser or Postman with the request body: (with authenticate the route)
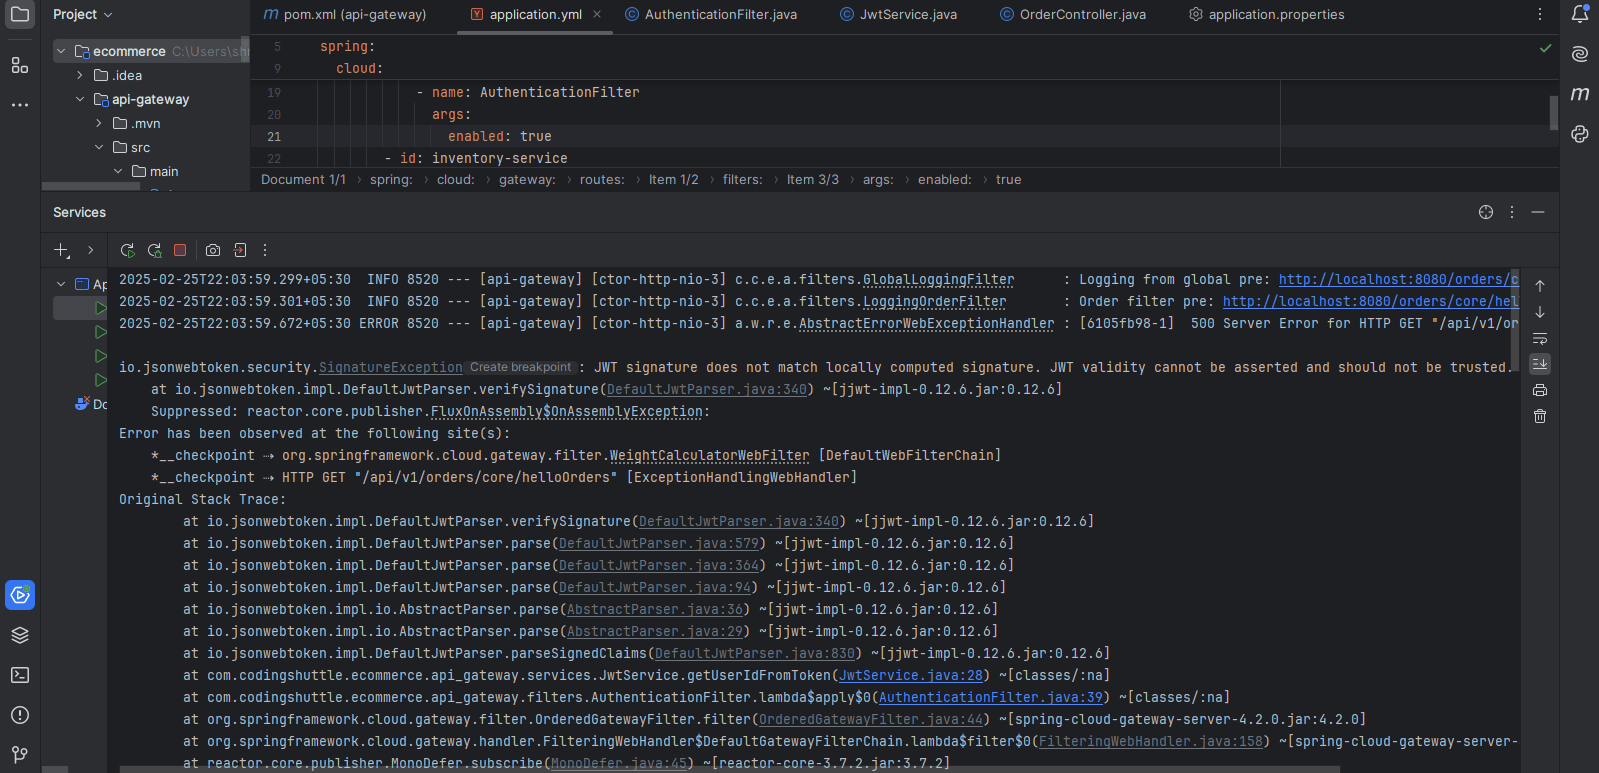
For authentication you need a valid token (without valid signature {your secrete key}). For that go to https://jwt.io/
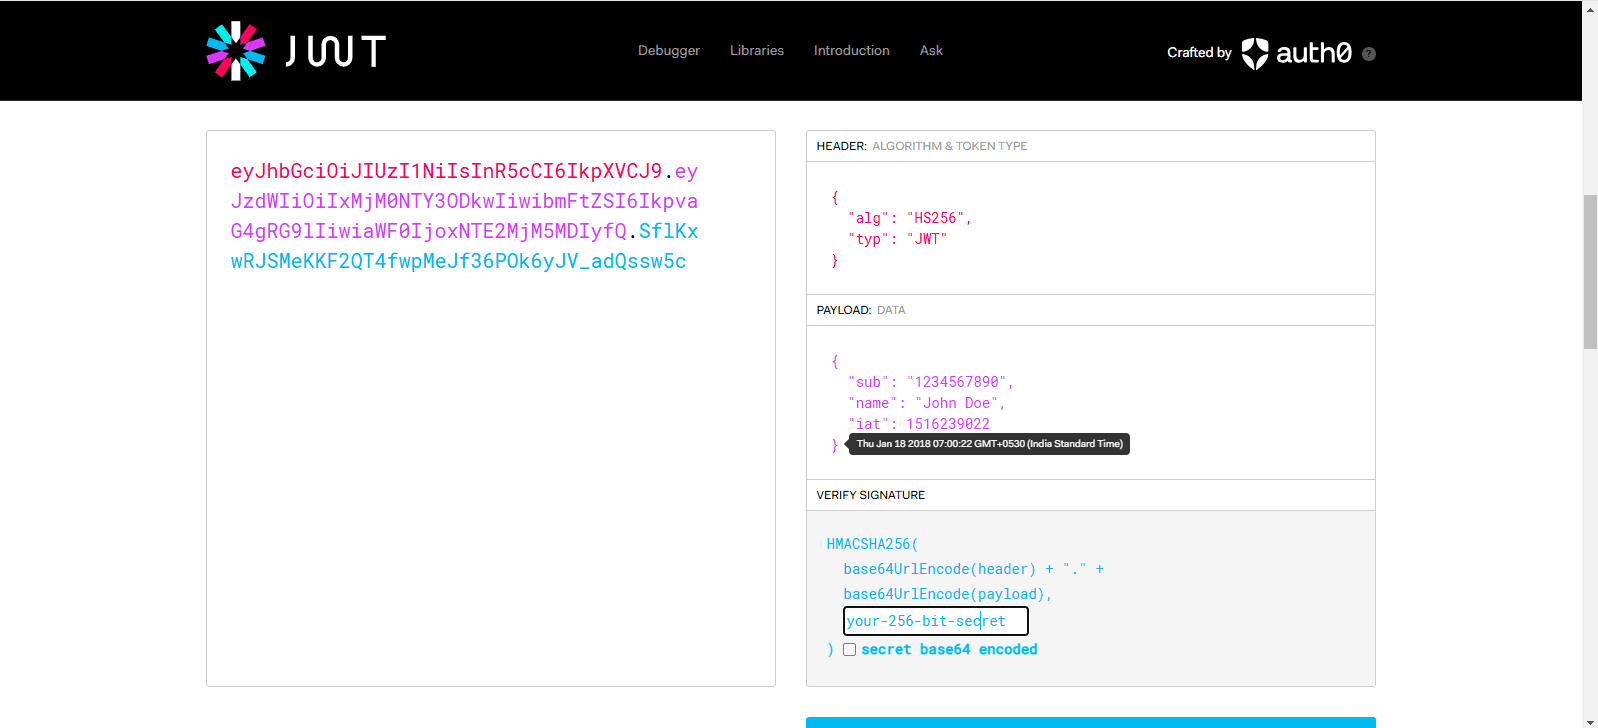
Put this token inside the postman’s header (without valid signature). You will get a “500 Server Error”
- After putting valid signature (value of the secrete key).
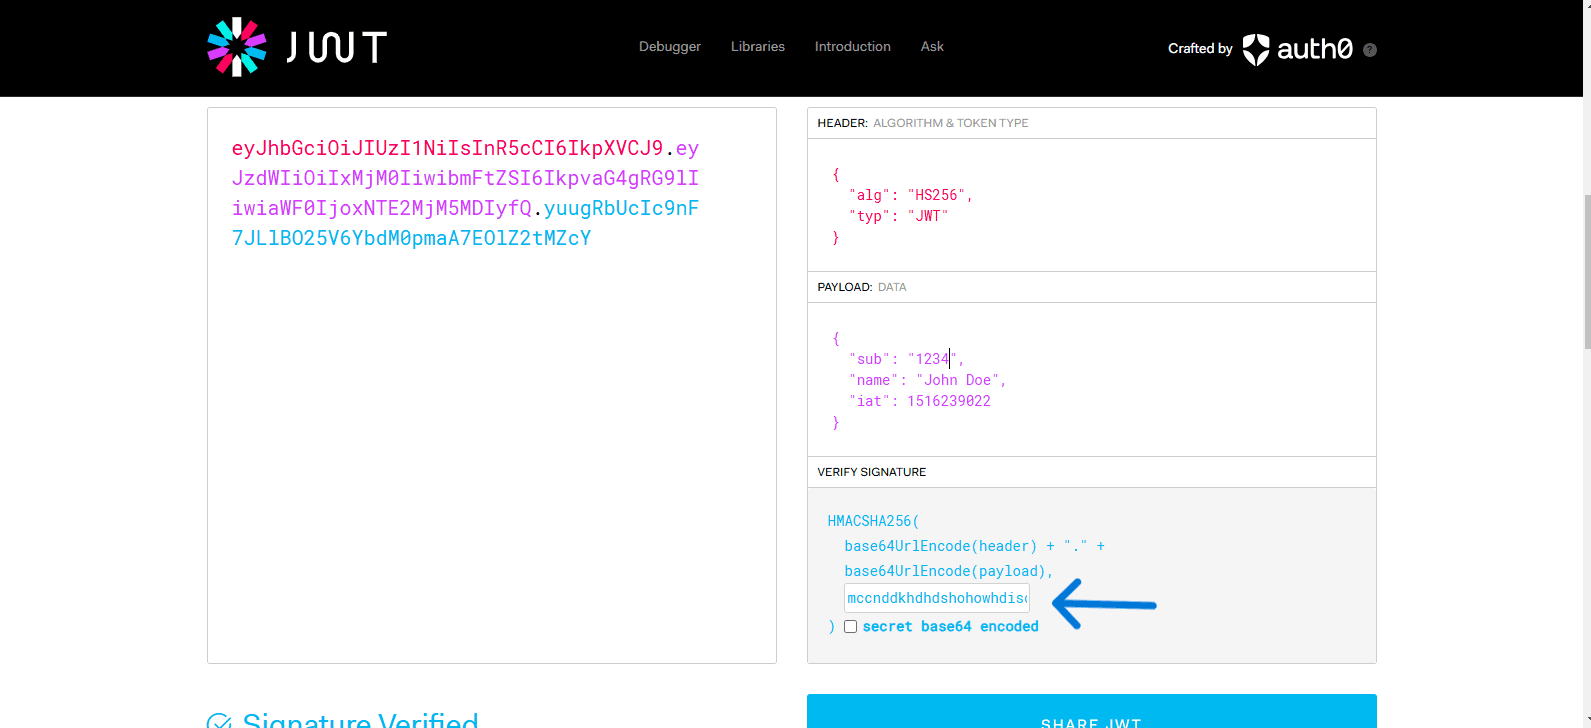
- Use this token inside header. To get the actual output.
Mutating the Requests: Authentication and Request Mutation with API Gateway#
What is Request Mutation?#
A request mutation is an API request that has been modified by the time it reaches a specific microservice.
Pre-filtering mechanisms are set up generally at the API Gateway itself to enable request header, request path, or query parameter modifications without making changes to the microservices themselves.
Common Use Cases for Request Mutation#
- Add or change HTTP headers: Include authentication tokens, tracking information, or metadata.
- Rewrite request paths: Make dynamic API routing changes to match internal service paths.
- Alteration of query parameters: Additional parameters are added or modified for logging, analytics, or A/B testing.
The rationale for API Gateway Request Mutation#
- Centralized request processing: Since it offloads the request transformation logic from microservices, it keeps microservices lightweight.
- Enhanced security: Guarantees that the safety of authentication tokens and security policies is not compromised before reaching the backend services.
- Better flexibility: Allows dynamic request changes without carrying out modifications for many other microservices.
1. API Gateway as an Authentication Layer#
All requests should arrive and depart through an API Gateway. A client request is directed from the user's client device to an API Gateway endpoint to process that request, among other things. Thus, it acts as a central authentication point by validating client credentials before forwarding requests. Authentication may include one of the following methods.
- JWT (JSON Web Token): Clients append a token, which the gateway validates.
- OAuth2: The Gateway checks access tokens assigned by an authorization server.
- Custom Authentication: The Gateway authenticates user credentials and injects user-specific data into request headers.
Example: Adding an Authentication Header
In this example, the API Gateway adds an Authorization header to ensure only authenticated requests reach backend microservices.
2. Mutating Requests in API Gateway#
Request mutation refers to modifying request bodies, headers, or the path before passing them to downstream services. Typically, such modifications are done using pre-filters in Spring Cloud Gateway.
Common Use Cases of Request Mutation
- **Adding Headers—**Injecting authentication tokens or user details.
- **Modifying the Path—**Dynamically changing the request URL.
- **Changing Query Parameters—**Adding or modifying query parameters.
Example: Adding a Custom Header with User ID
In this case, the API Gateway adds an "X-User-Id" header, which downstream services can use for authorization or tracking.
3. Mutating the Request Path#
Sometimes, you may need to rewrite the request URL before forwarding it.
Example: Changing the Request Path Dynamically
Noted: Since Spring Boot 3.4.0+,
ServerWebExchangeandServerHttpRequesthave become strictly immutable, meaning any modification requires creating a new instance.
Mutating the Response#
API Gateway response transformation simply ensures that responses returned by the APIs do not reach the client directly. These responses are altered mostly in post-filters so that they allow for security, consistency, and flexibility in a microservices architecture.
Key Aspects of Response Transformation:#
- Security Headers: CORS, CSP, and Auth headers were added to increase API security.
- Modify Response Body: JSON structuring, masking of sensitive data, and attaching additional metadata to the response as required.
- Standardization of Error Replies: The error message formats should be uniform across all of the microservices.
- Log and Monitor enhancement: API responses can now be appended with tracking IDs that can be injected as analytics data.
1. Adding Custom Headers to the Response (Adding a Security Header to the Response)#
This ensures that every response contains the "X-Processed-By" header to indicate that it was handled by the API Gateway.
2. Modifying the Response Body (Transforming JSON Response)#
Here, the modifyResponseBody filter intercepts the response and applies modifications.
3. Modifying Response Status Code (Changing Status Code Based on Conditions)#
Conclusion#
This article describes using advanced authentication in an API Gateway to offer custom gateway filter features that would provide security to microservices. It also covers centralized authentication using JWT/OAuth2, the mutation of requests and responses, and how custom filters enhance scalability and maintenance. It also illustrates how Spring Cloud Gateway allows developers to build secure, efficient, and flexible microservices architecture.