Interceptors in Spring Boot: Creating Custom Interceptors for Request/Response Processing
Interceptors are a powerful feature in Spring Boot that allow you to perform operations before and after the execution of a request. They are particularly useful for tasks such as logging, authentication, or modifying the request and response.
In this article, we'll walk through the basics of interceptors, their purpose, and how to create custom interceptors in a Spring Boot application. We'll also provide practical examples to help you understand how to implement and use them effectively.
What are Interceptors?
In the context of Spring Boot, interceptors are components that allow you to intercept HTTP requests and responses in your web application. They provide a way to execute code before the request is handled by a controller and after the response is generated.
Key Uses of Interceptors#
- Logging: Log request details and response statuses.
- Authentication and Authorization: Check user credentials and permissions.
- Performance Monitoring: Measure request processing times.
- Modification of Requests/Responses: Add headers or modify request parameters.
How Interceptors Work#
Interceptors are similar to filters but provide more specific control over request handling. They are part of the Spring MVC framework and are implemented using the HandlerInterceptor interface.
Here's a step-by-step guide to creating a custom interceptor in Spring Boot.
Step 1: Create a Spring Boot Project#
If you haven't already, create a new Spring Boot project using Spring Initializr or your preferred IDE. Ensure that you include the necessary dependencies such as spring-boot-starter-web.
Step 2: Define the Custom Interceptor#
Create a class that implements the HandlerInterceptor interface. This interface has three key methods that you can override:
preHandle(HttpServletRequest request, HttpServletResponse response, Object handler): Called before the request is processed by a controller.postHandle(HttpServletRequest request, HttpServletResponse response, Object handler, ModelAndView modelAndView): Called after the request has been processed but before the view is rendered.afterCompletion(HttpServletRequest request, HttpServletResponse response, Object handler, Exception ex): Called after the request has been completed, including view rendering.
Here's an example of a custom interceptor that logs request and response details:
Step 3: Register the Interceptor#
To make your interceptor functional, you need to register it with Spring Boot. This is done by creating a configuration class that implements WebMvcConfigurer and overrides the addInterceptors method.
Here's an example of how to register the interceptor:
Step 4: Test the Interceptor#
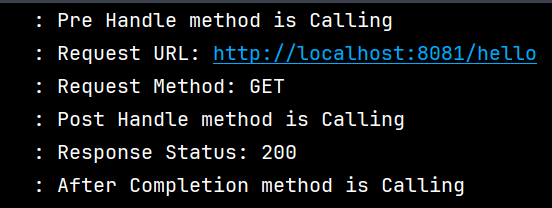
Start your Spring Boot application and make a few requests to test your interceptor. You should see logs in the console indicating that the interceptor's methods are being called at different stages of request processing.
Eg:-

In this article, we explored the concept of interceptors in Spring Boot, highlighting their importance and practical applications. Interceptors serve as powerful tools for handling requests and responses, allowing developers to implement functionalities such as logging, authentication, and performance monitoring seamlessly.