Step by Step guide to Deploy a Spring Boot App on AWS Elastic Beans stalk
This step-by-step guide walks you through deploying a Spring Boot application on AWS Elastic Beanstalk. It covers the essential setup, including configuring the environment, IAM roles, and database integration, ensuring a seamless deployment. By the end, you'll have your Spring Boot app running on AWS with auto-scaling and load balancing capabilities.
Santosh Mane
January 06, 2025
12 min read
Introduction#
In today's world, cloud computing has become a crucial part of modern web application deployment. Among the many cloud platforms available, AWS (Amazon Web Services) stands out with its powerful, scalable, and reliable services. One of the easiest ways to deploy and manage your Java Spring Boot application on AWS is by using AWS Elastic Beanstalk.
AWS Elastic Beanstalk abstracts away much of the complex infrastructure management while offering a simple platform to deploy, manage, and scale applications. In this guide, we will walk you through a step-by-step process to deploy your Spring Boot application on AWS Elastic Beanstalk.
Initial Setup to be done#
- First of all, visit aws website and create your AWS account If you don’t have an account on AWS.
- Before we move forward to deploy our spring boot app on AWS Elastic Beanstalk make sure you have created postgres db-instance on AWS RDS.
- Also, you need to be ready with your spring boot project, In this blog, I am going to deploy my library-management spring boot application on AWS Elastic Beanstalk. You will need to just build the jar file of your project and simply deploy it on Elastic Beanstalk.
Steps to create Elastic Beanstalk environment on aws#
Login to your aws account and open aws services from there select Elastic Beanstalk service and click on create application.
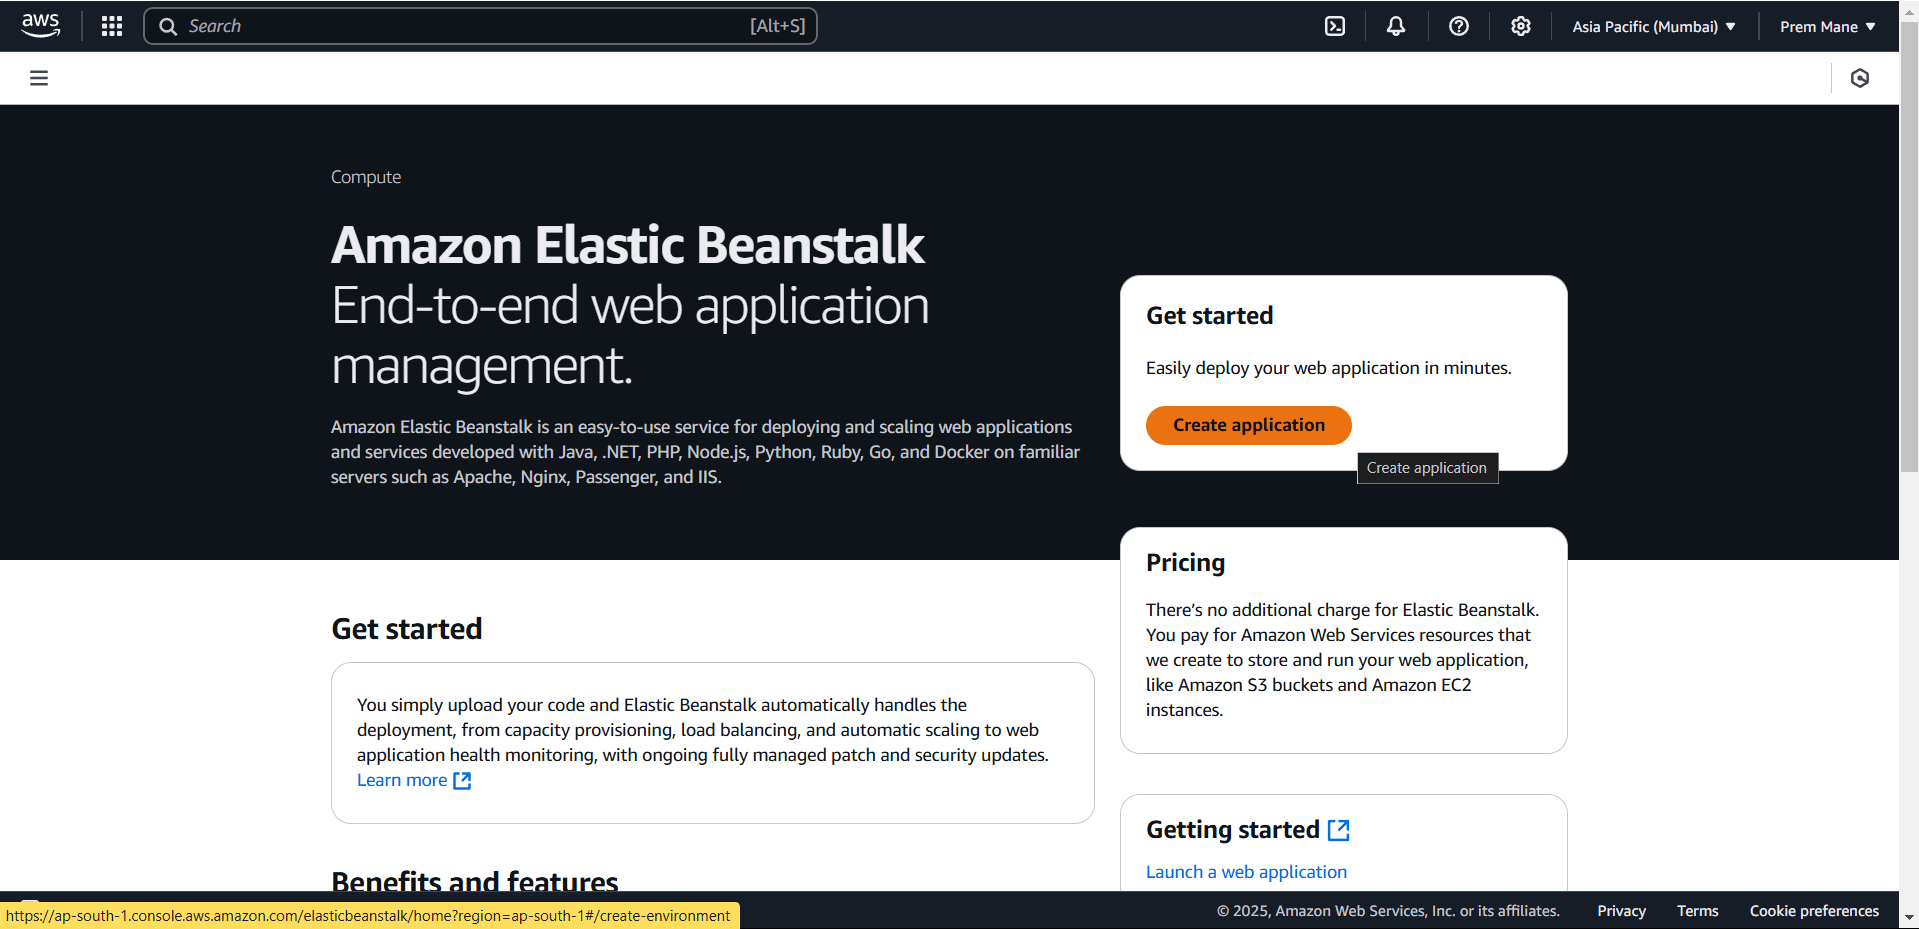
After clicking on create application button you will be redirected to the configure environment page and this is step-1, you have to complete all 6 steps to setup your AWS Elastic Beanstalk environment.
Step 1 :- Configure environment#
In step 1 you have to configure your environment. In Environment tier section just select web server environment this says that your elastic beanstalk environment will run a website, web application, or web API that serves HTTP requests.
In Additional infromation section give application name, since we are deploying our spring boot library-management application I will give the name as library-management-service
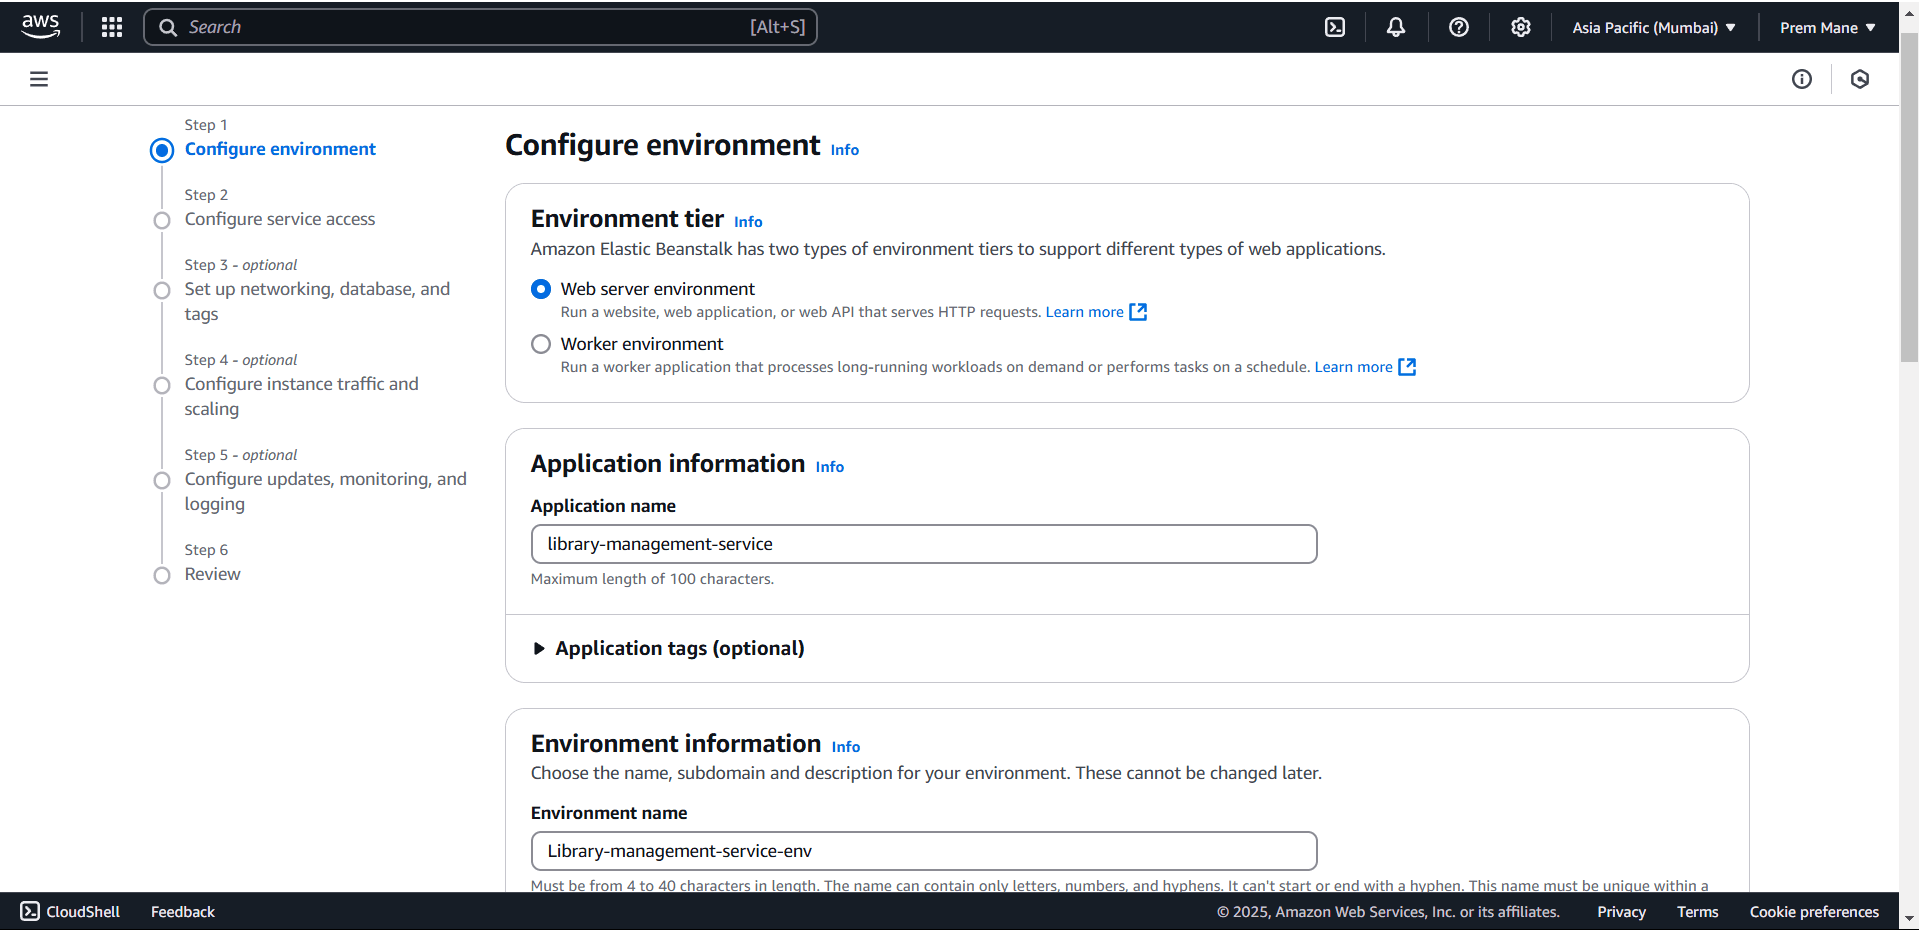
After giving application name the environment name will be automatically set based on the name you have provided for your application.
Basically elastic beanstalk creates environment to run you applications, you can have more than one applications under one environment.
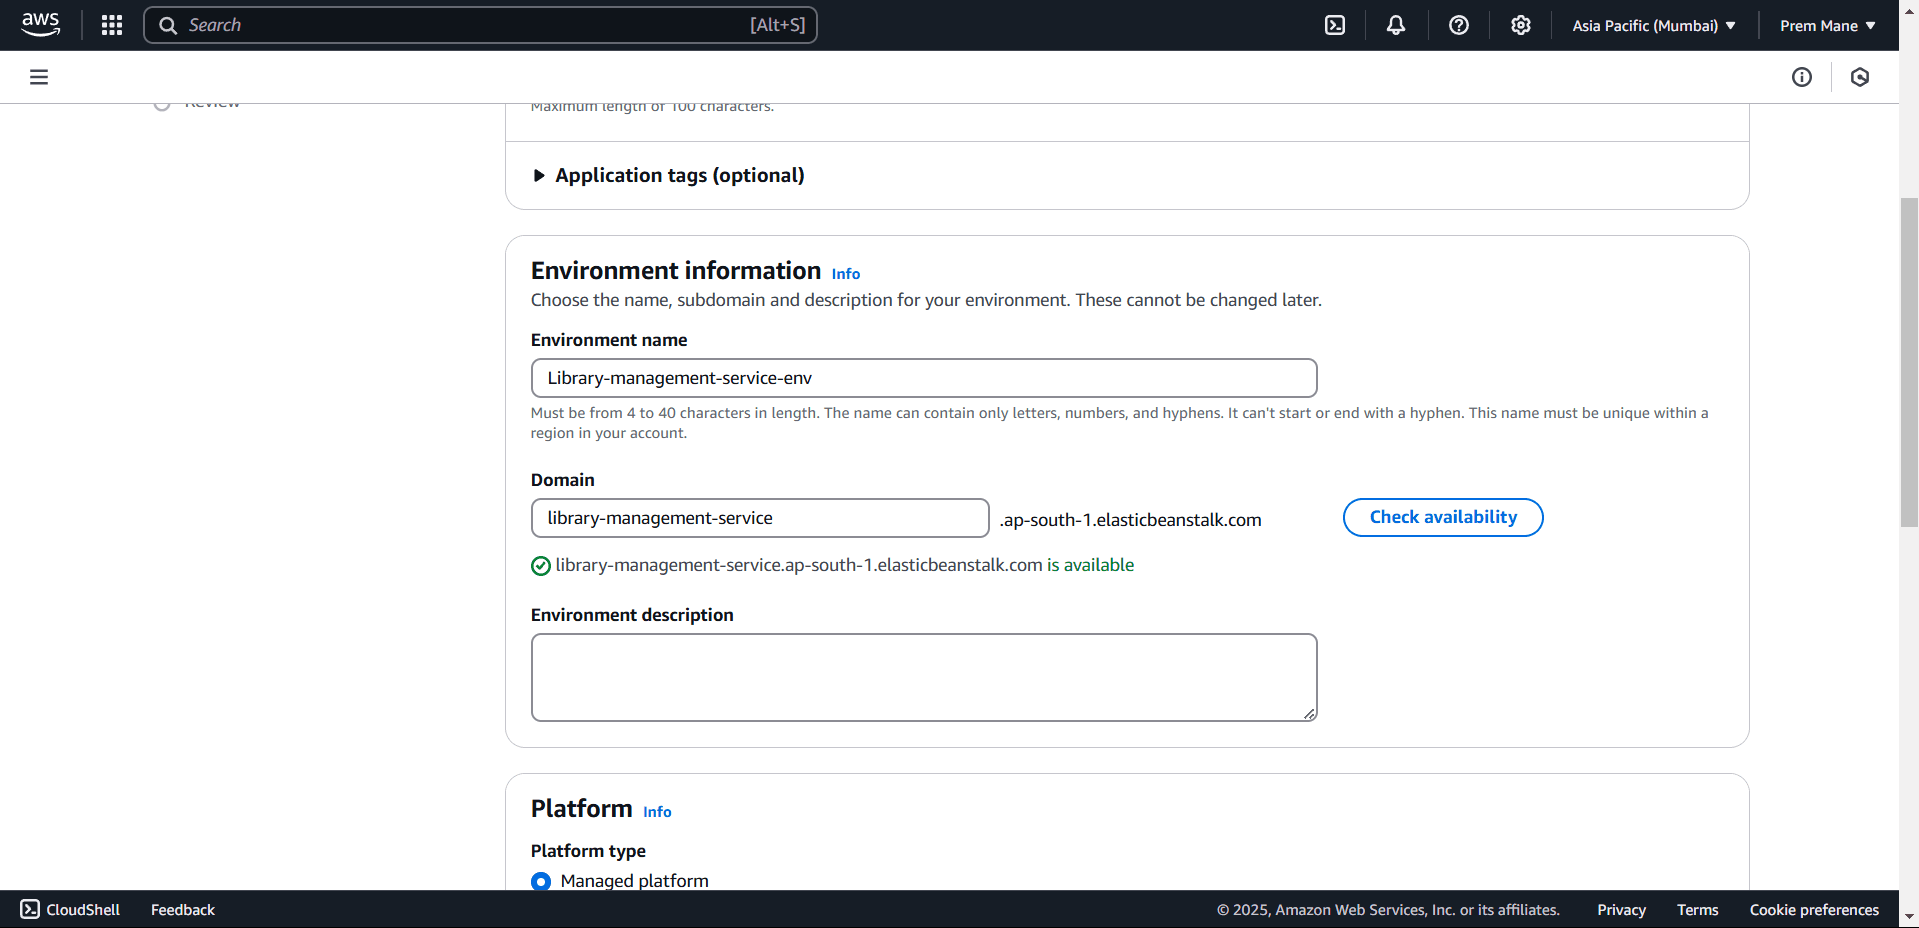
In the Environment information section you have to also set the domain, with this domain you will be able to access your running spring boot application from anywhere. Just enter the domain name of your choice and click on check availability button to check if domain is available or not. This domain will be your load balancer url which is spinned by elastic beanstalk for you. You can also provide the environment description if you want, we will leave it empty.
Next is Platform section, in this we will select platform as Java and platform branch as Corretto 21 with platform version as 4.2.2 you can select the latest one.
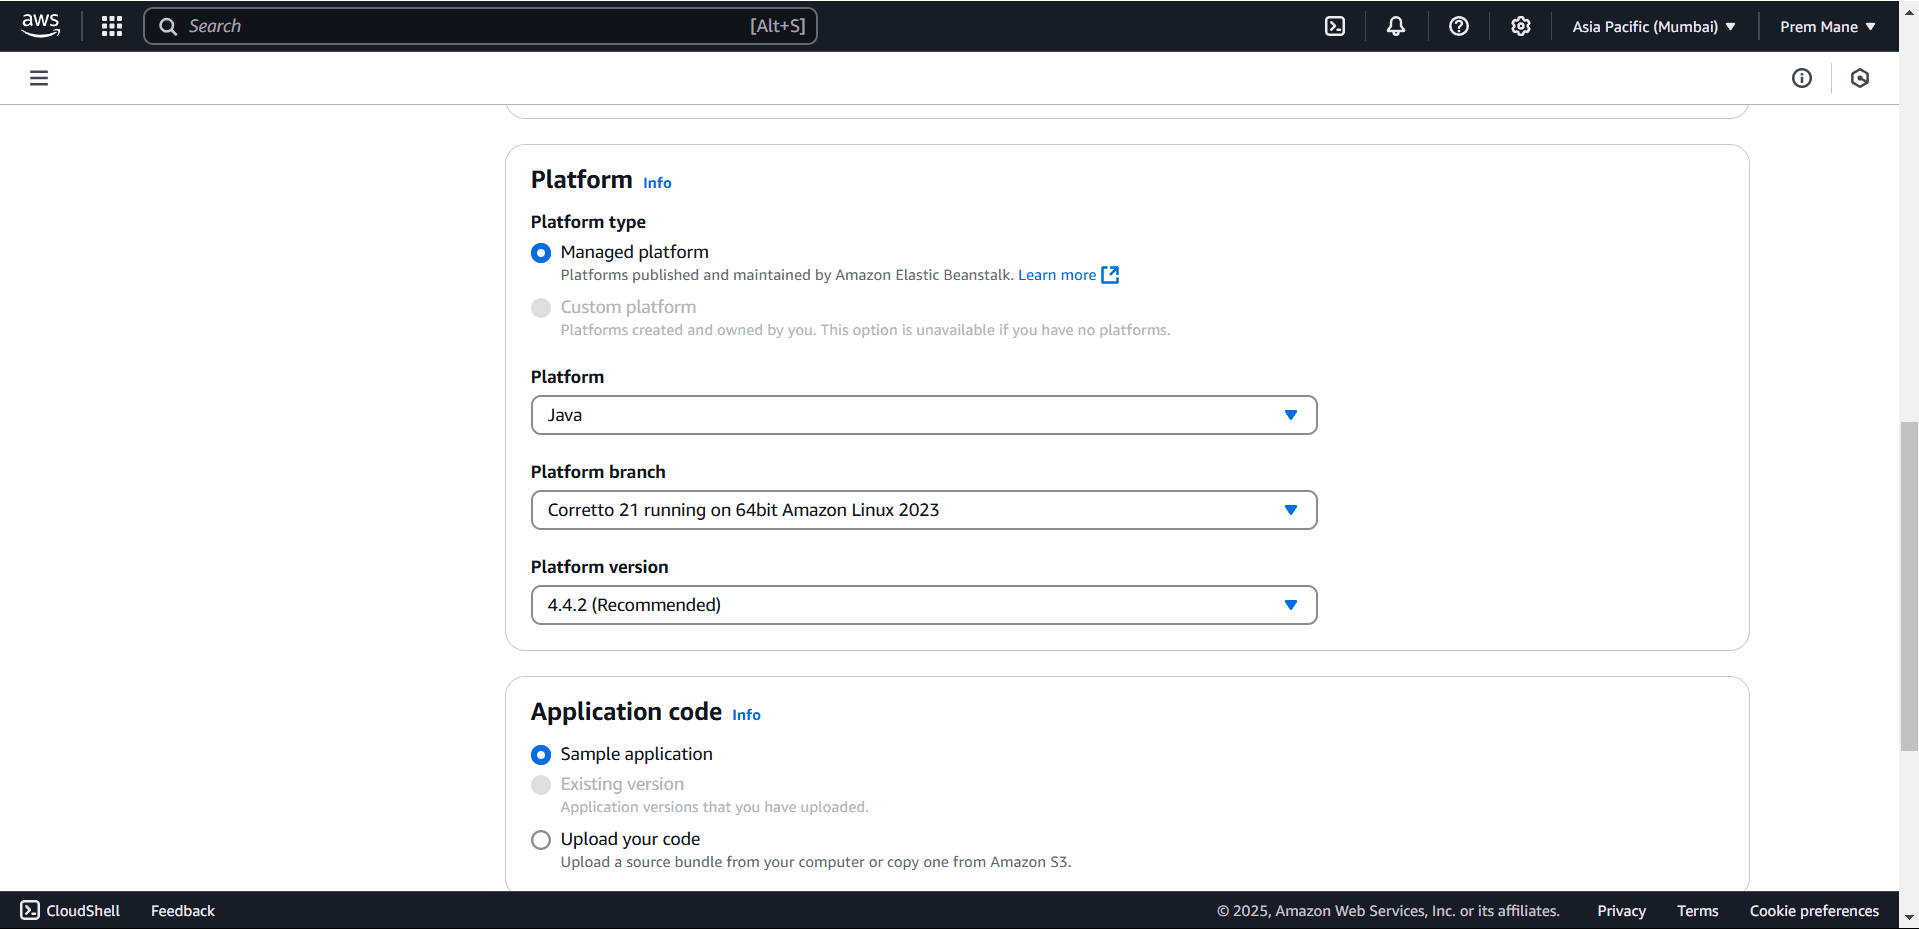
Next is Application code section, here we will select sample application, by selecting this elastic beanstalk will deploy a sample application for us on starting the elastic beanstalk environment
Further we will see how to deploy our spring boot application instead of this sample application
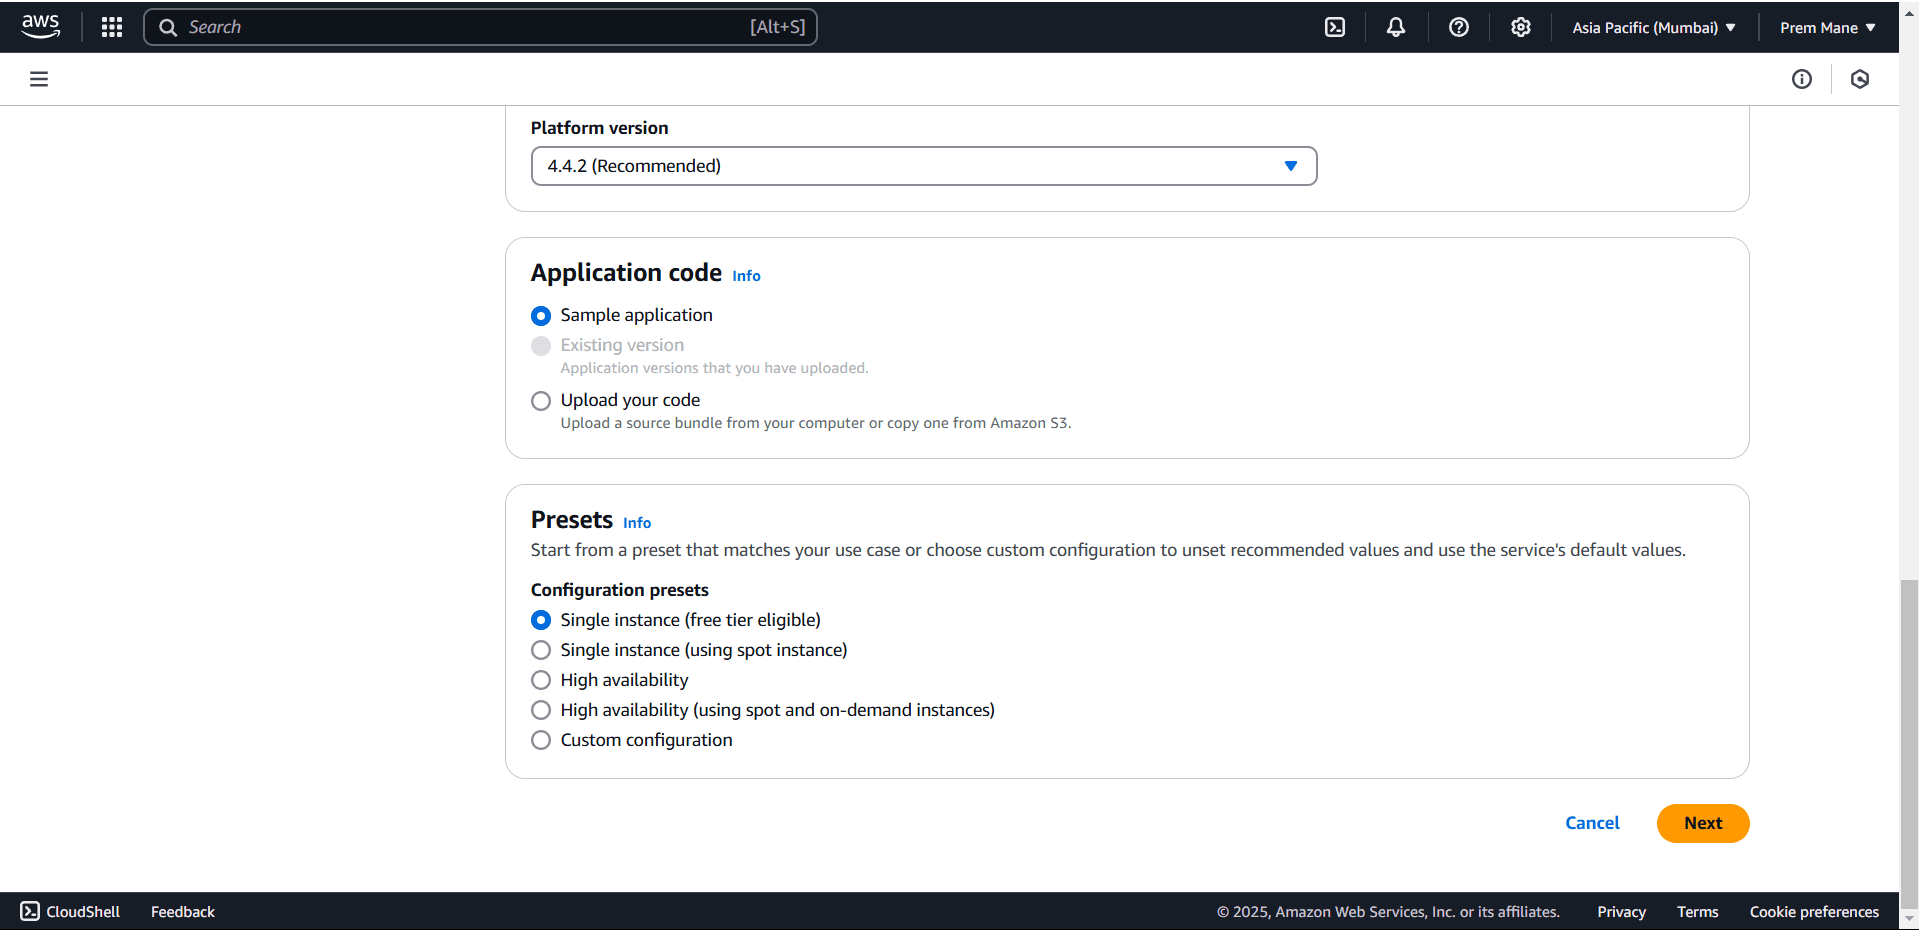
In the next section (Presets) select Single instance (free tier eligible).
Afer doing this click on next button to move to next step.
Step 2 :- Configure service access#
Next step is one of the important step as we are going to set IAM roles (service roles) and IAM EC2 instance profiles this allows Elastic Beanstalk to create and manage your environment. Both the IAM role and instance profile must be attached to IAM managed policies that contain the required permissions.
To create a Instance profile go to IAM Roles in AWS and press create role button
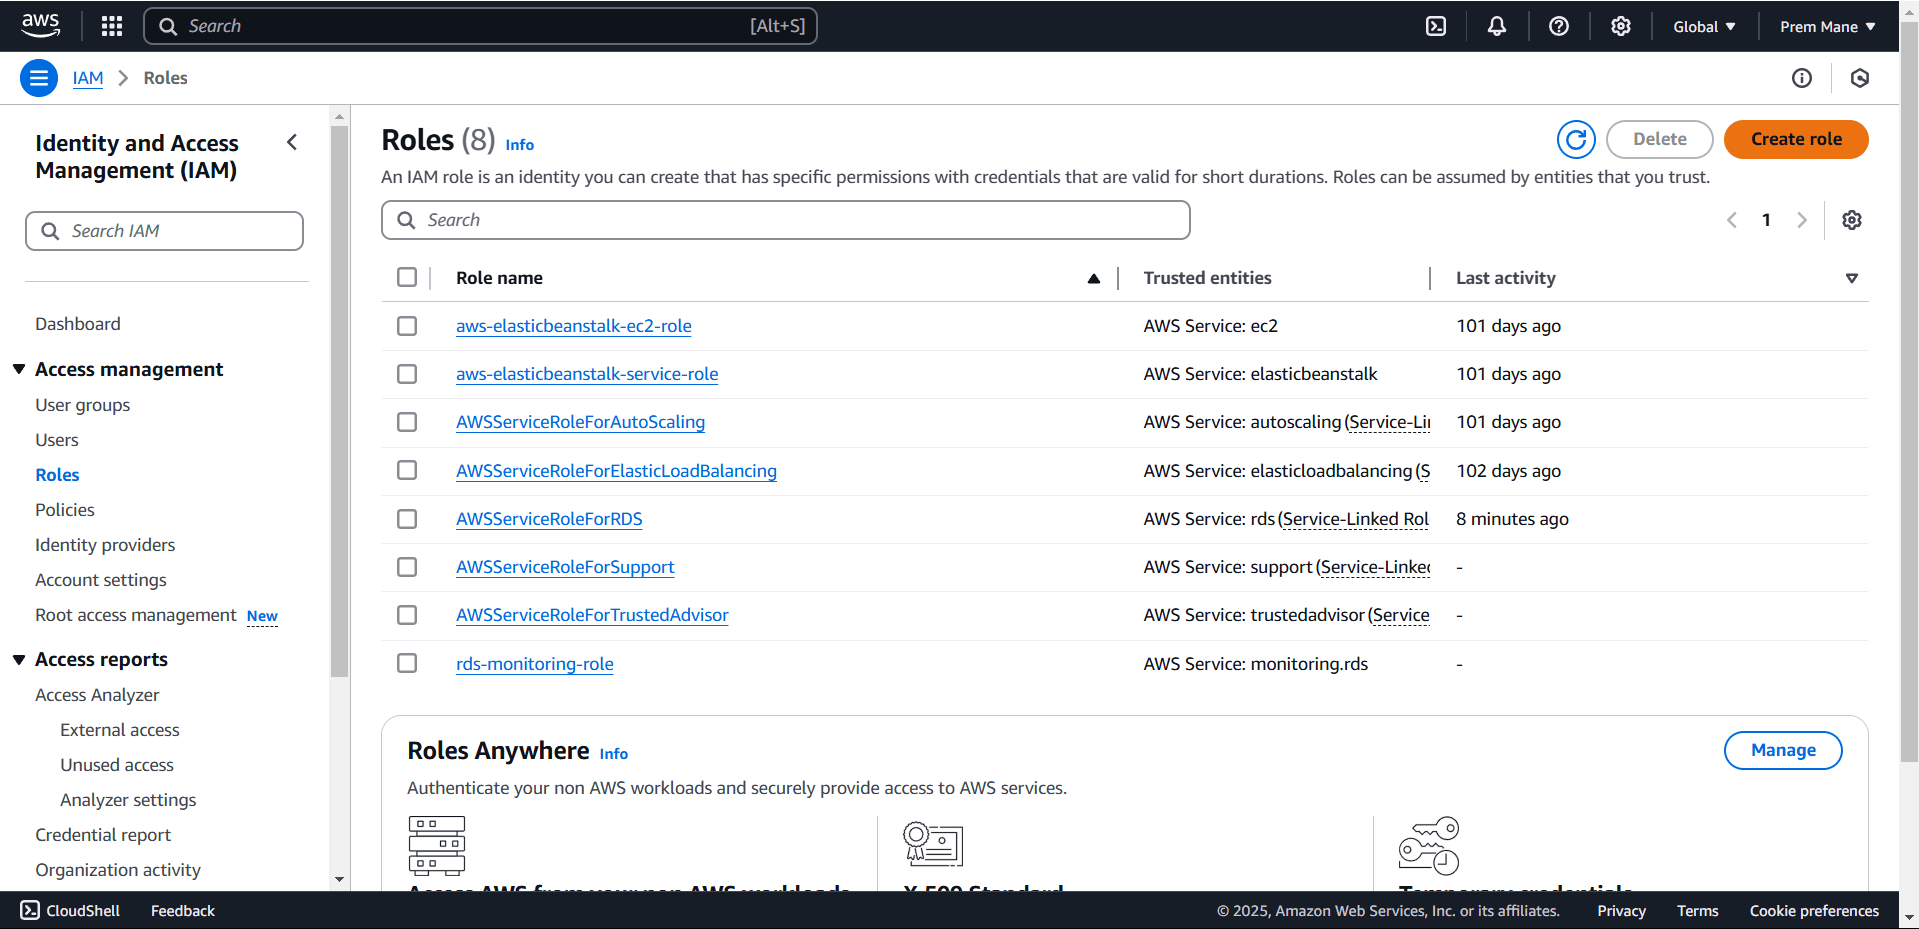
After that you have to follow the 3 steps to create role for ec2
Step 1 - Select trusted entity Select AWS service as trusted entity and in use case select EC2 as use case and click on next button.
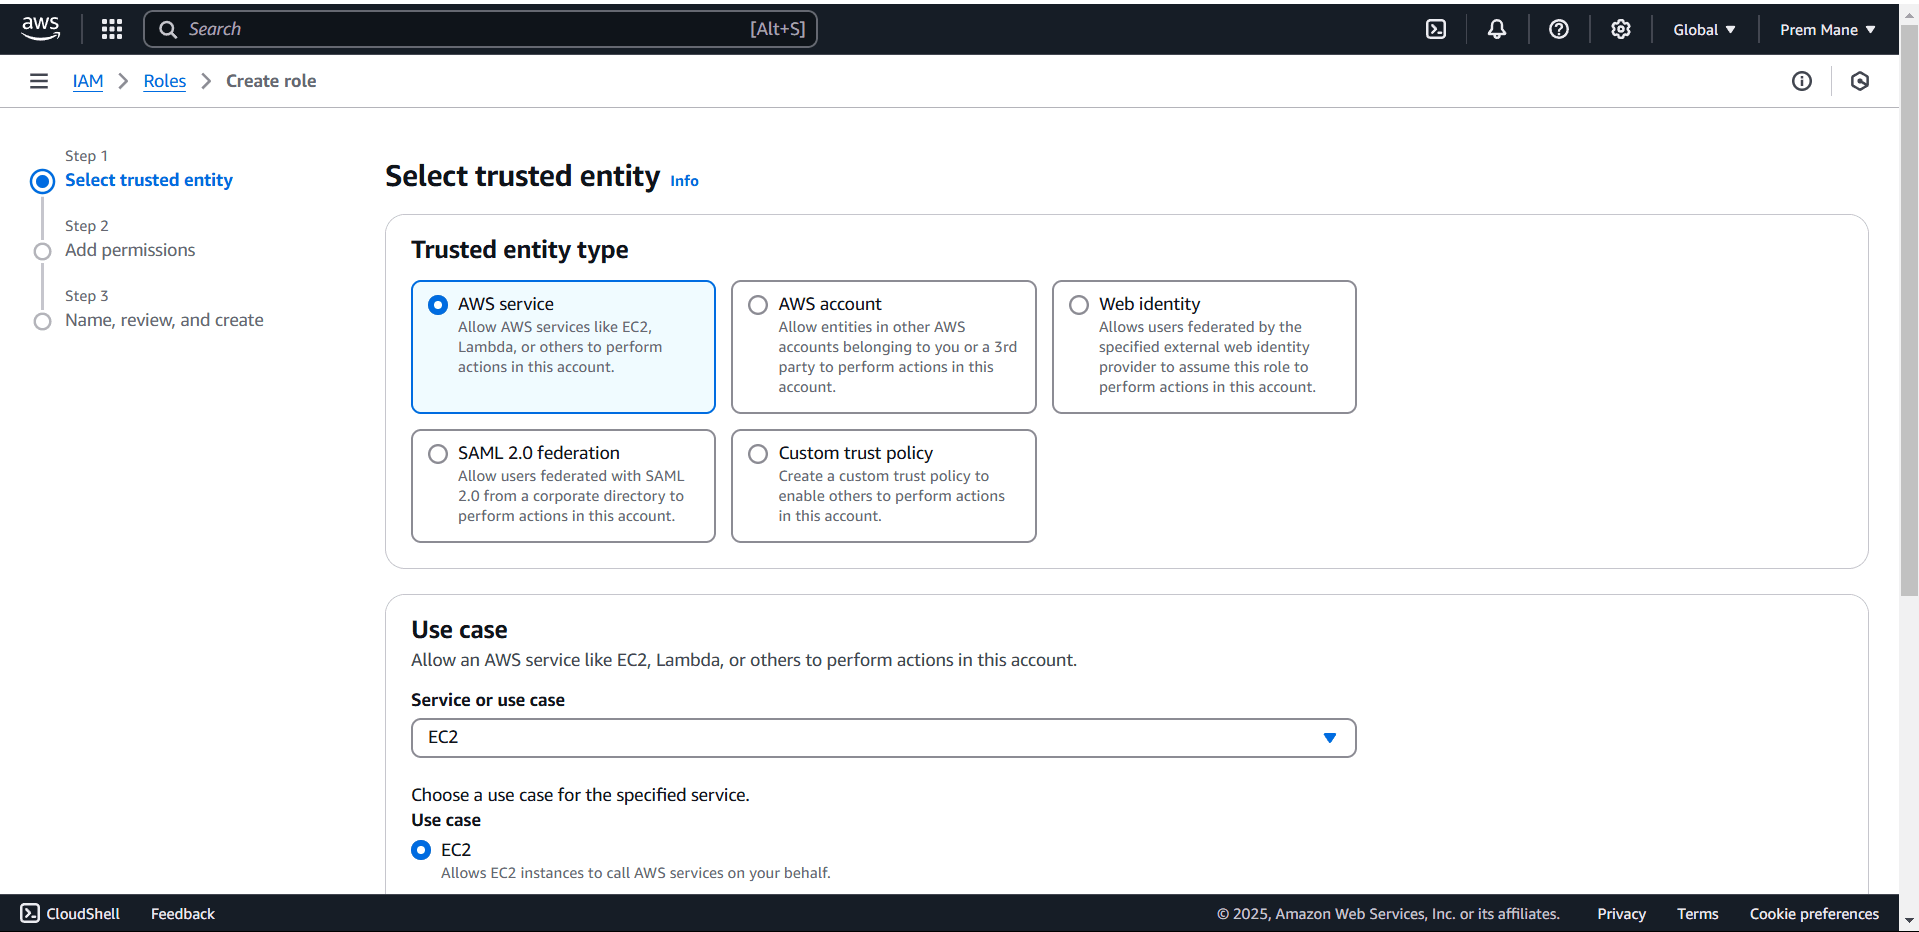
Step 2 - Add permission
In step 2 select two permissions AWSElasticBeanstalkCustomPlatformforEC2Role and AWSElasticBeanstalkManagedUpdatesCustomerRolePolicy and click on next button.
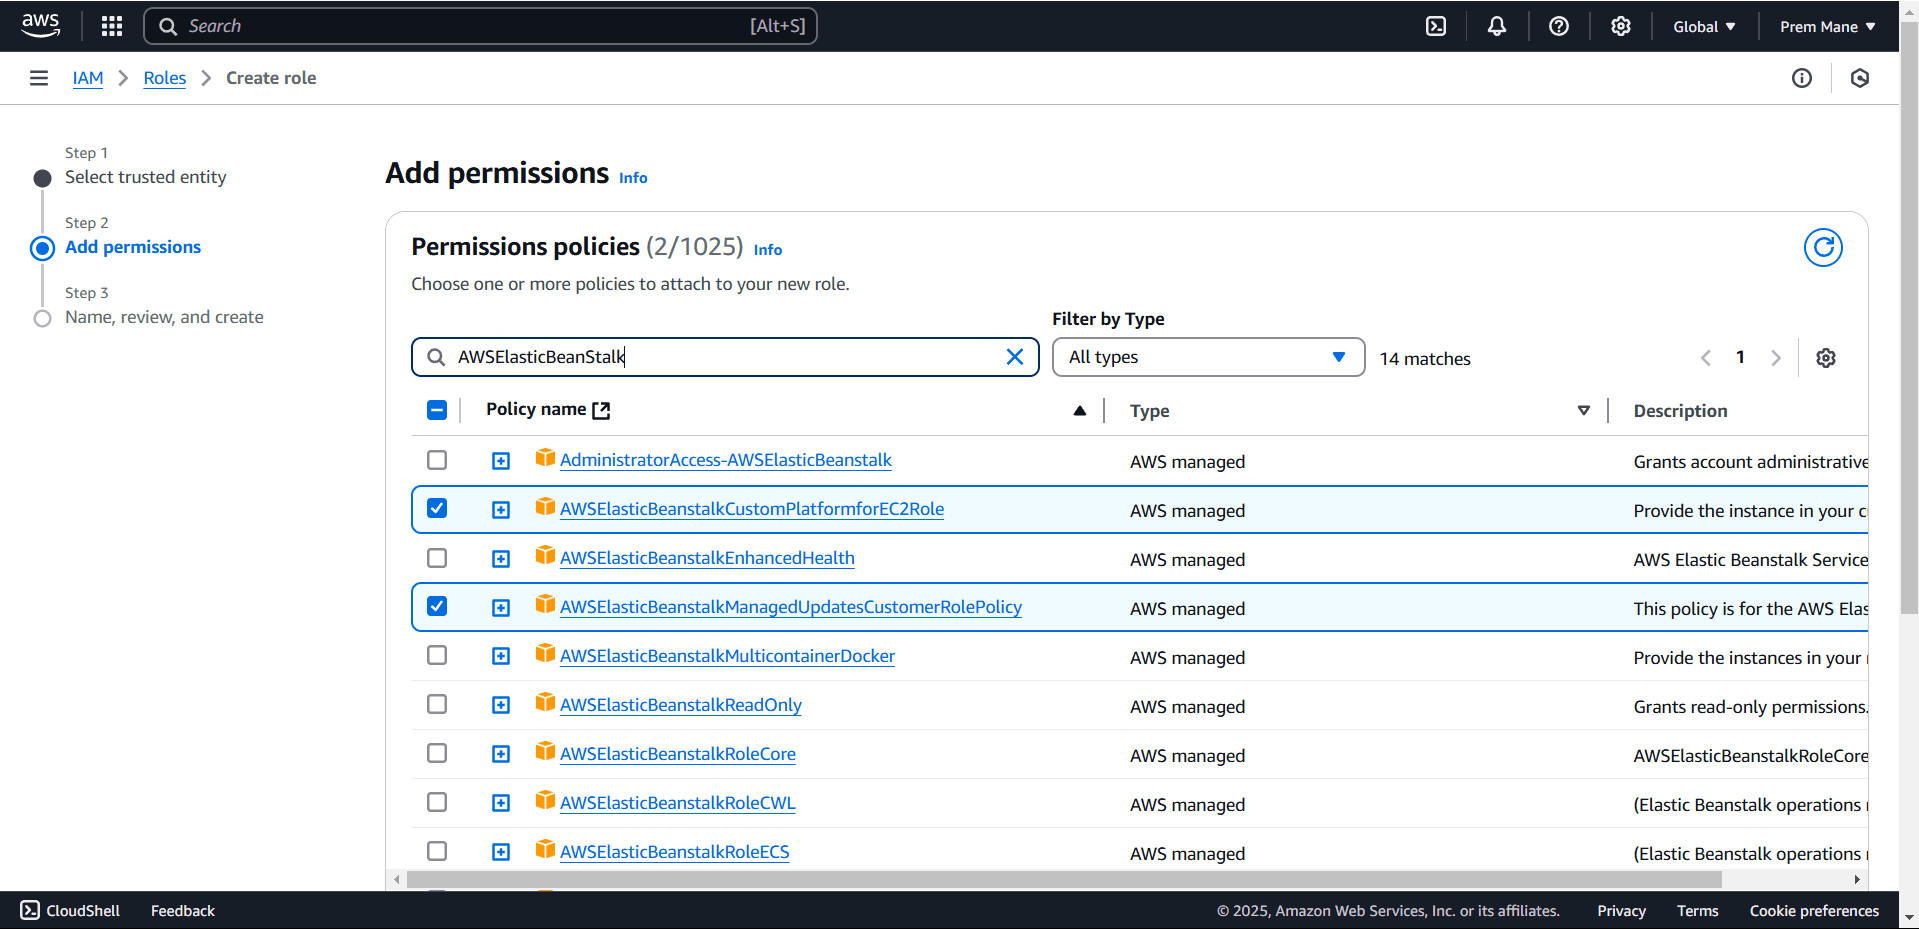
Step 3 - Name, review and create
In the last step give name to the role “aws-elasticbeanstalk-ec2-role” and review all the settings then click on create role
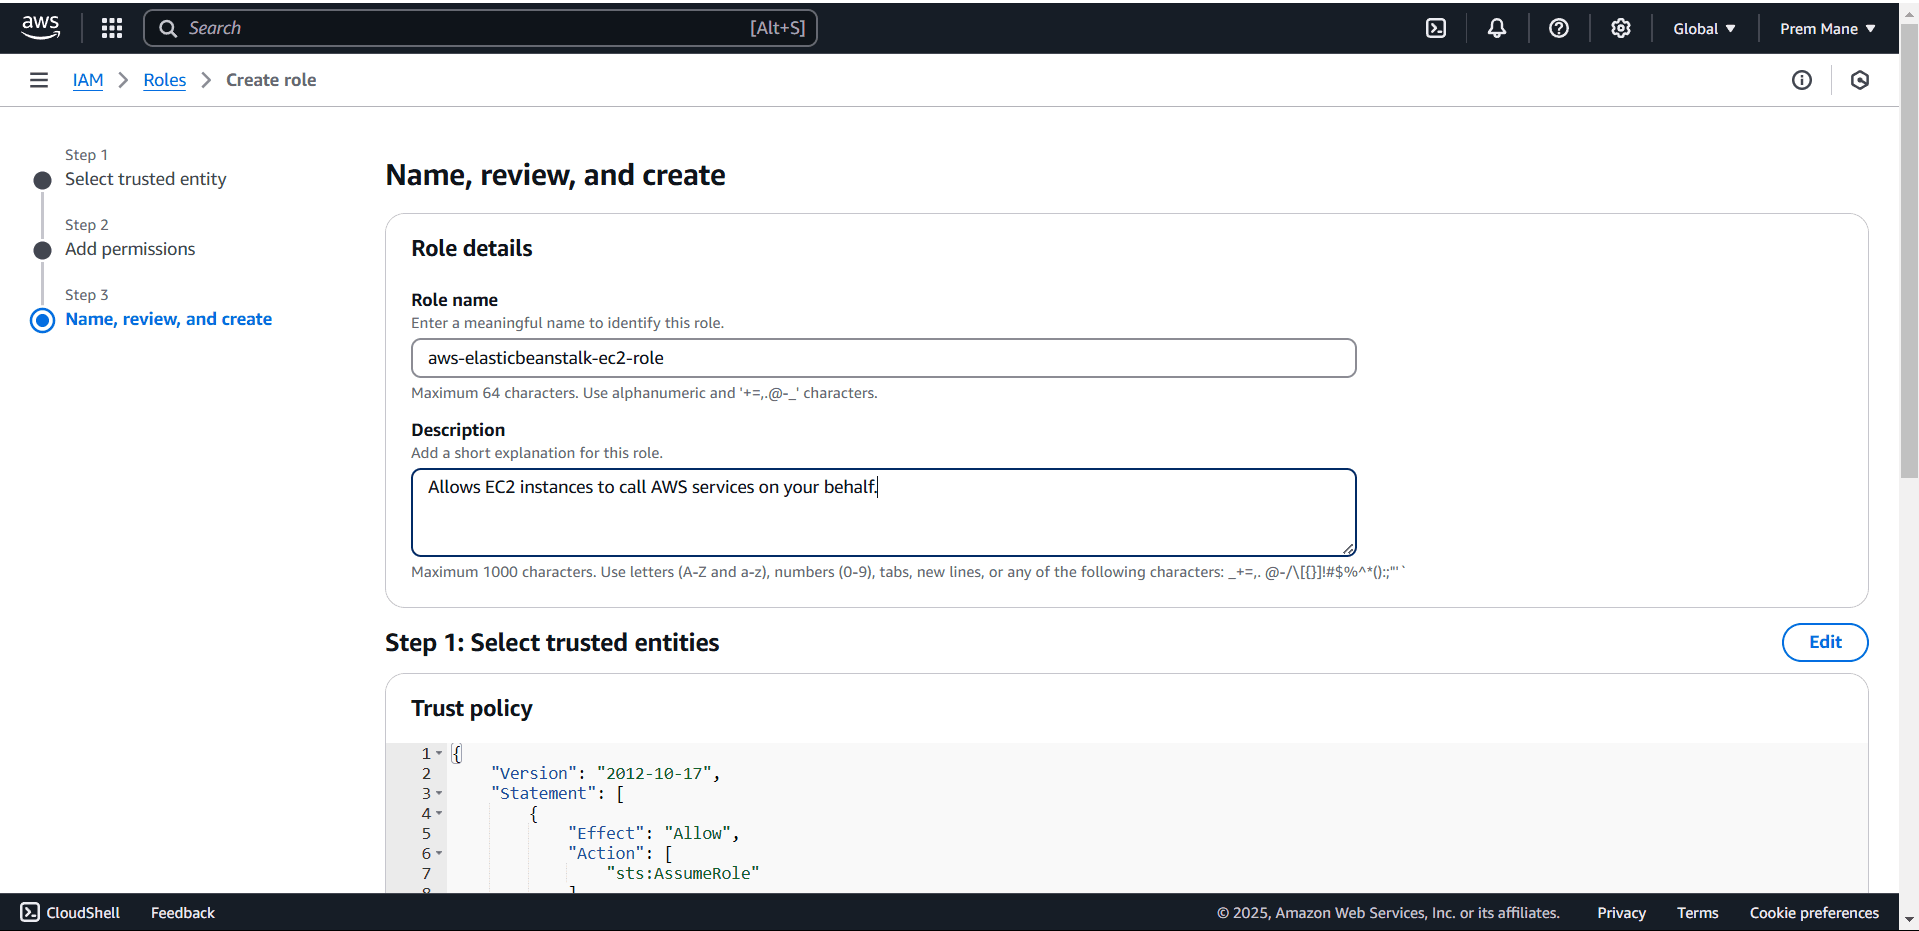
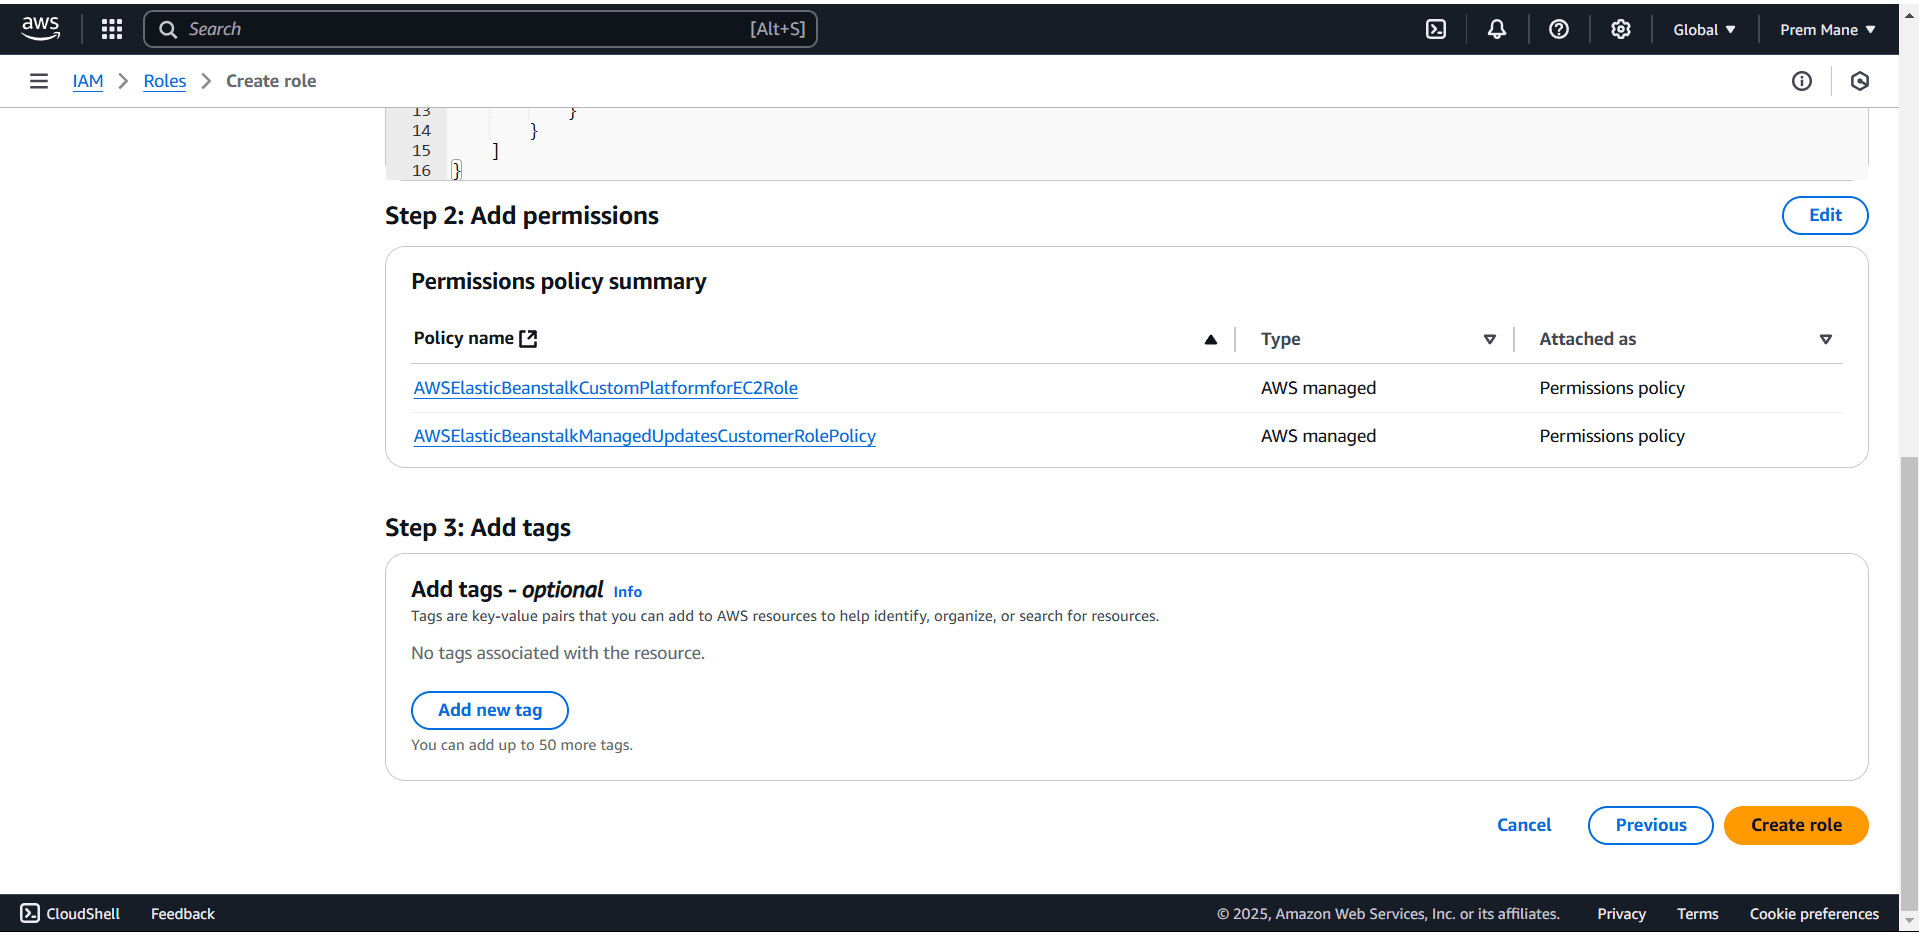
After creating the role come back to your step 2 - Configure service access
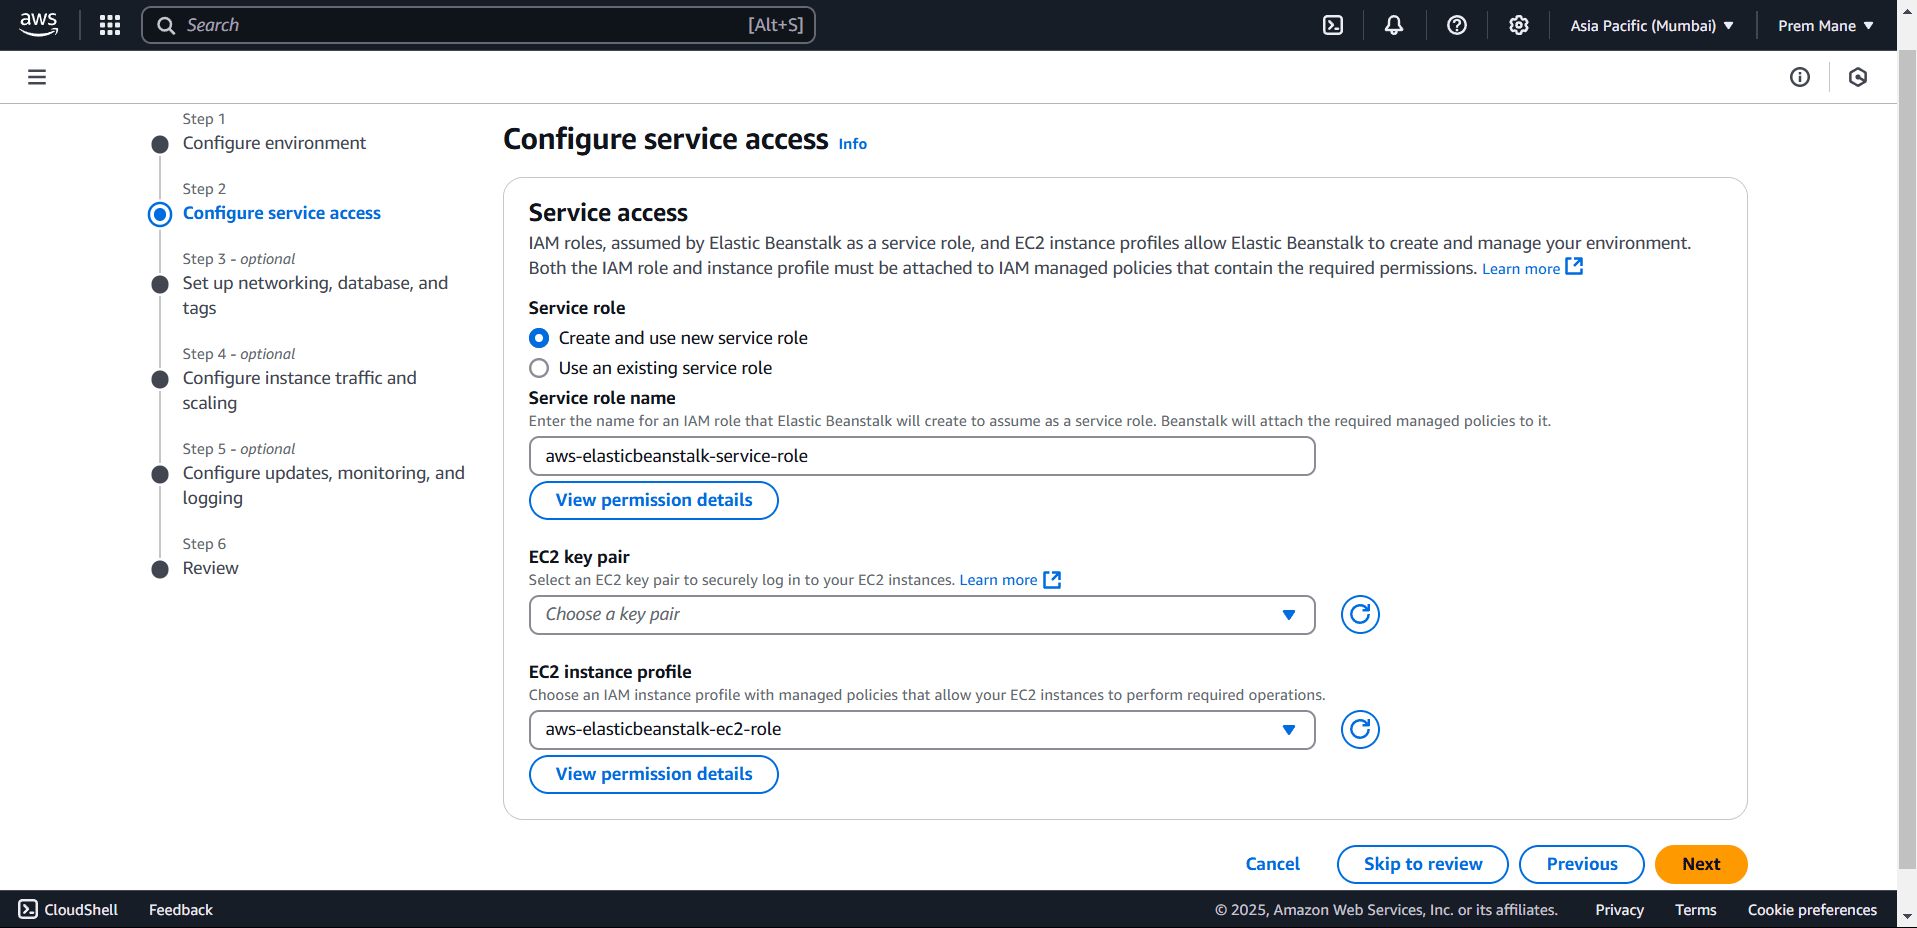
To create service role select Create and use new service role option.
And in EC2 instance profile we have to select the role which we created “aws-elasticbeanstalk-ec2-role”.
After doing this click on next button to move to next step.
Step 3 :- Set up networking, database, and tags#
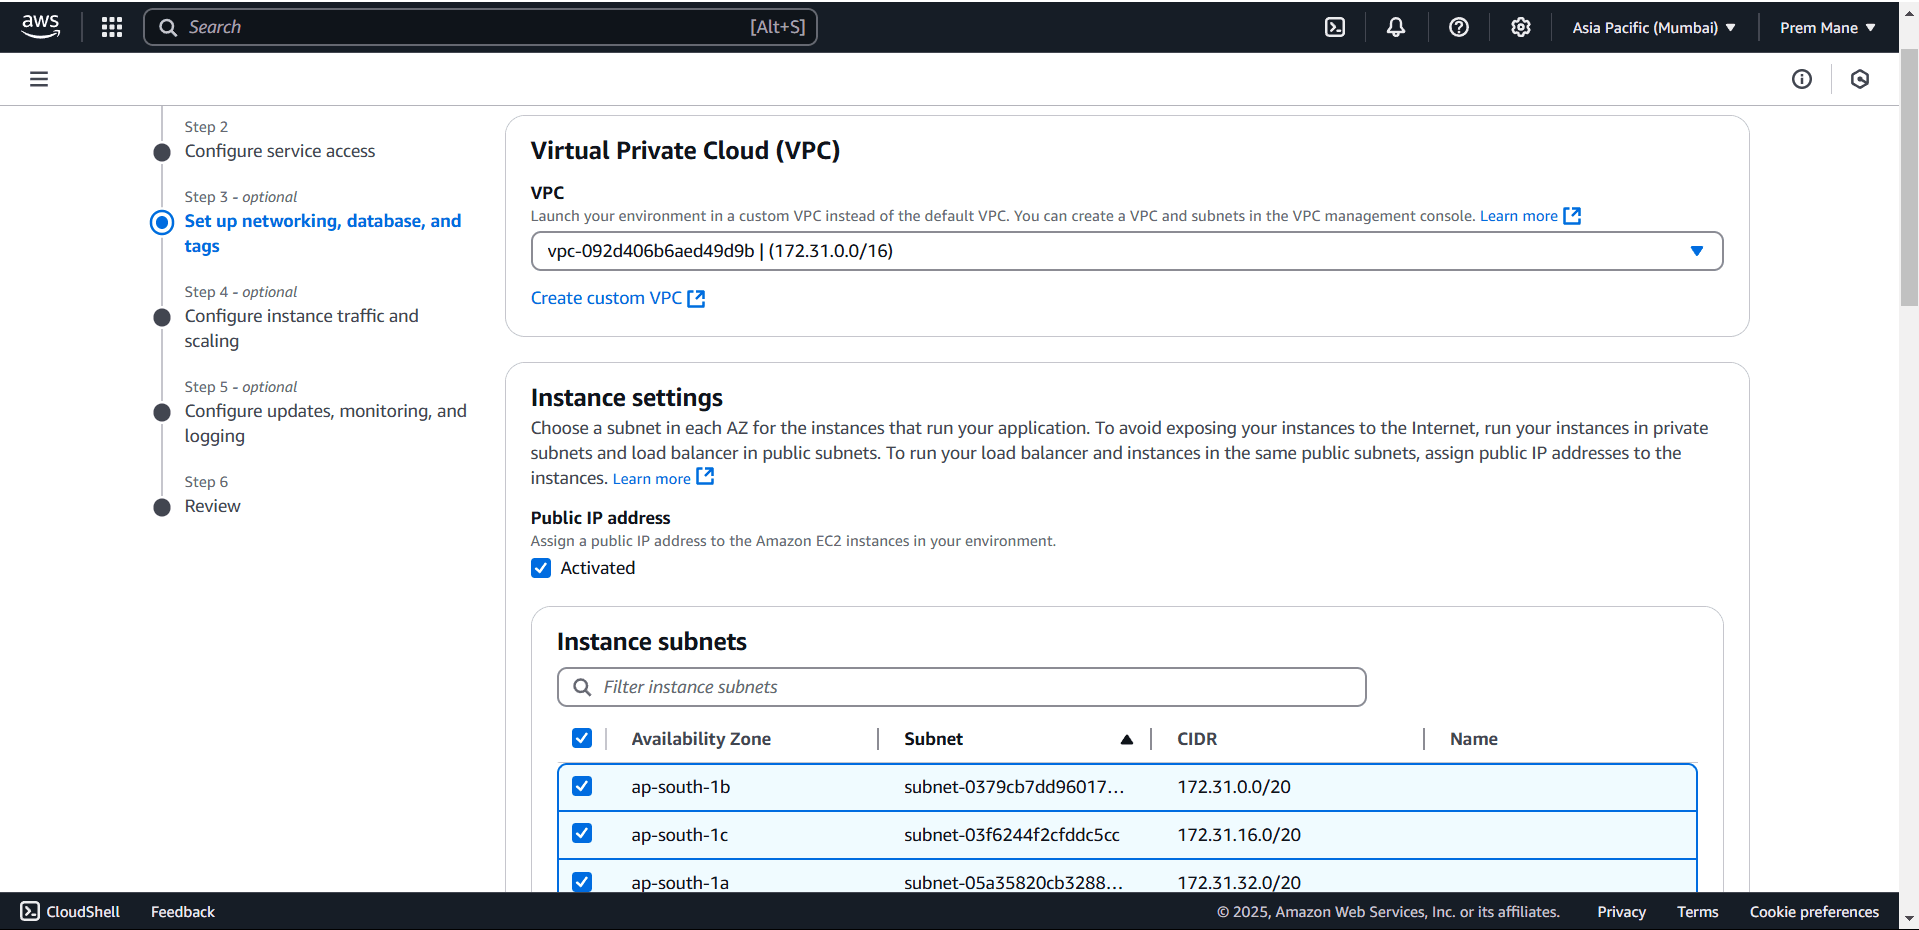
In the next step under the VPC section select the default VPC and under insthe tance settings section check on the Activated option to assign a public IP address to the Amazon EC2 instances in your environment.
Select all availability zones under Insrtance subnets to make your instance available in all zones.
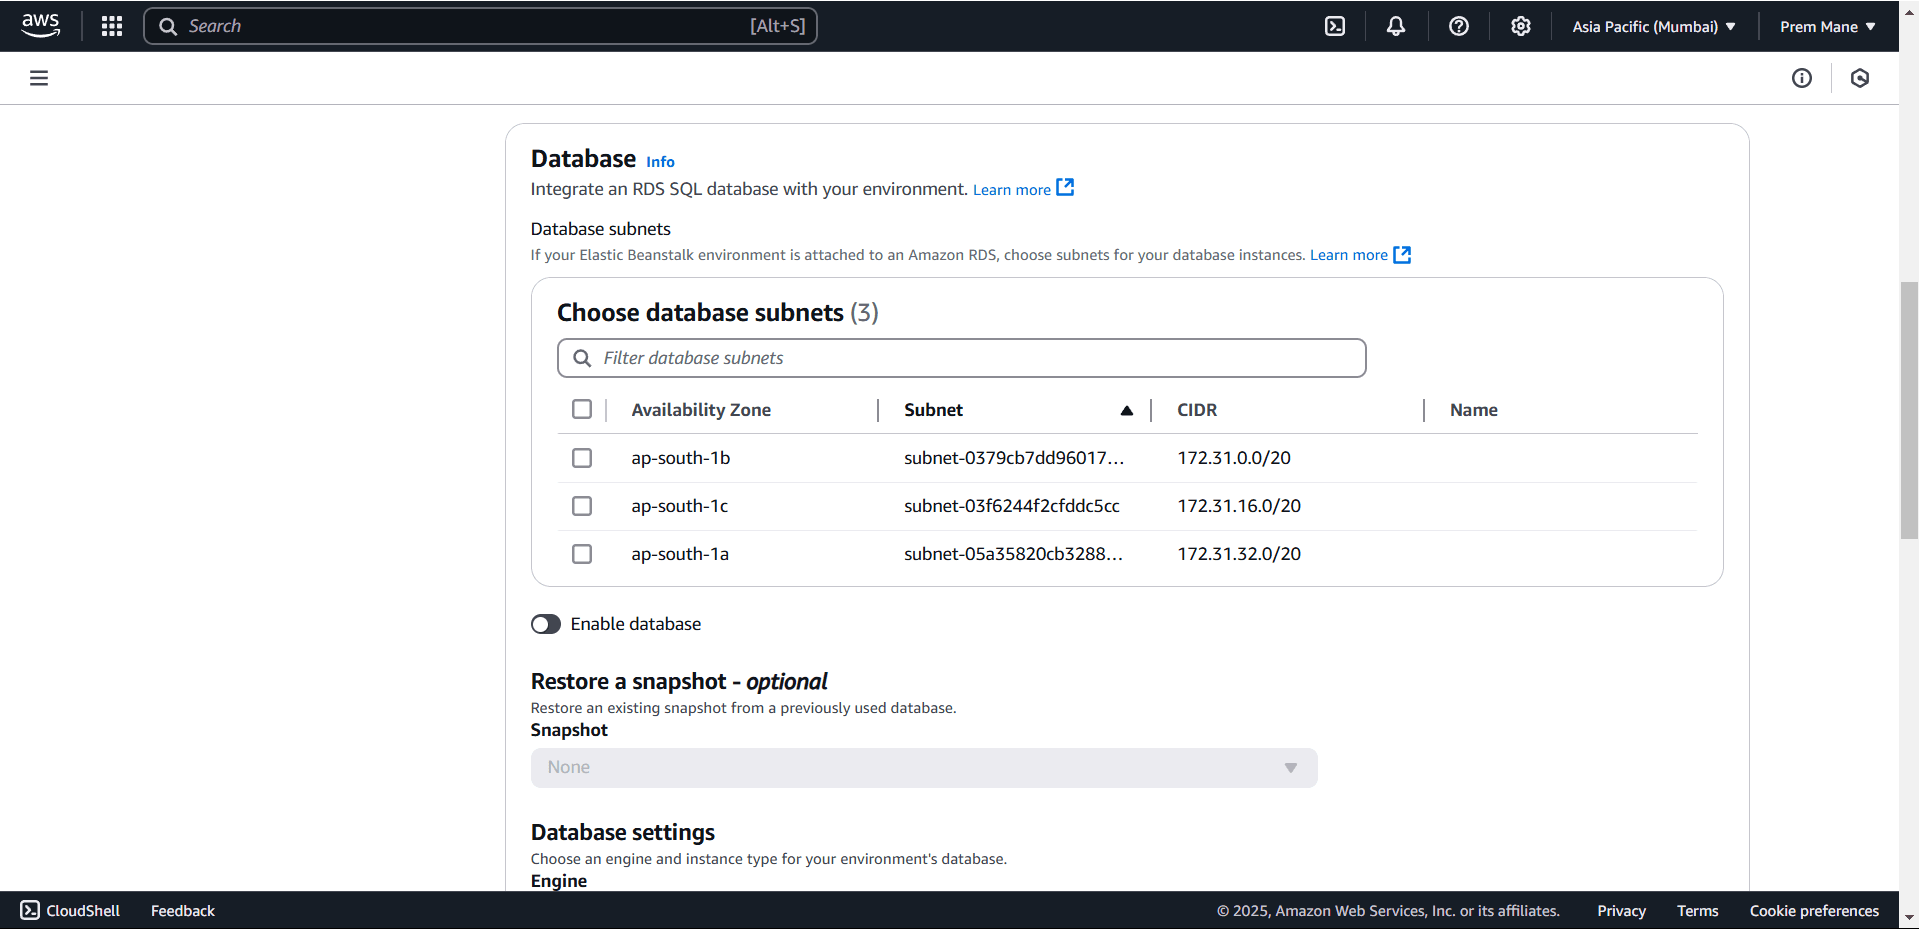
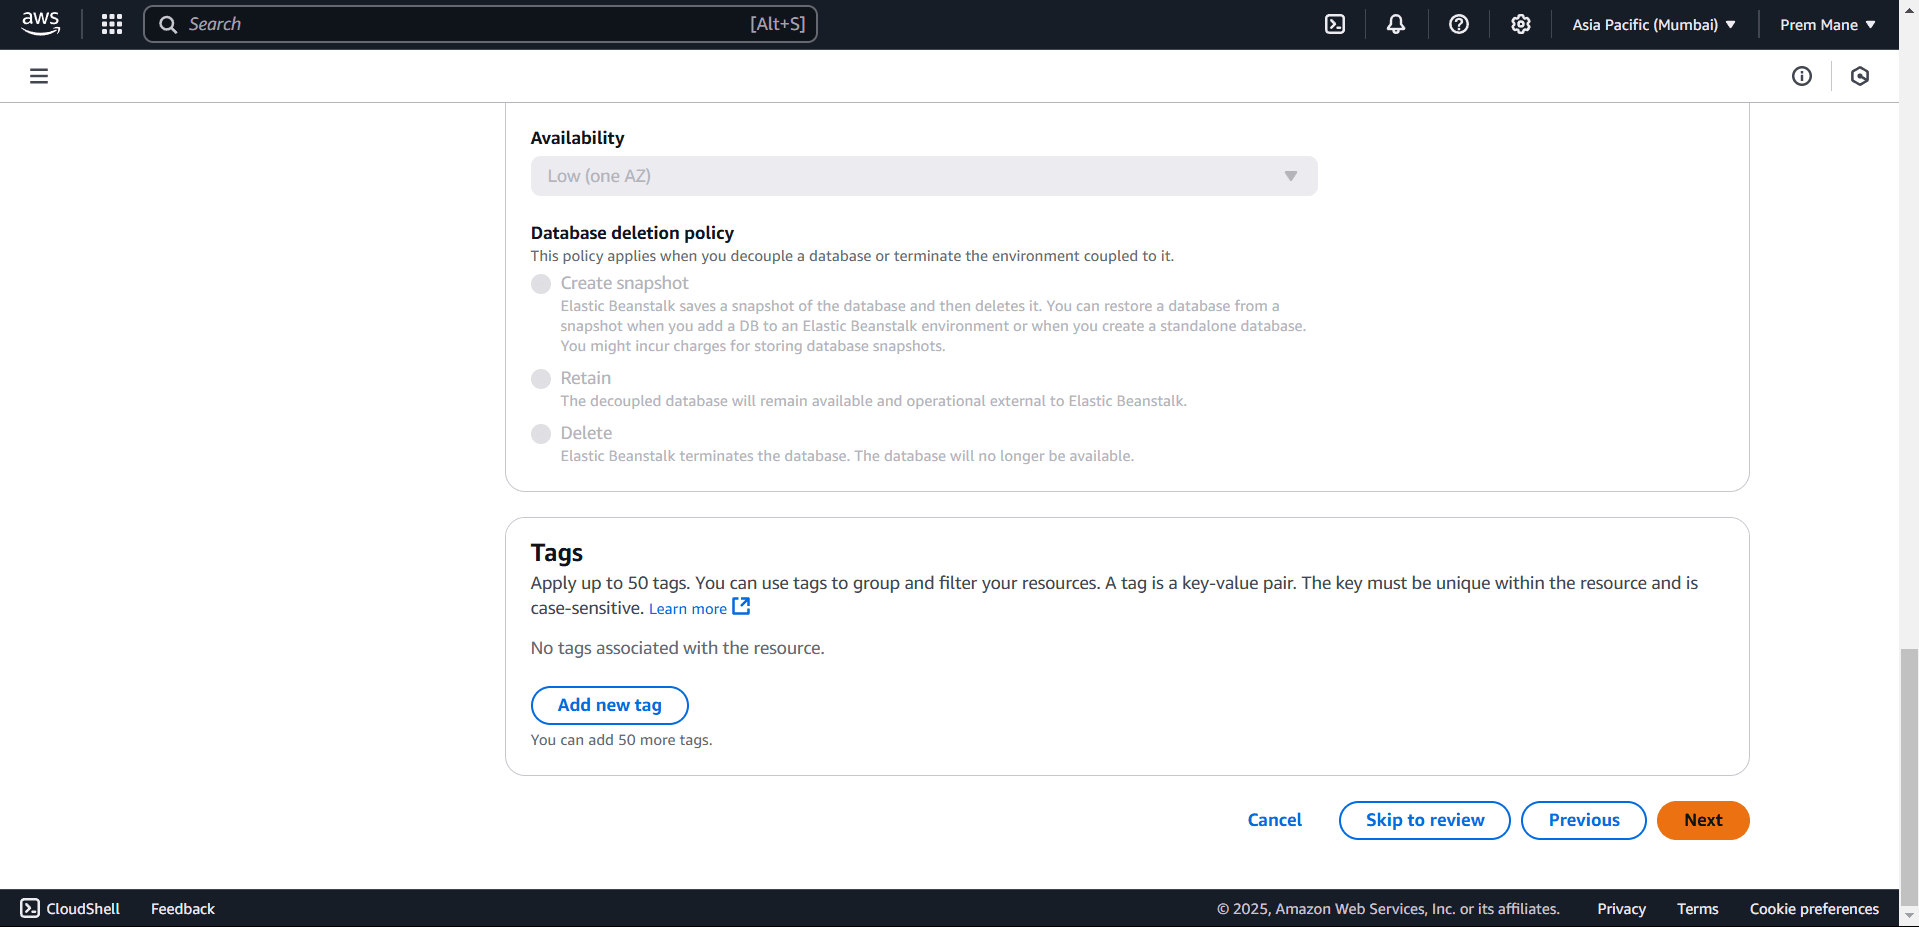
The next section is the Database section we will not configure any DB here as we already have set our RDS instance. Also it is not recommended to configure DB here because if we delete our environment then we will loss our database too.
Next scroll down and simply click on next button.
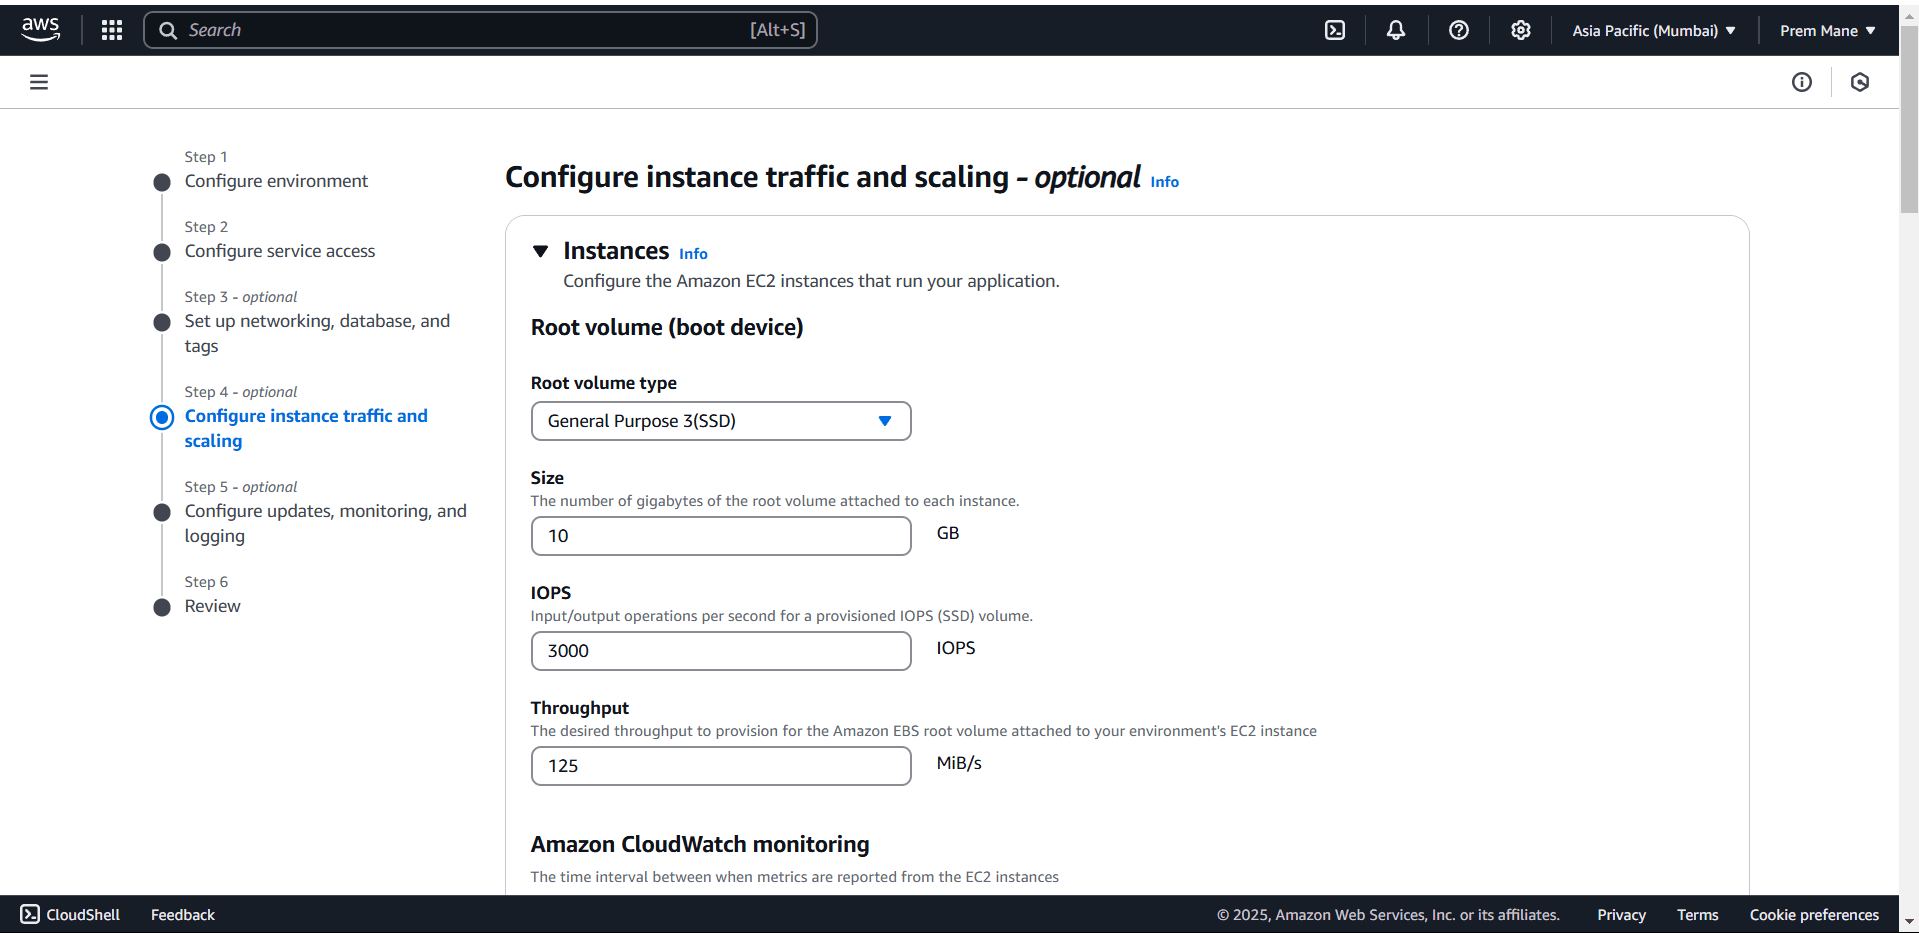
Step 4:- Configure instance traffic and scaling#
In the next step under instance section select root volume type as General Purpose 3 SSD.
Size 10 GB, IOPS 100, Throughput 125 MiB/s
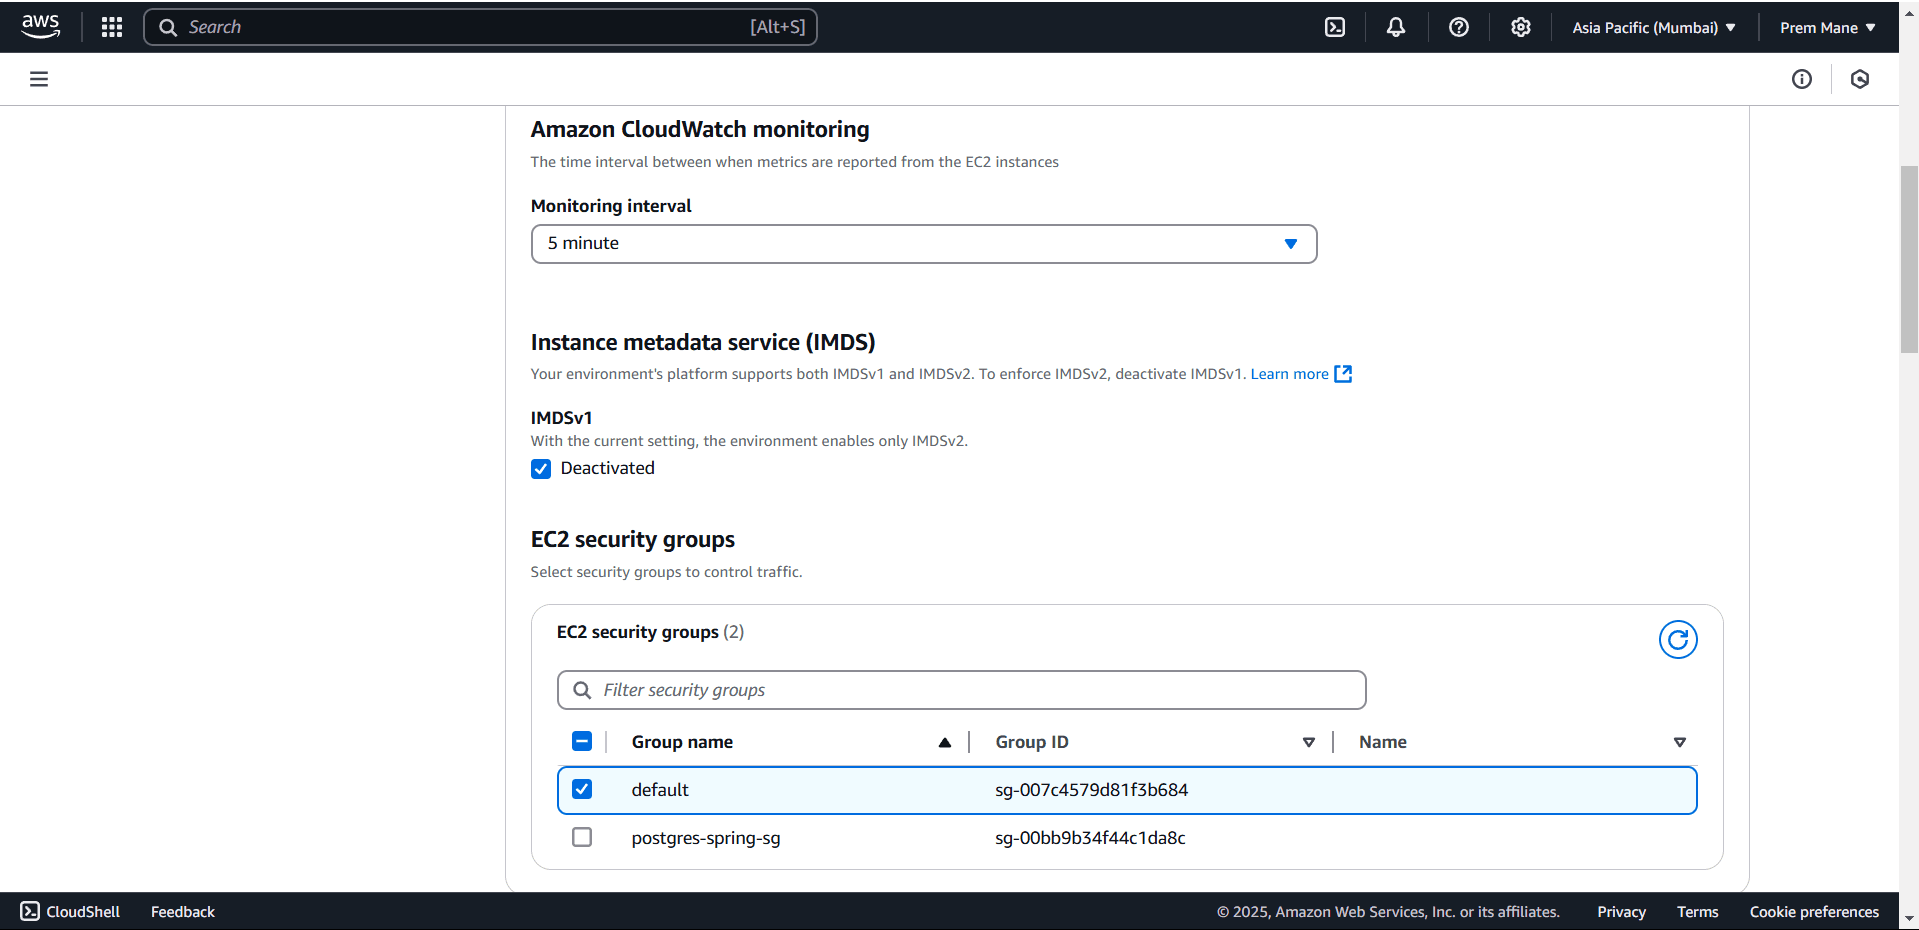
Next in Amazon CloudWatch monitoring select interval as 5 minutes, this is the time interval between when metrics are reported from the EC2 instances.
Keep IMDS 1 (Instance metadata service) as deactivated. Your environment's platform supports both IMDSv1 and IMDSv2. To enforce IMDSv2, deactivate IMDSv1.
In EC2 security group section, select default security groups to control traffic.
Next scroll down you will see Capacity section, We have to configure the compute capacity of your environment and auto scaling settings to optimize the number of instances used.
Select environment type as load balanced. You can develop and test an application in a single-instance environment to save costs and then upgrade to a load-balanced environment when the application is ready for production.
Specify the min and max number of instances you want in environment on scaling up and down, I have selected min as 1 and max 4, so that up-to 4 instances will be spinned as the traffic increases basically the load/CPU utilization of instances increases.
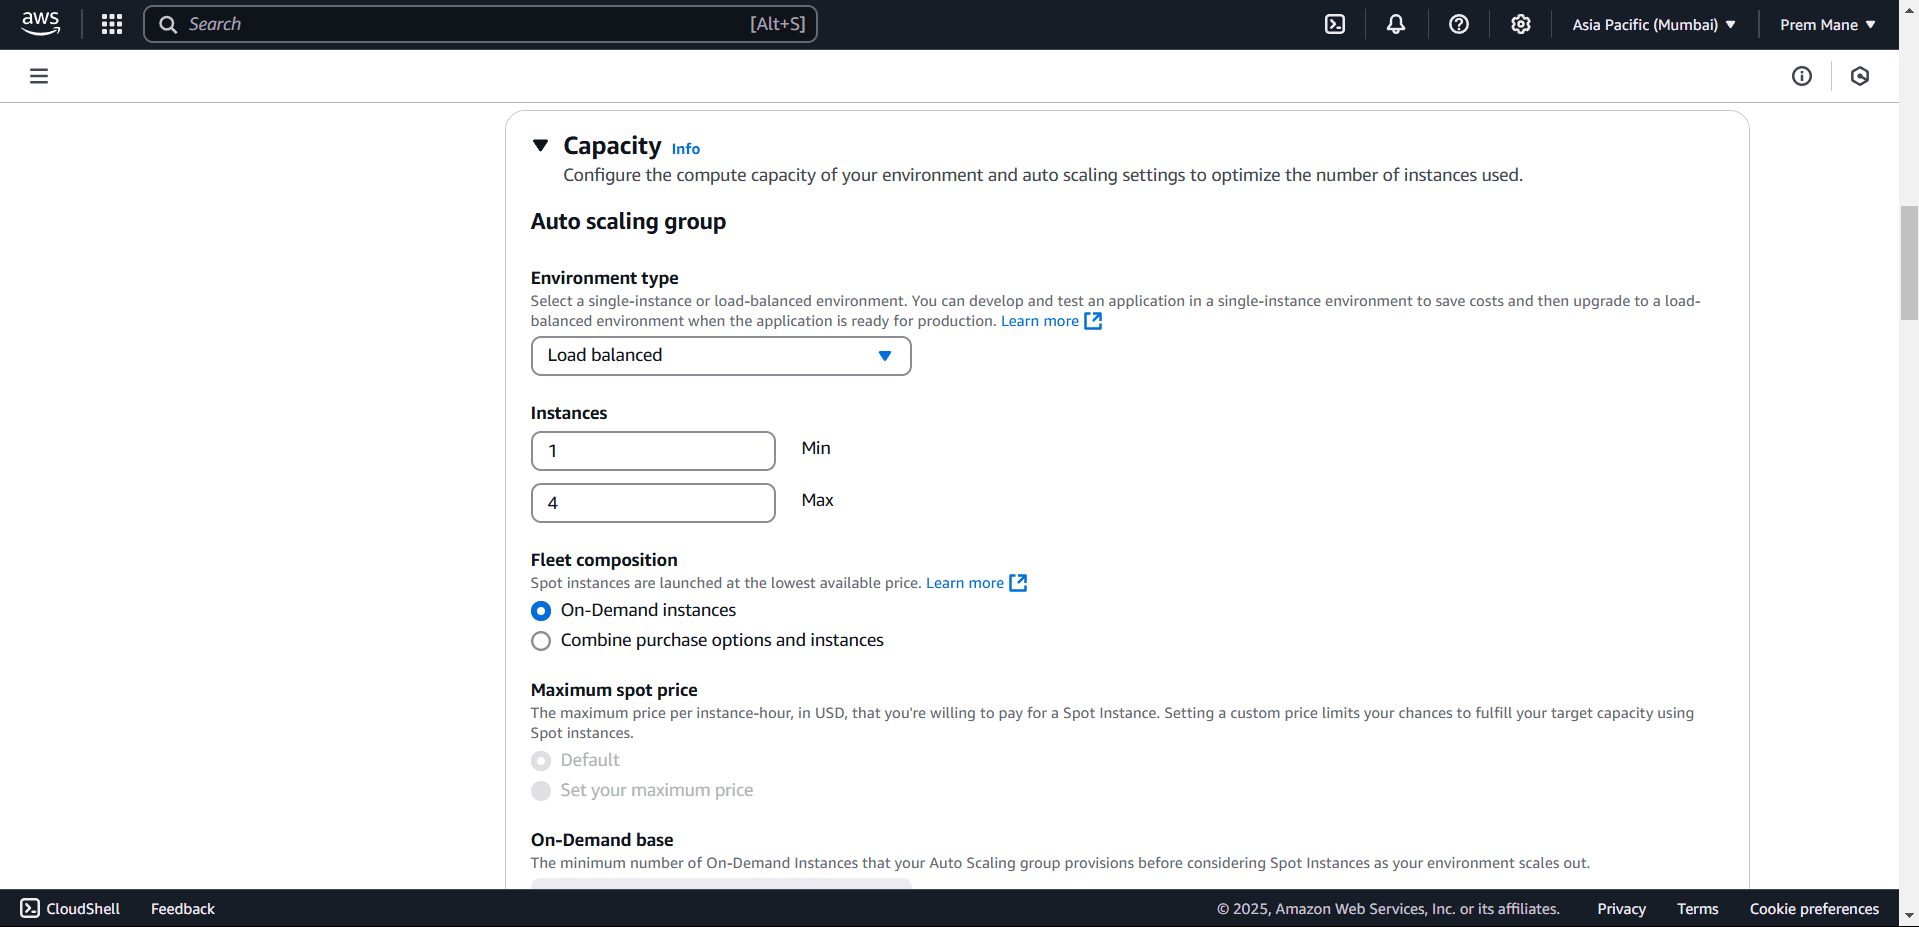
Select On Demand Instances option under Fleet compositions, scroll down and rest keep all default
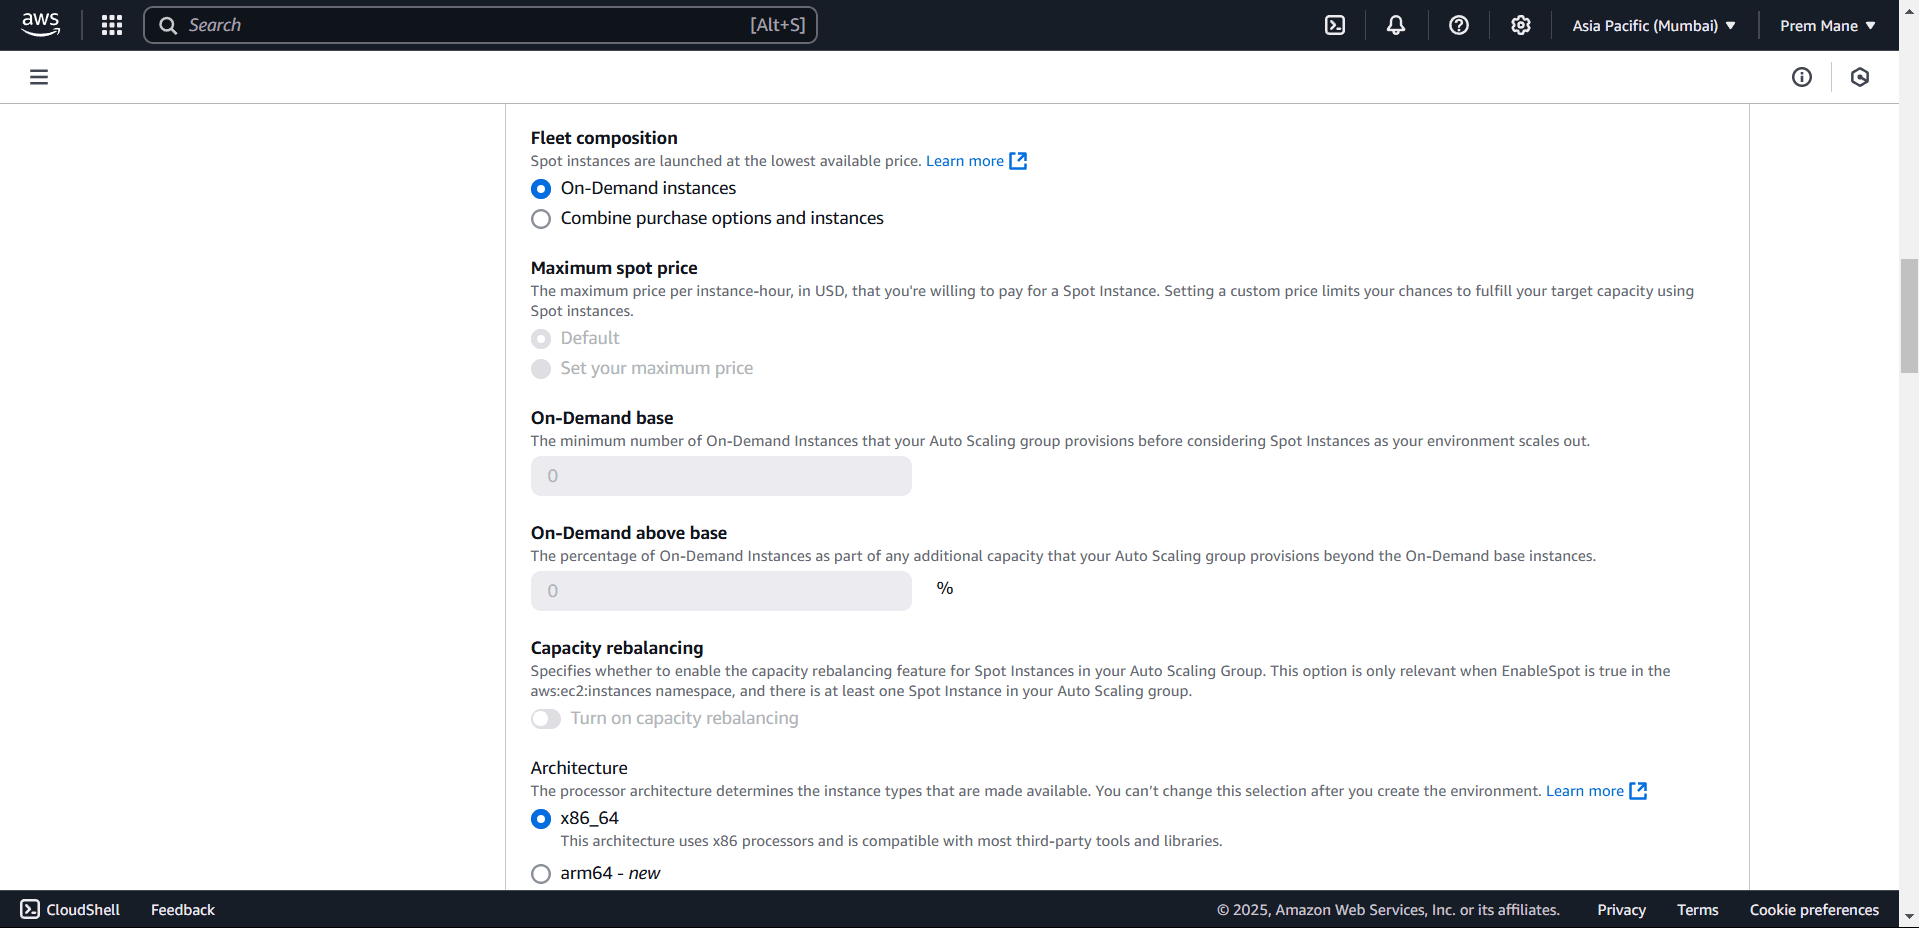
After scrolling downyou will see Architecture section, select x86_64. The processor architecture determines the instance types that are made available. You can’t change this selection after you create the environment.
Under Instance Types choose t3.micro or any other as per your requirement
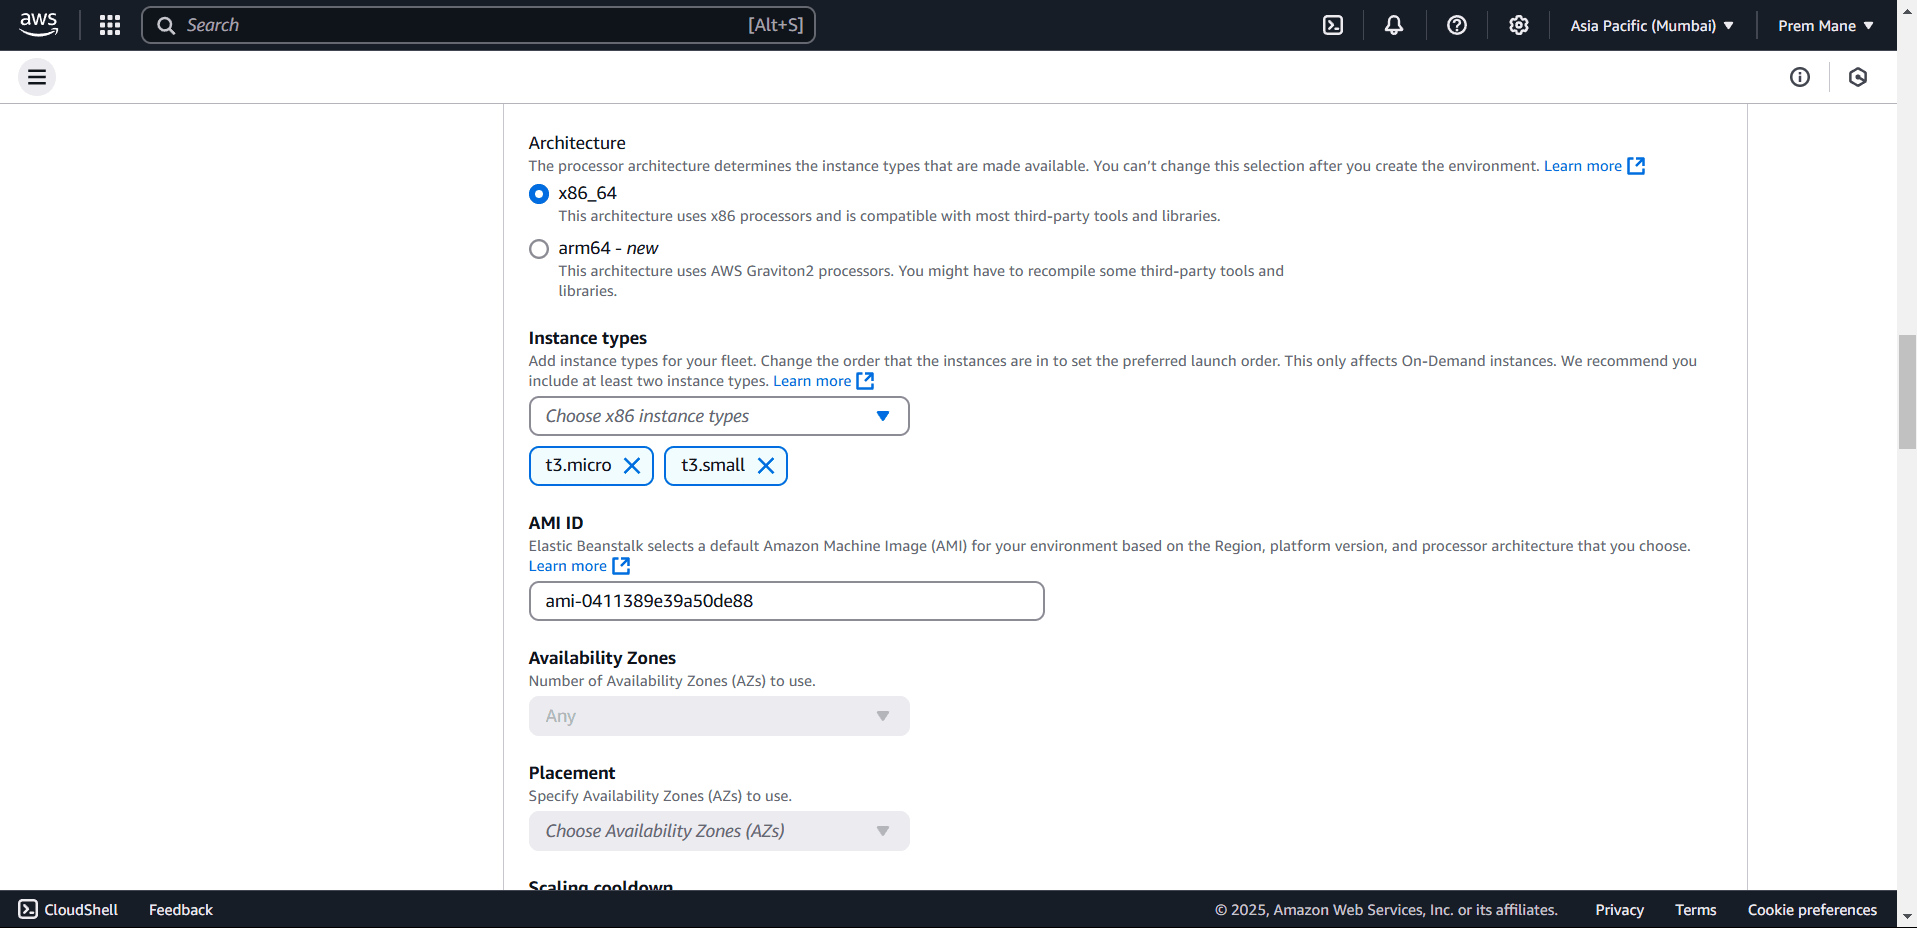
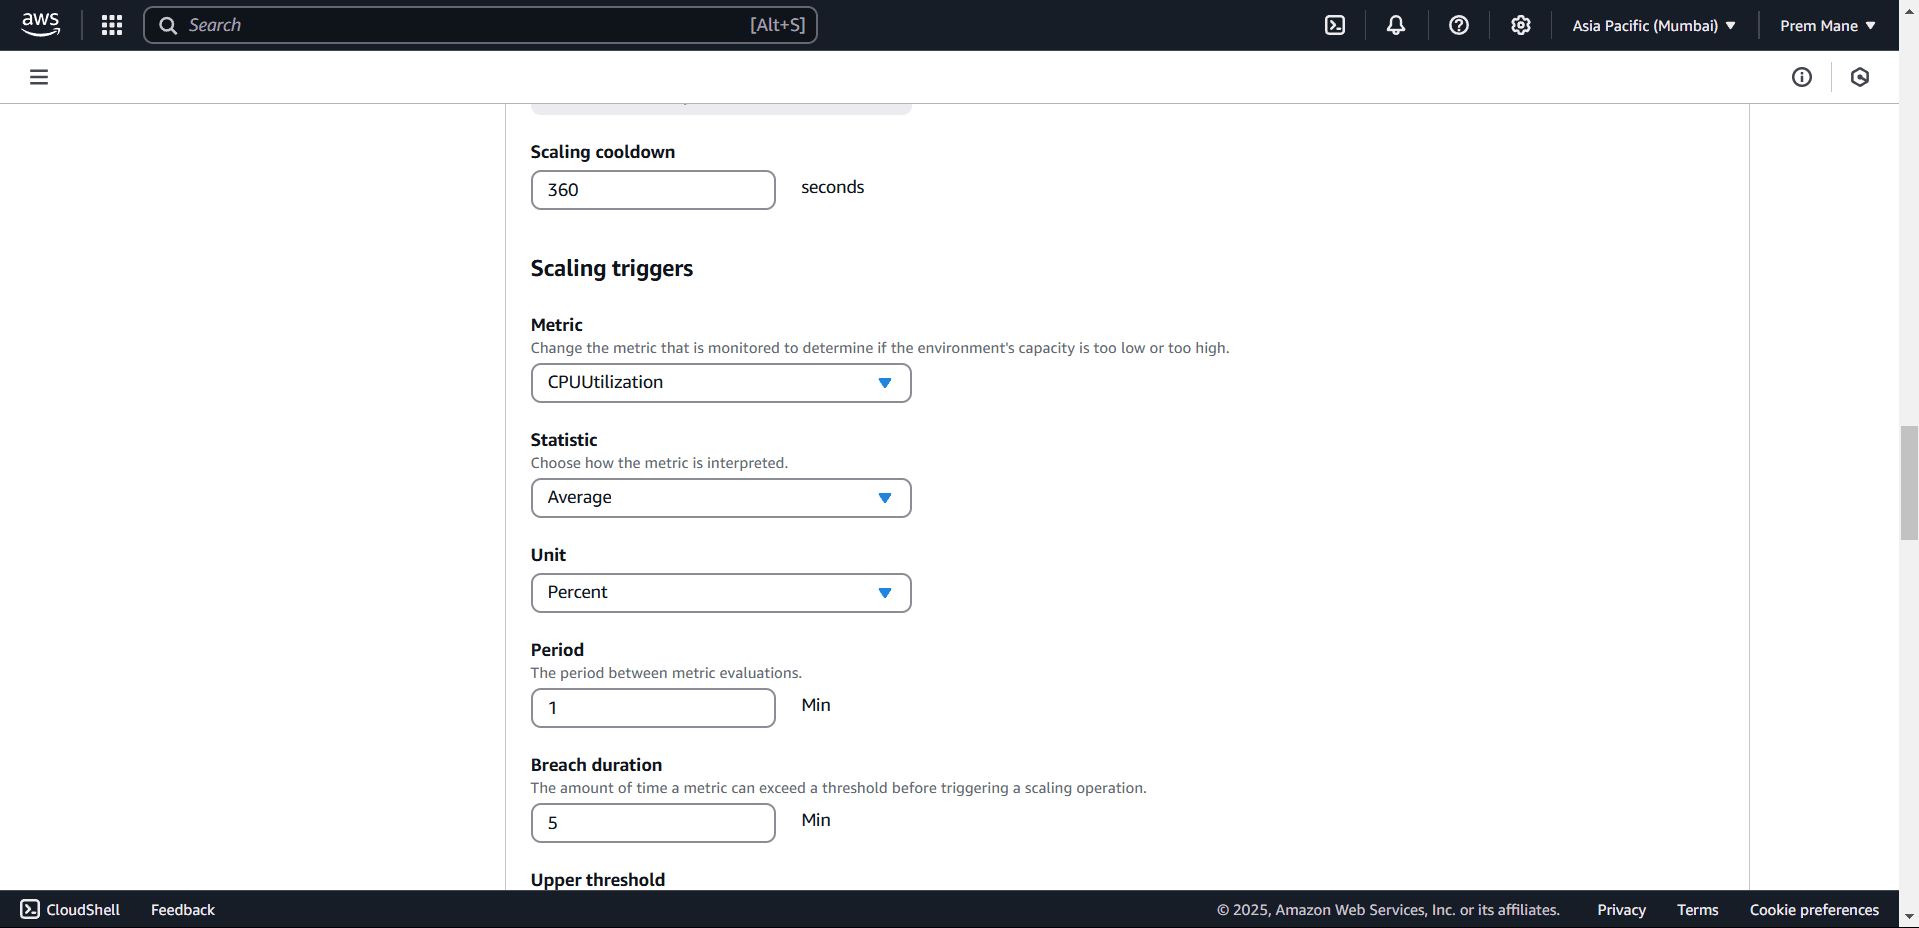
Scroll down and in scaling cooldown keep 150 seconds
Next you will see the scaling triggers section, under that keep the metric parameter CPUUtilization that is monitored to determine if the environment's capacity is too low or too high.
Choose how the metric is interpreted as Average under Statistic and select unit as Percent. Select 1 min for period between metric evaluations.
Select 5 min for the amount of time a metric can exceed a threshold before triggering a scaling operation under Breach duration.
Next scroll down and select upper threshold as 80 and lower threshold as 40 with Scale up increment 1 and Scale down increment -1 .
Overall this settings says if the CPU utilization is beyond 80% over a period of 5 min when it is checked every 1 min it will scale up 1 instance. Similarly scale down by 1 instance if CPU utilization is below 40%.
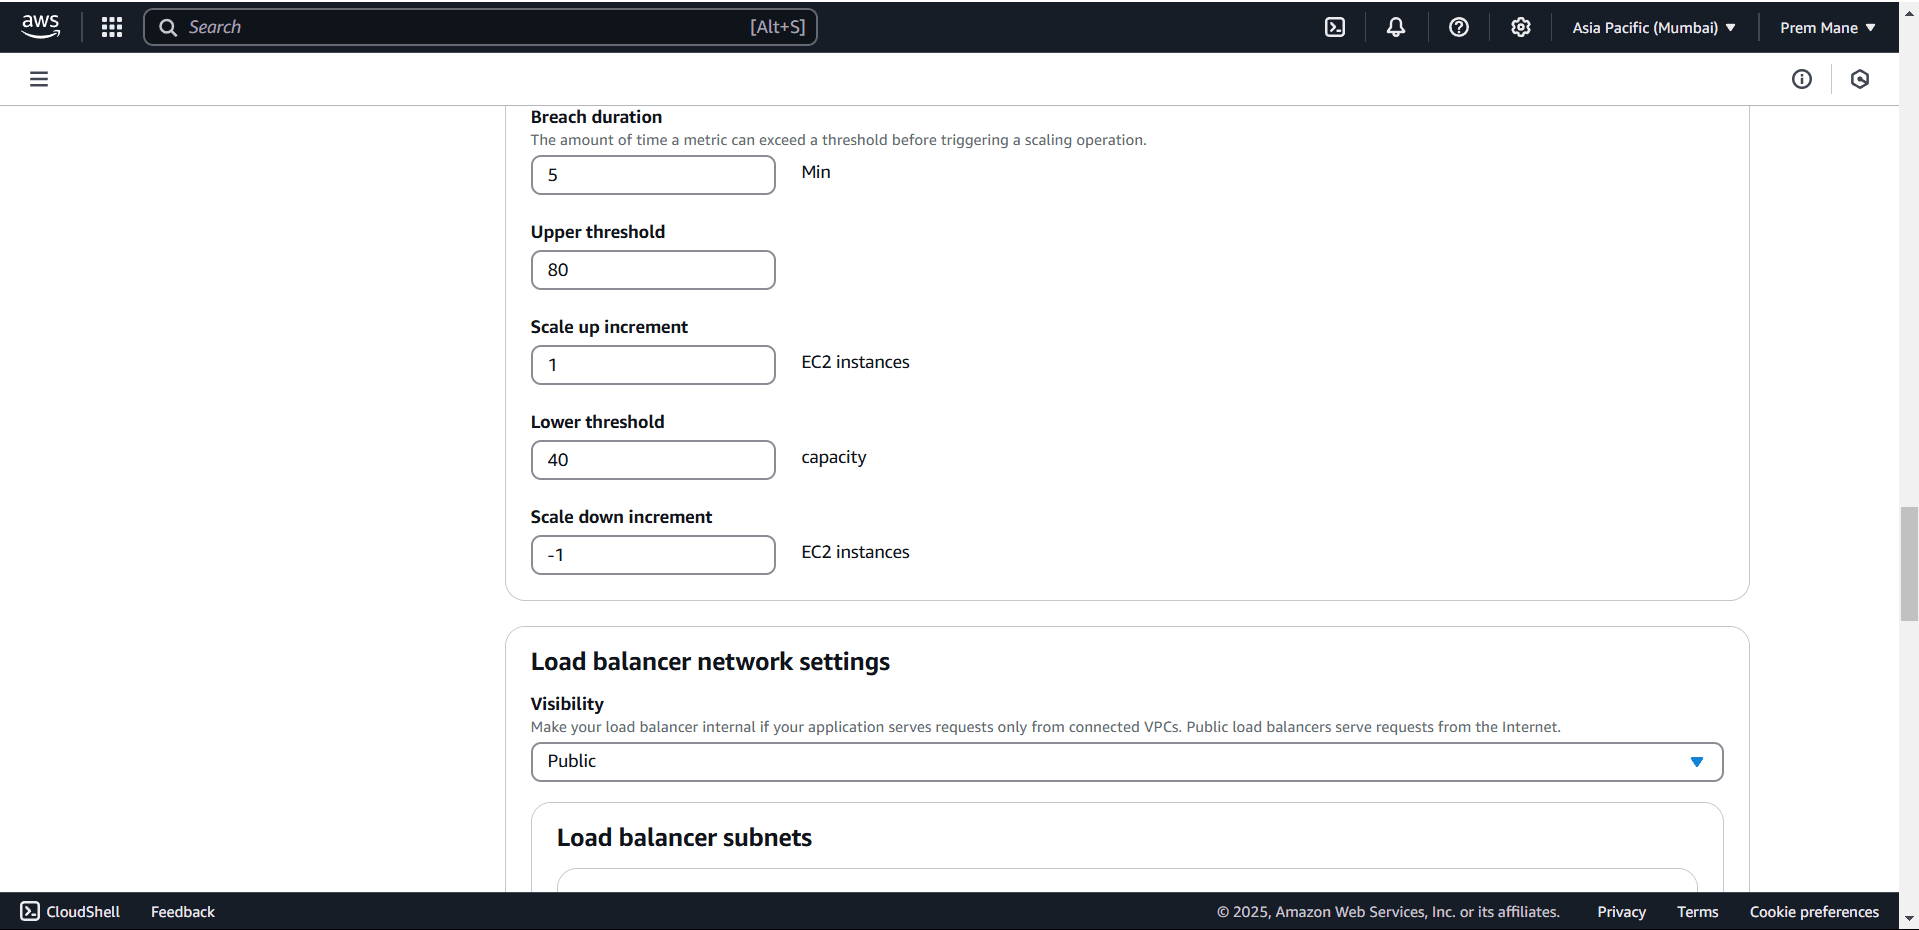
Next Scroll down you will get Load balancer network settings, Keep visibility as public, you can make your load balancer internal if your application serves requests only from connected VPCs. Public load balancers serve requests from the Internet. We will keep public.
Also select all Availability zones for your load balancer subnets.
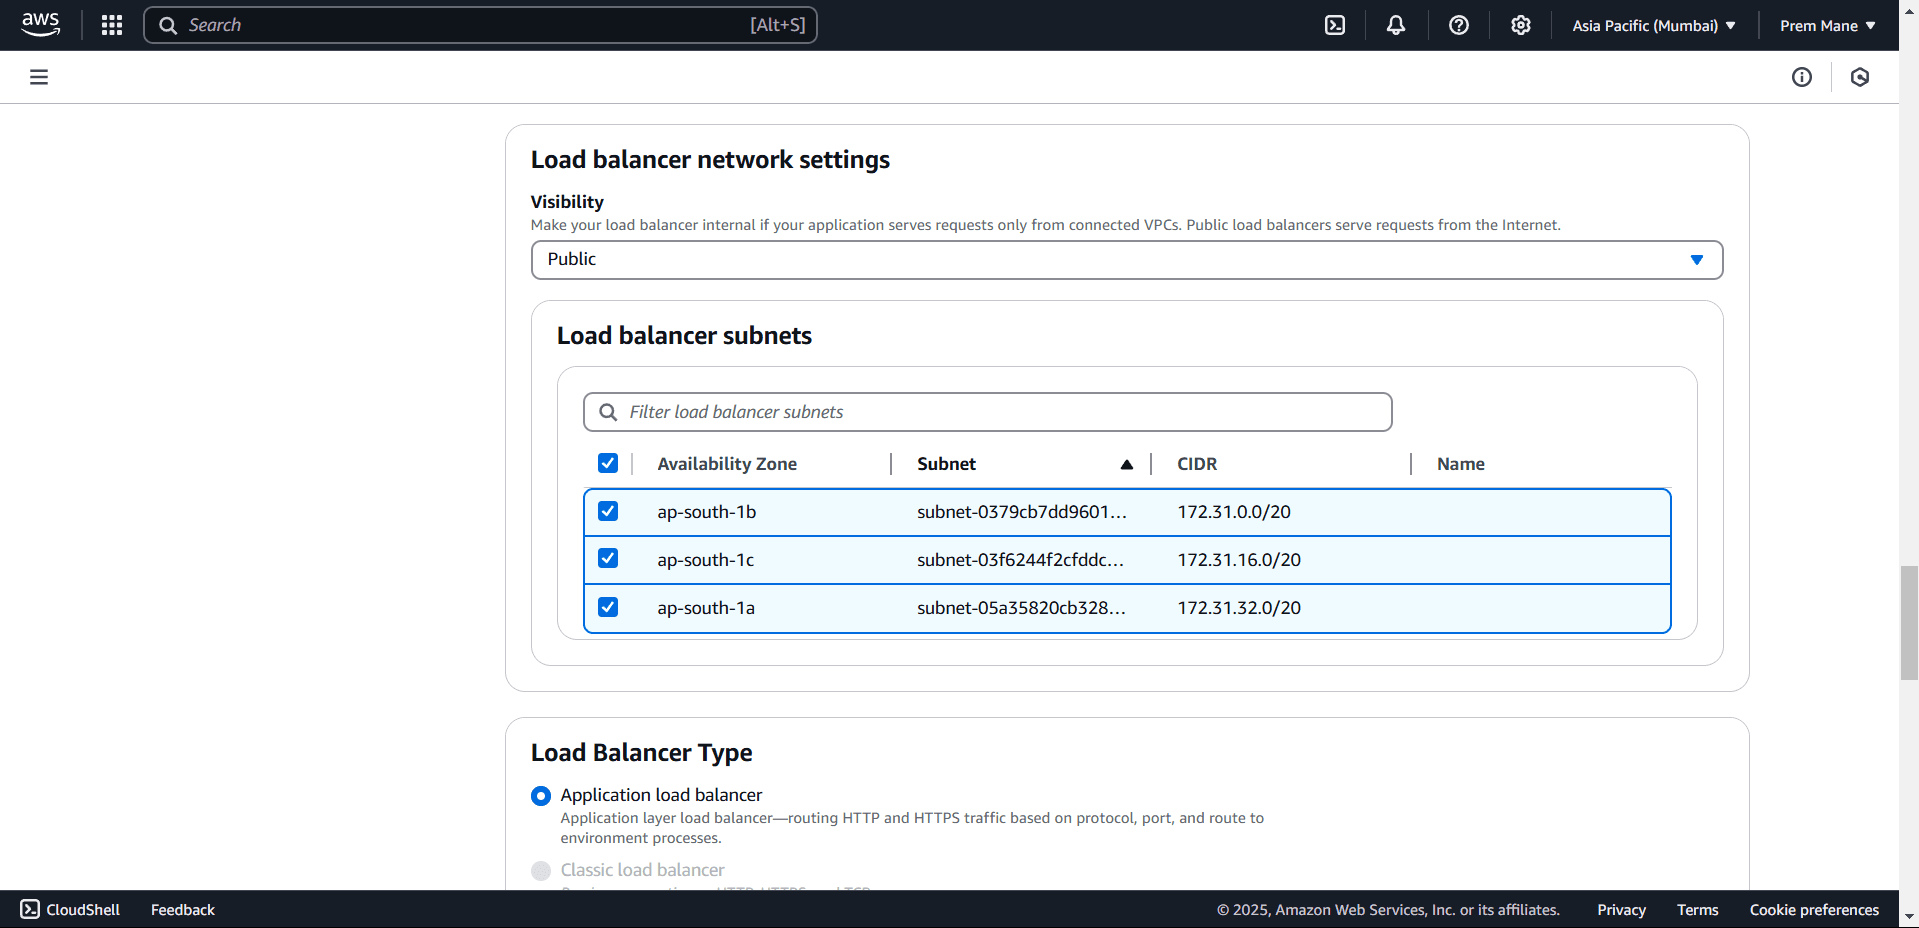
Next scroll down and select Application load balancer and dedicated, Under listeners keep default port as 80, protocol HTTP and enabled.
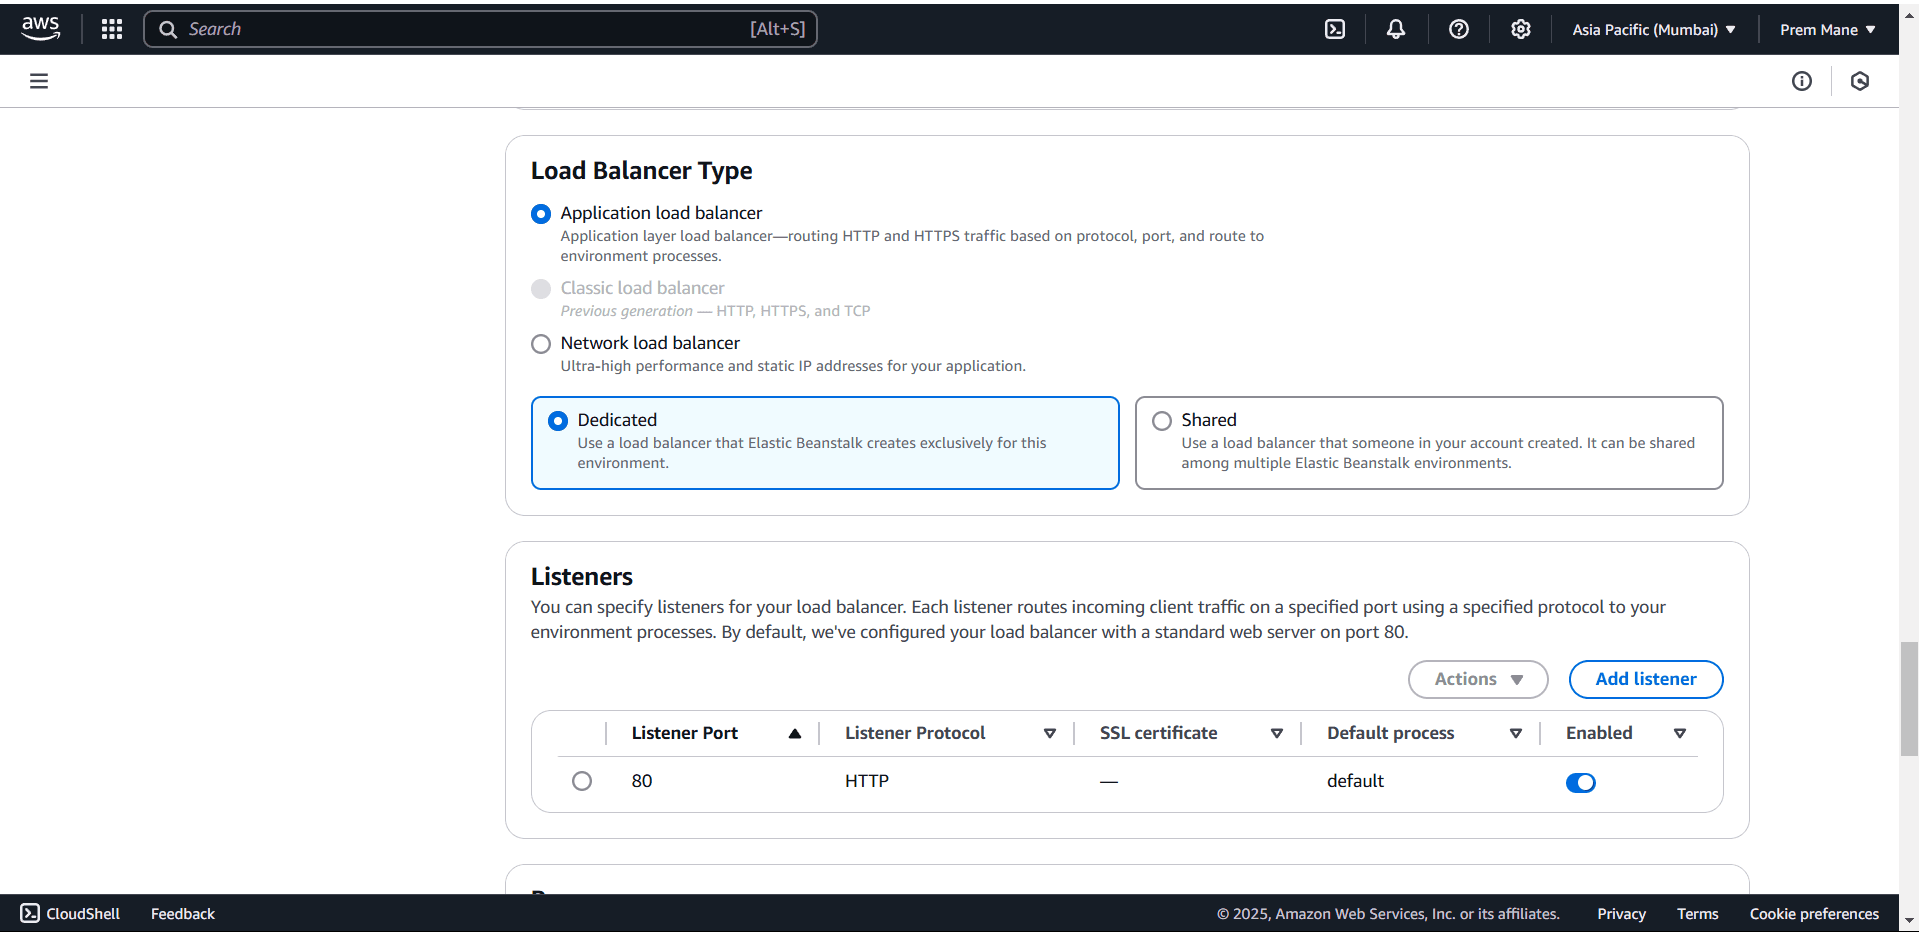
Next in processes you will see the health check and default it is “/” path, for that in your project you have to add controller for health check also.
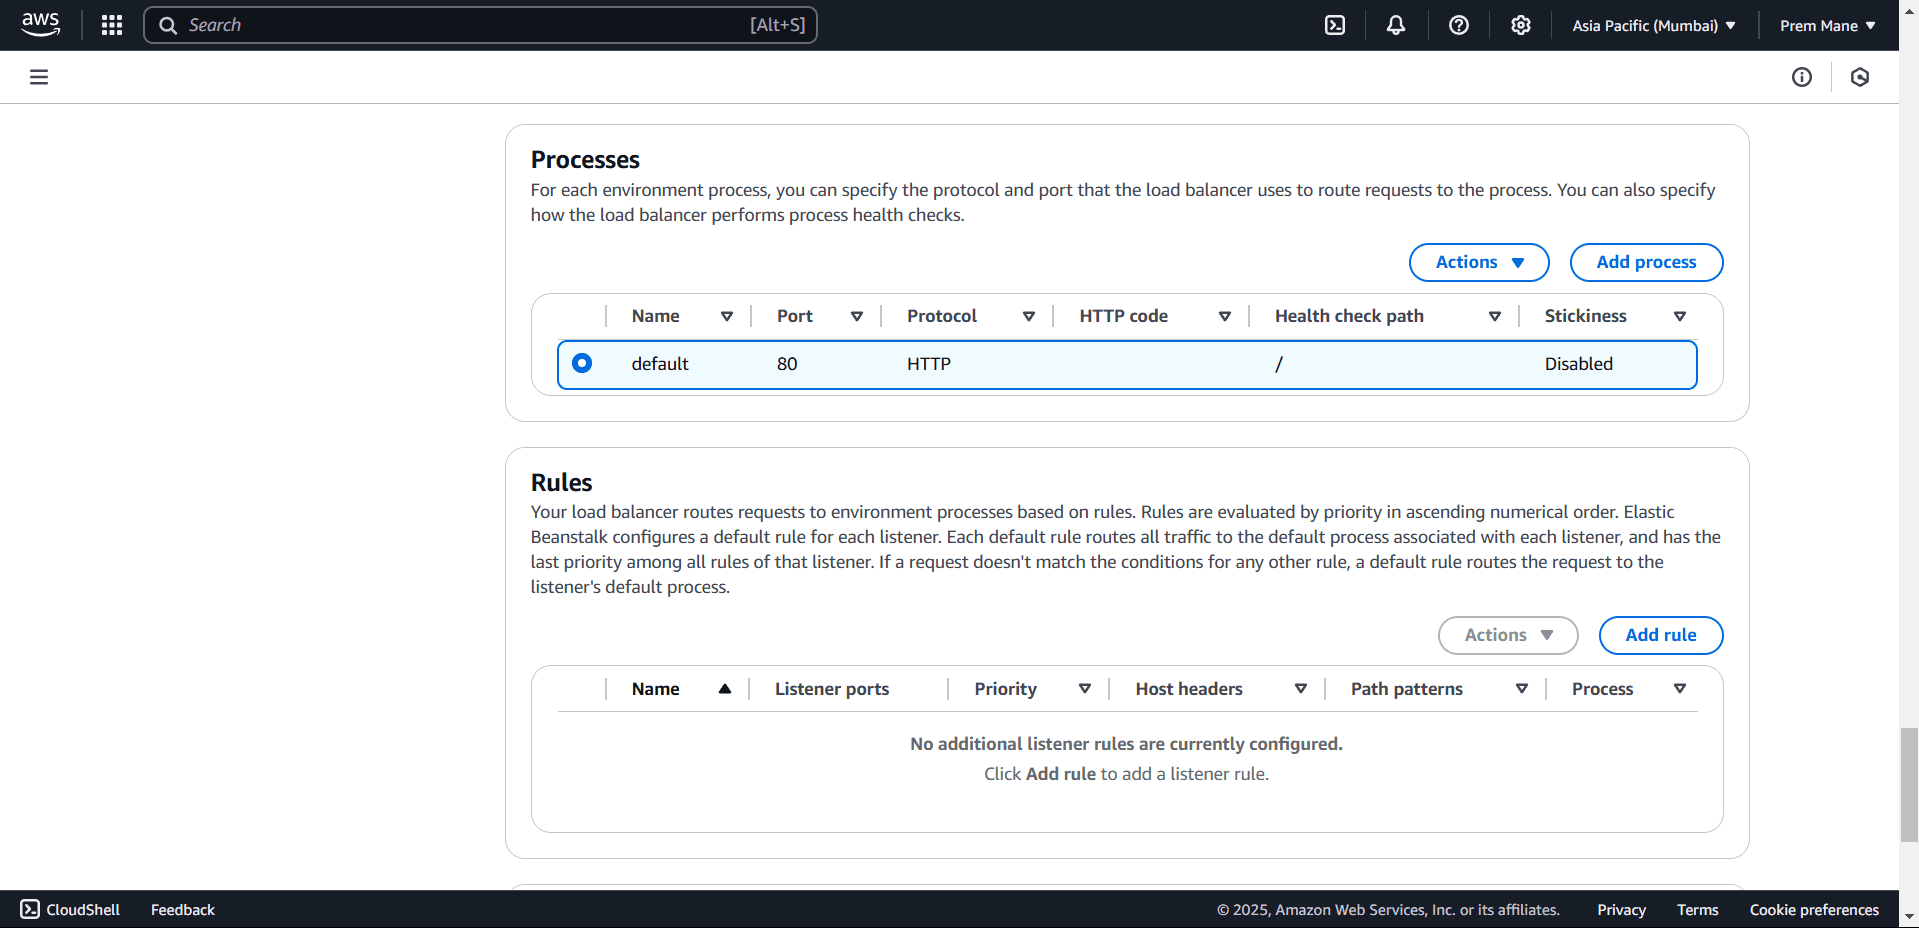
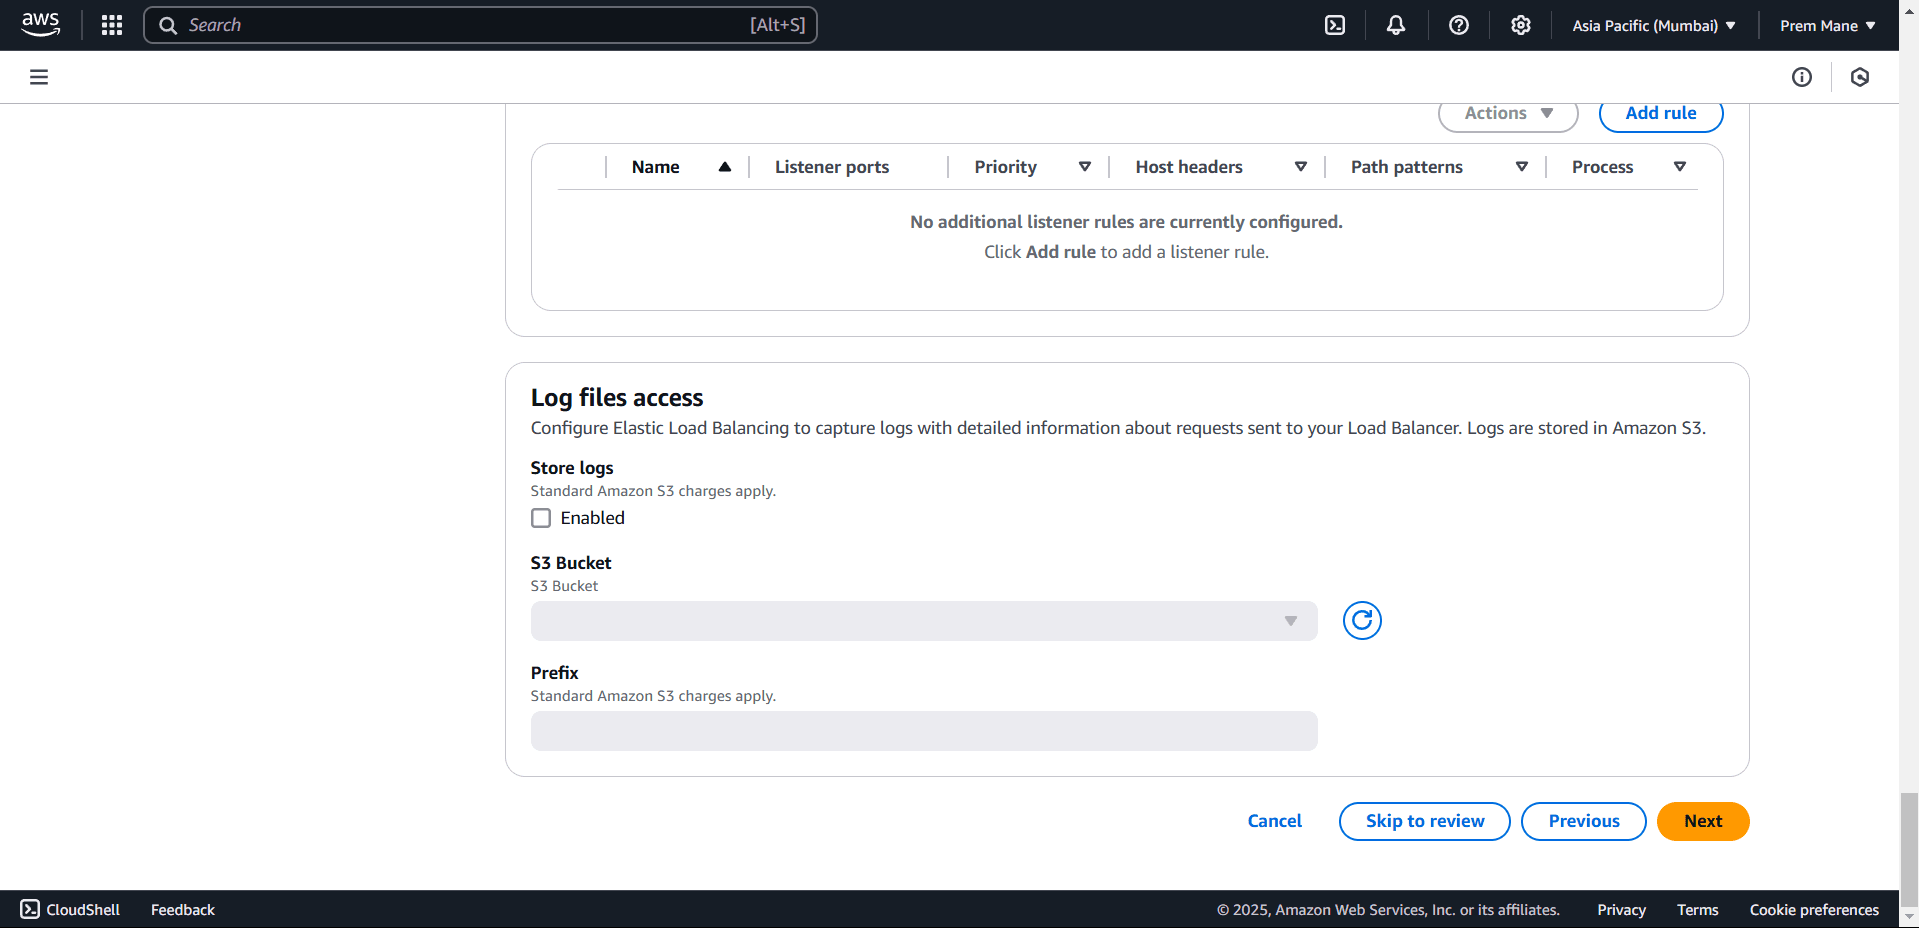
Next scroll down and keep everything default, you can configure Elastic Load Balancing to capture logs with detailed information about requests sent to your Load Balancer. Logs are stored in Amazon S3 by enbling it.
After that click next button to go to next step.
Step 5:- Configure updates, monitoring, and logging#
In the next step, in monitoring section select basic monitoring and keep rest as default.
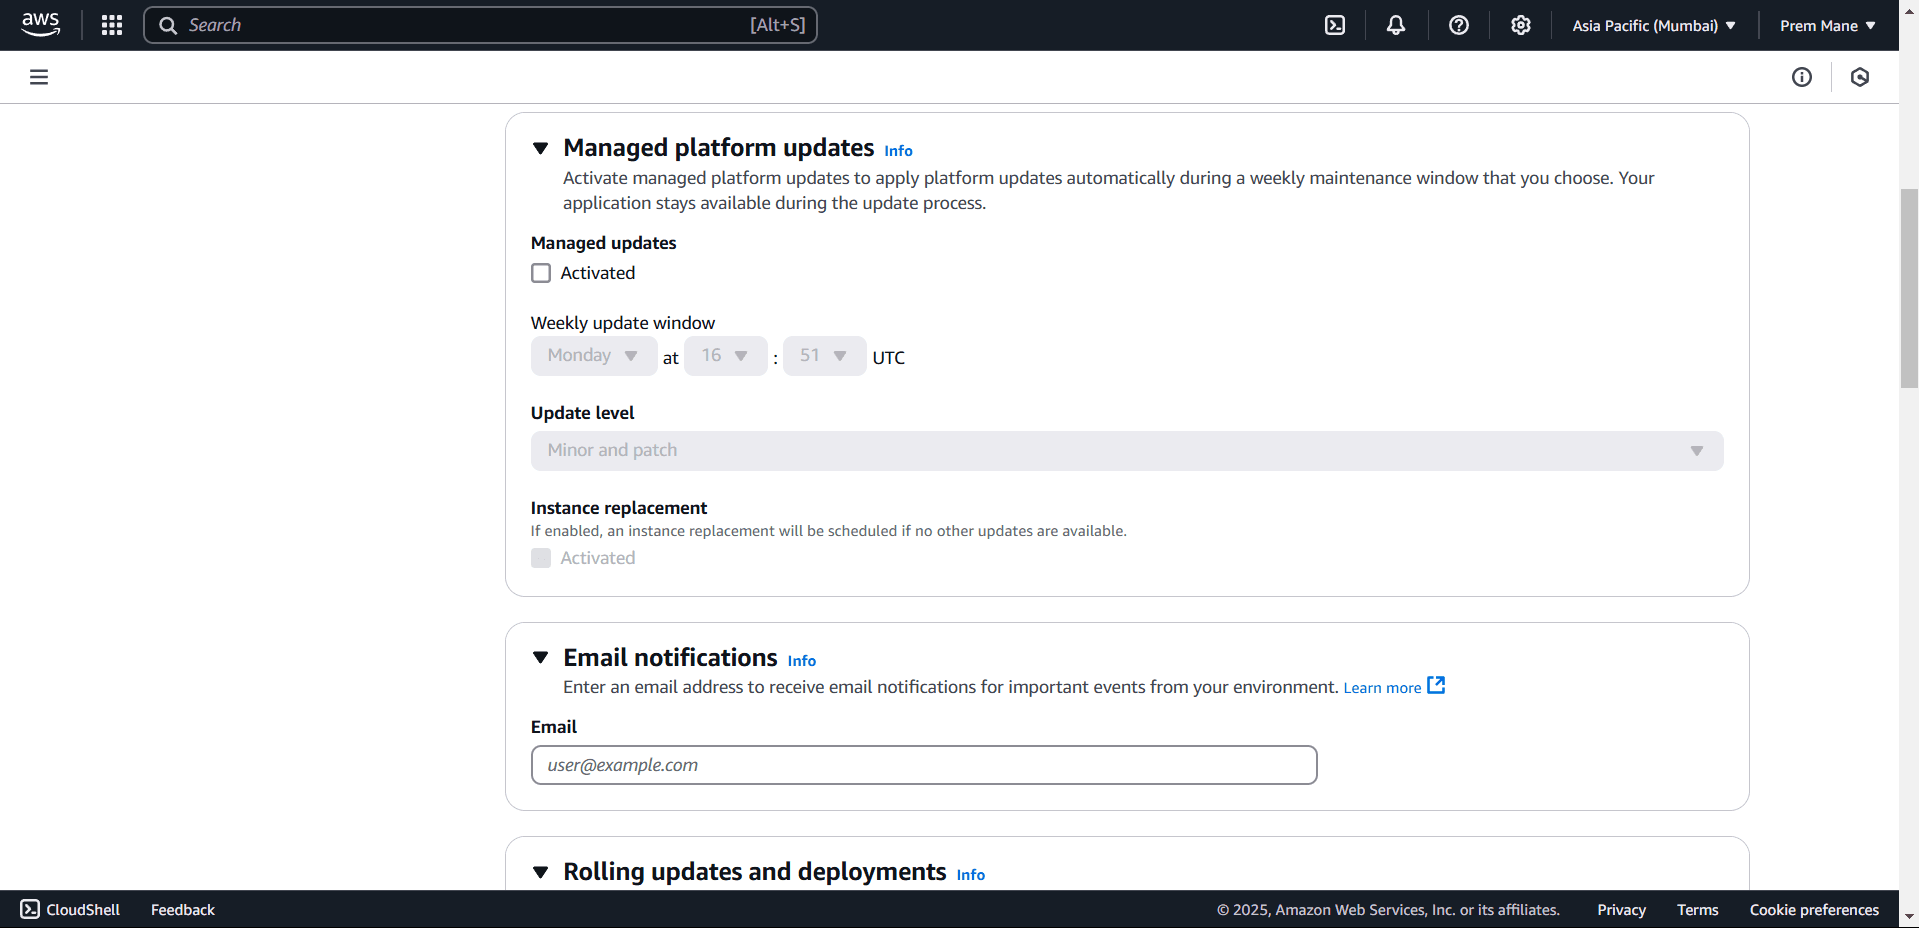
You can activate managed platform updates to apply platform updates automatically during a weekly maintenance window that you choose. Your application stays available during the update process. For now we will not activate, you can also give email to receive email notifications for important events from your environment.
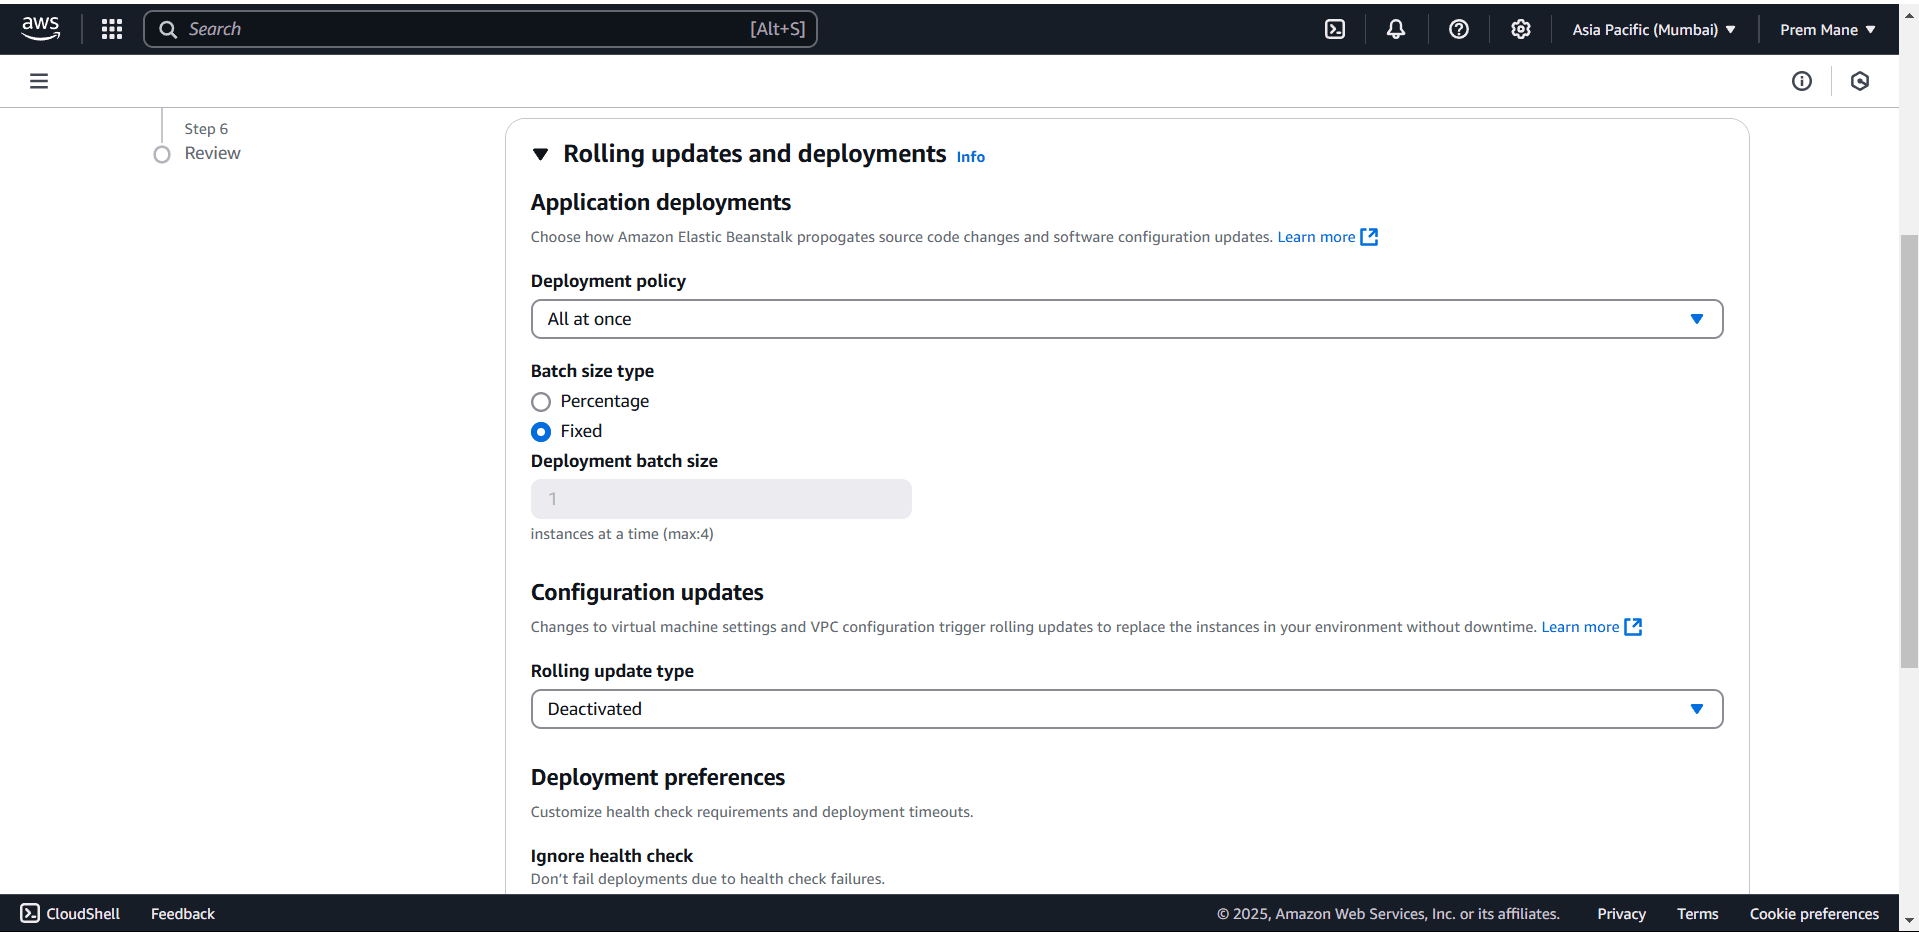
Next scroll down you will see Rolling updates and deployments, In Application deployments section Choose all at once Amazon Elastic Beanstalk propogates source code changes and software configuration updates also choose Fixed Batch size type. Rest keep all default.
Next scroll down and you will get Environment properties settings under Platform software section, here you have to add all the environment properties required for your spring boot application and click next button, rest click all default under Platform software section.
The following properties will be passed in the application as environment properties, After doing so click on next button to go to finat step.
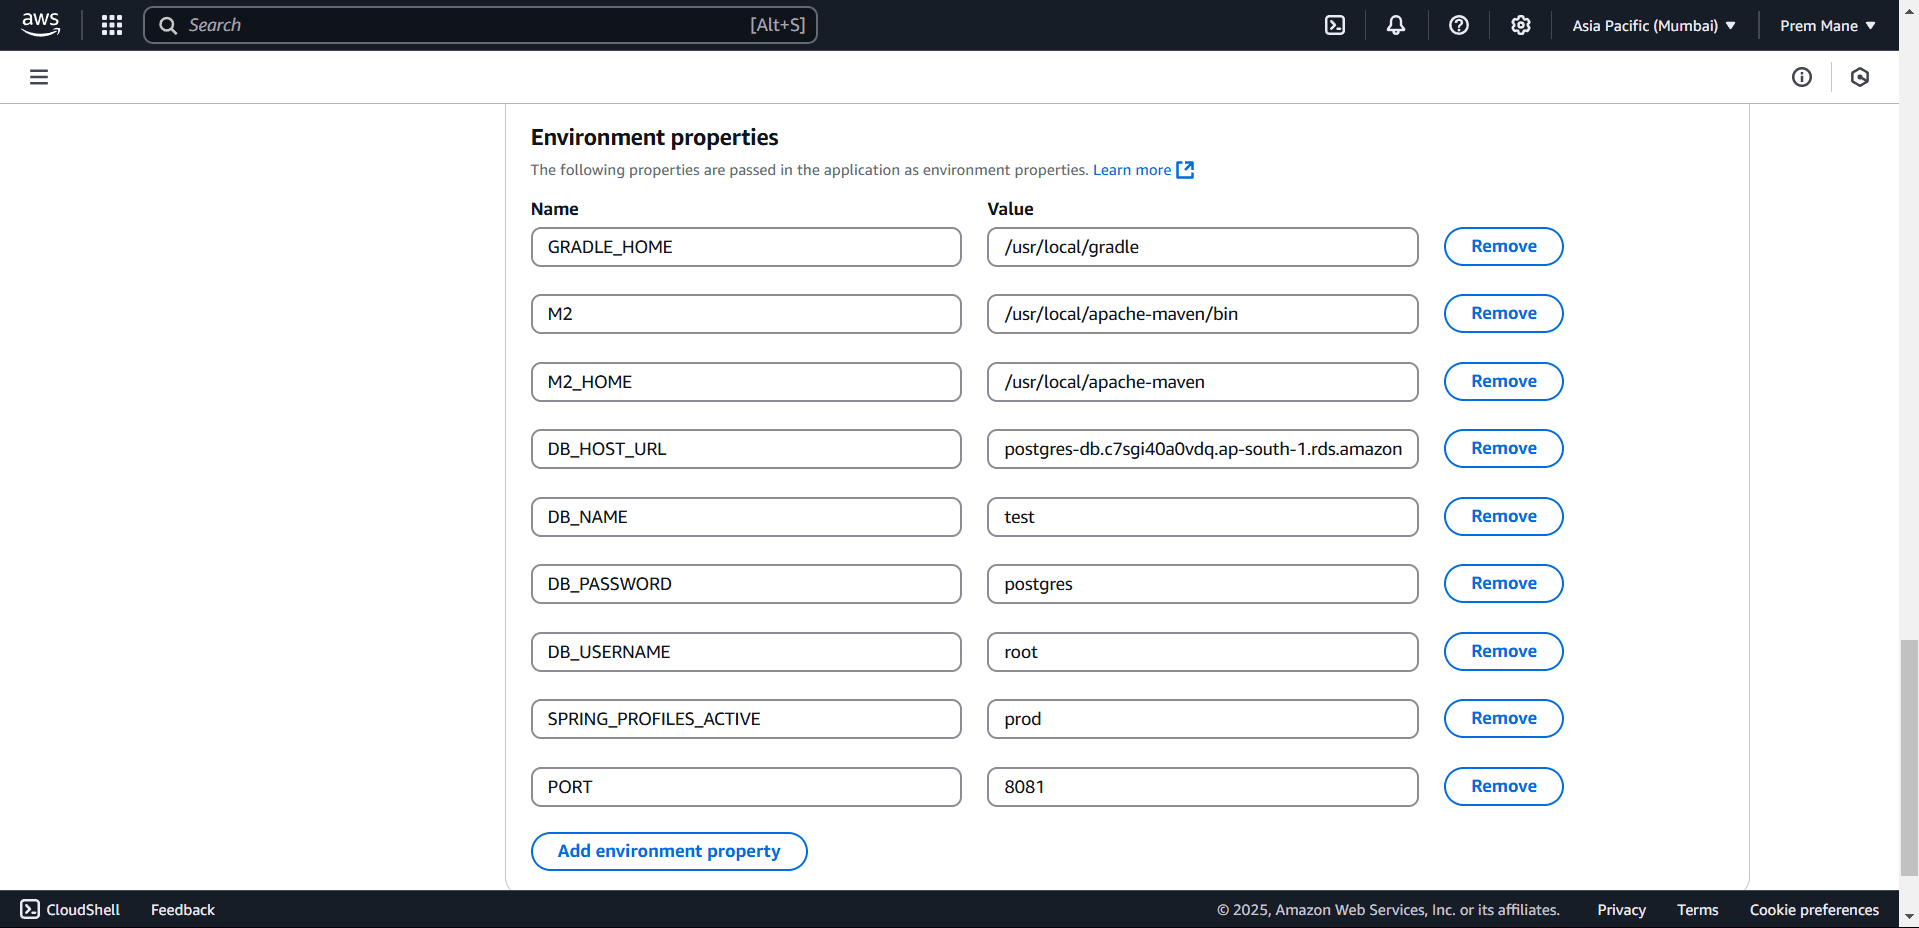
Note:- make sure that your application.propertie files has the same environment variables which you have created.
Step 6:- Review#
On the last step review all configuration and click on submit button.
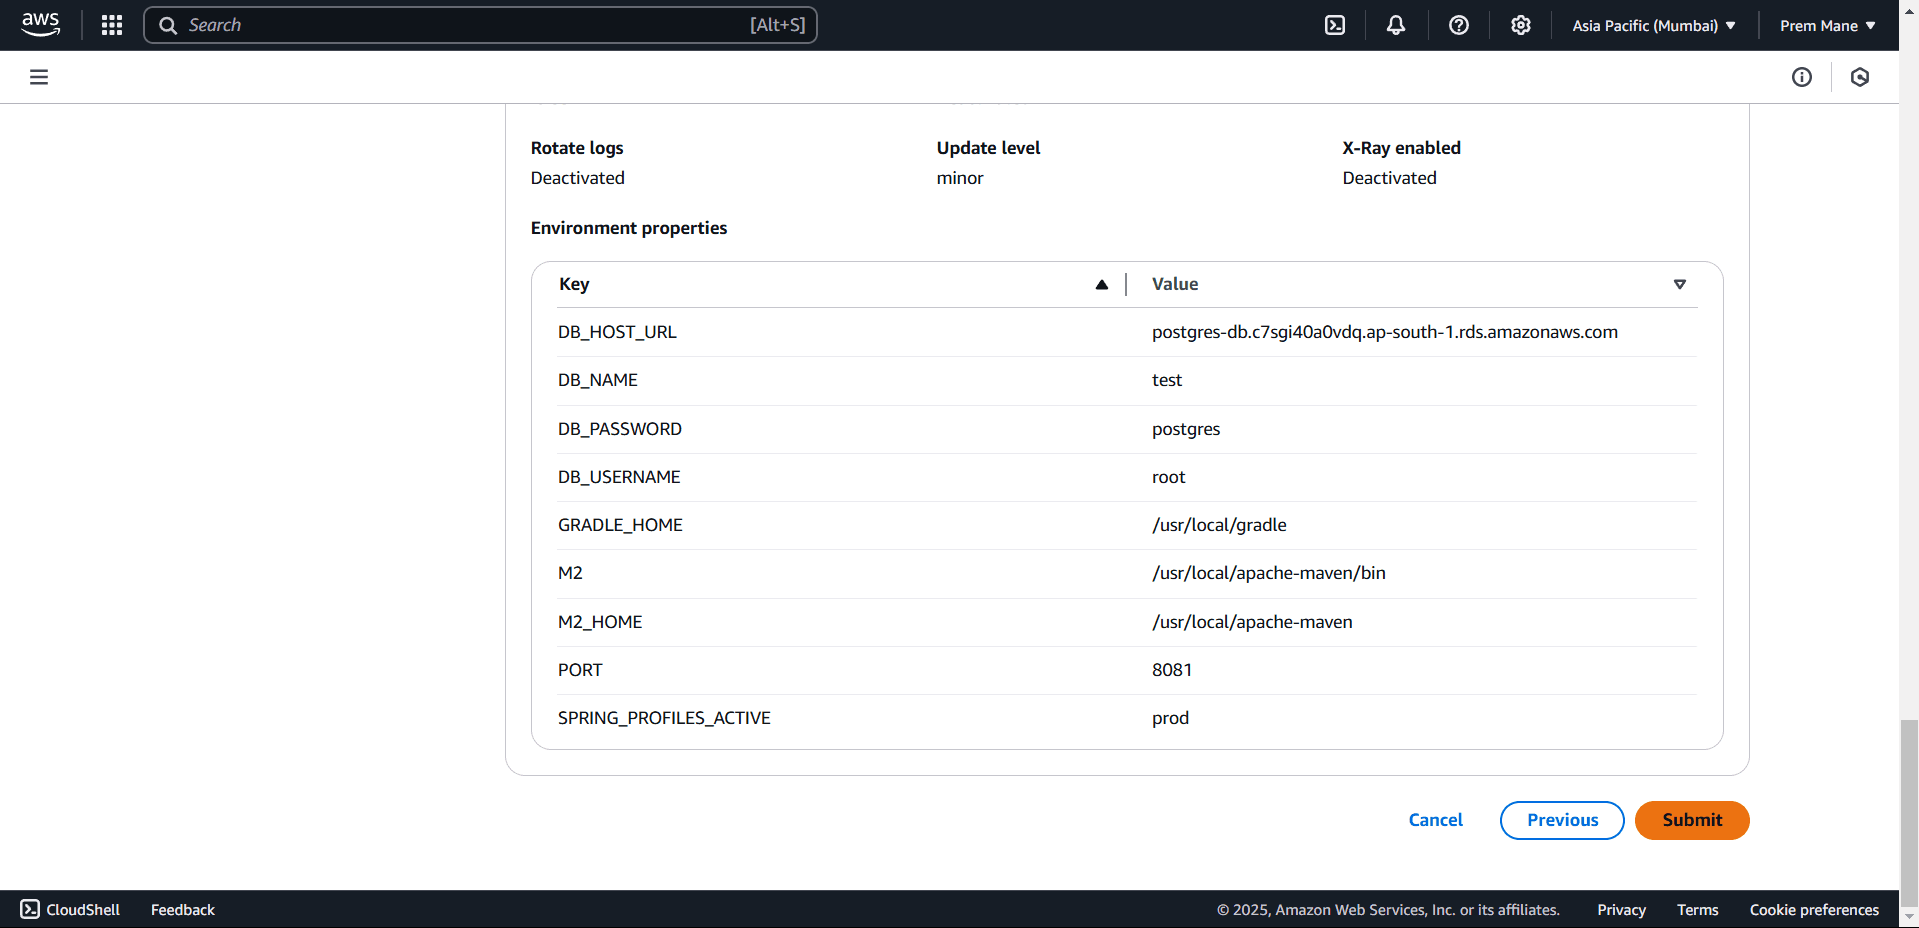
After that Elastic Beanstalk will launch your environment, it takes few minutes to launch the environment .
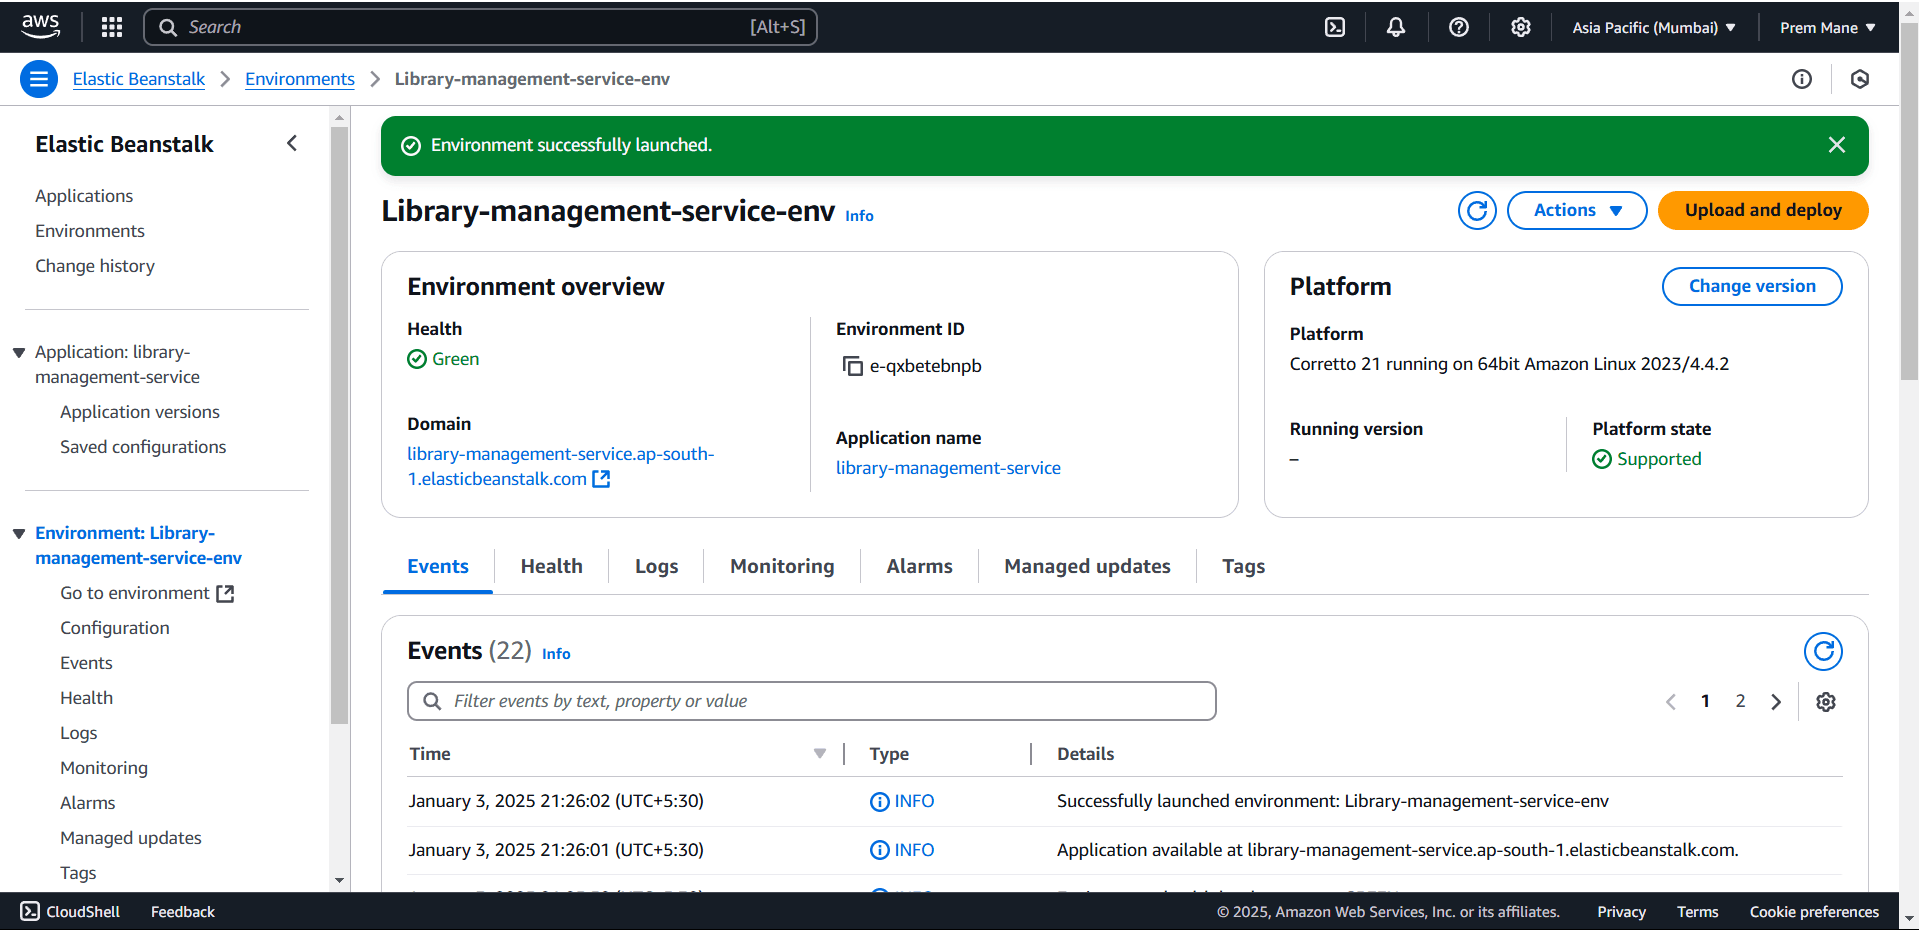
Once the environment is launched successfully, you can see that health status is green under Environment overview section, you can verify that the simple web application is running by just pasting the url in browser which is present under Domain in Environment overview.
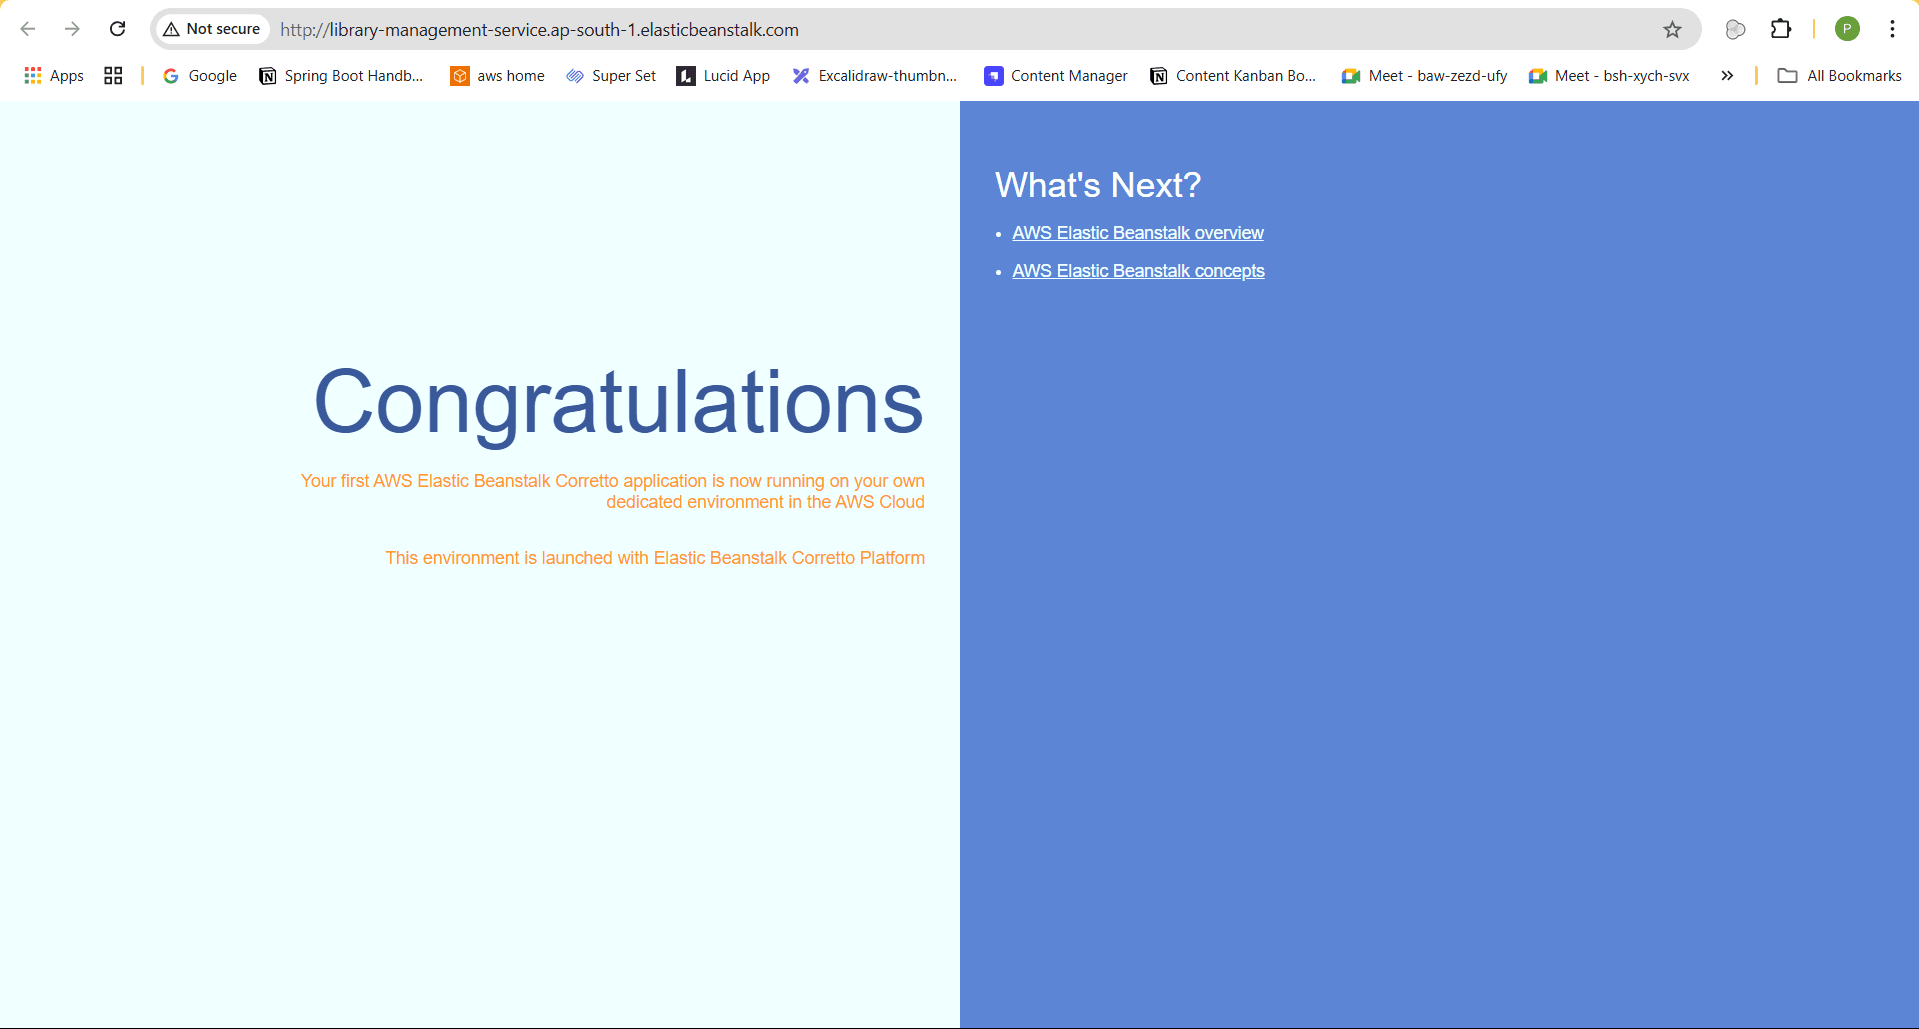
You will see this page once you paste the domain url in browser. This is the sample application which elastic beanstalk deployed for us. Now we have to deploy our spring boot library-management application in this environment.
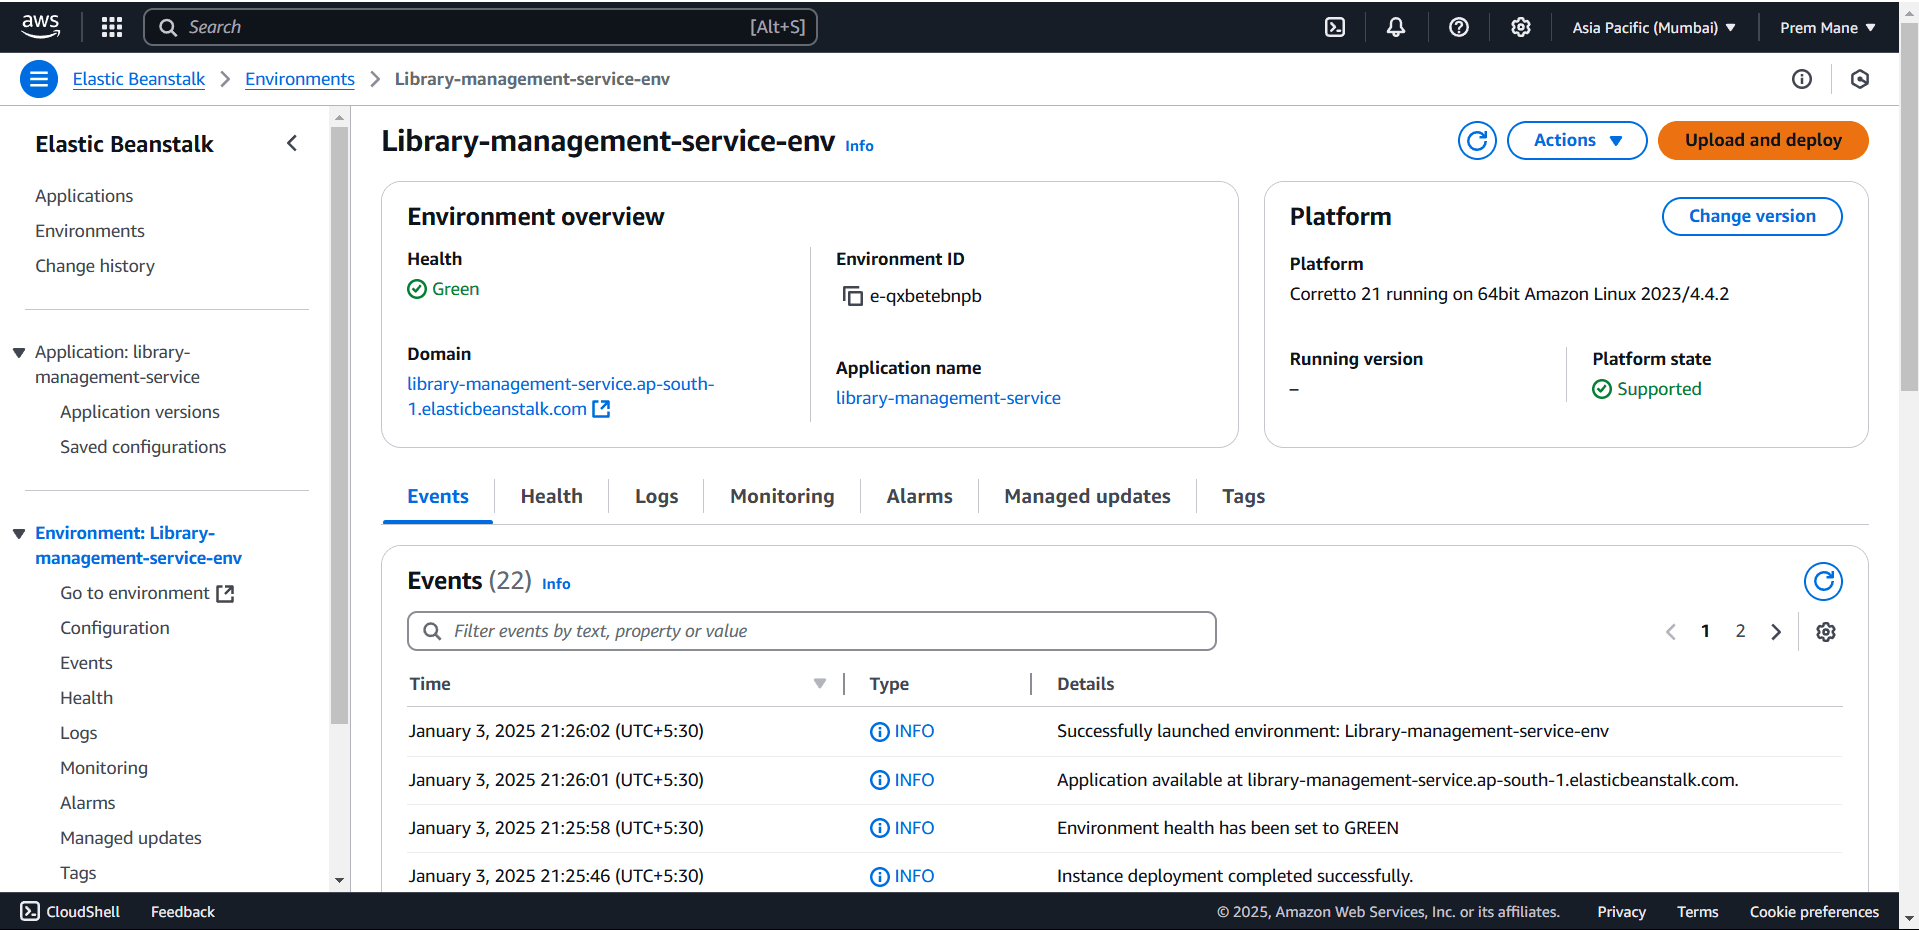
Deploying spring boot application on Elastic Beanstalk environment#
To deploy you spring boot application on elastic beanstalk environment, first build the jar file of your spring boot application.
Go to your elastic beanstalk environment in aws and click on upload deploy button which is present at top right corner.
You will get this pop-up click on choose file button and select the jar file of your spring boot application. You will get jar file under the target folder after doing maven package.
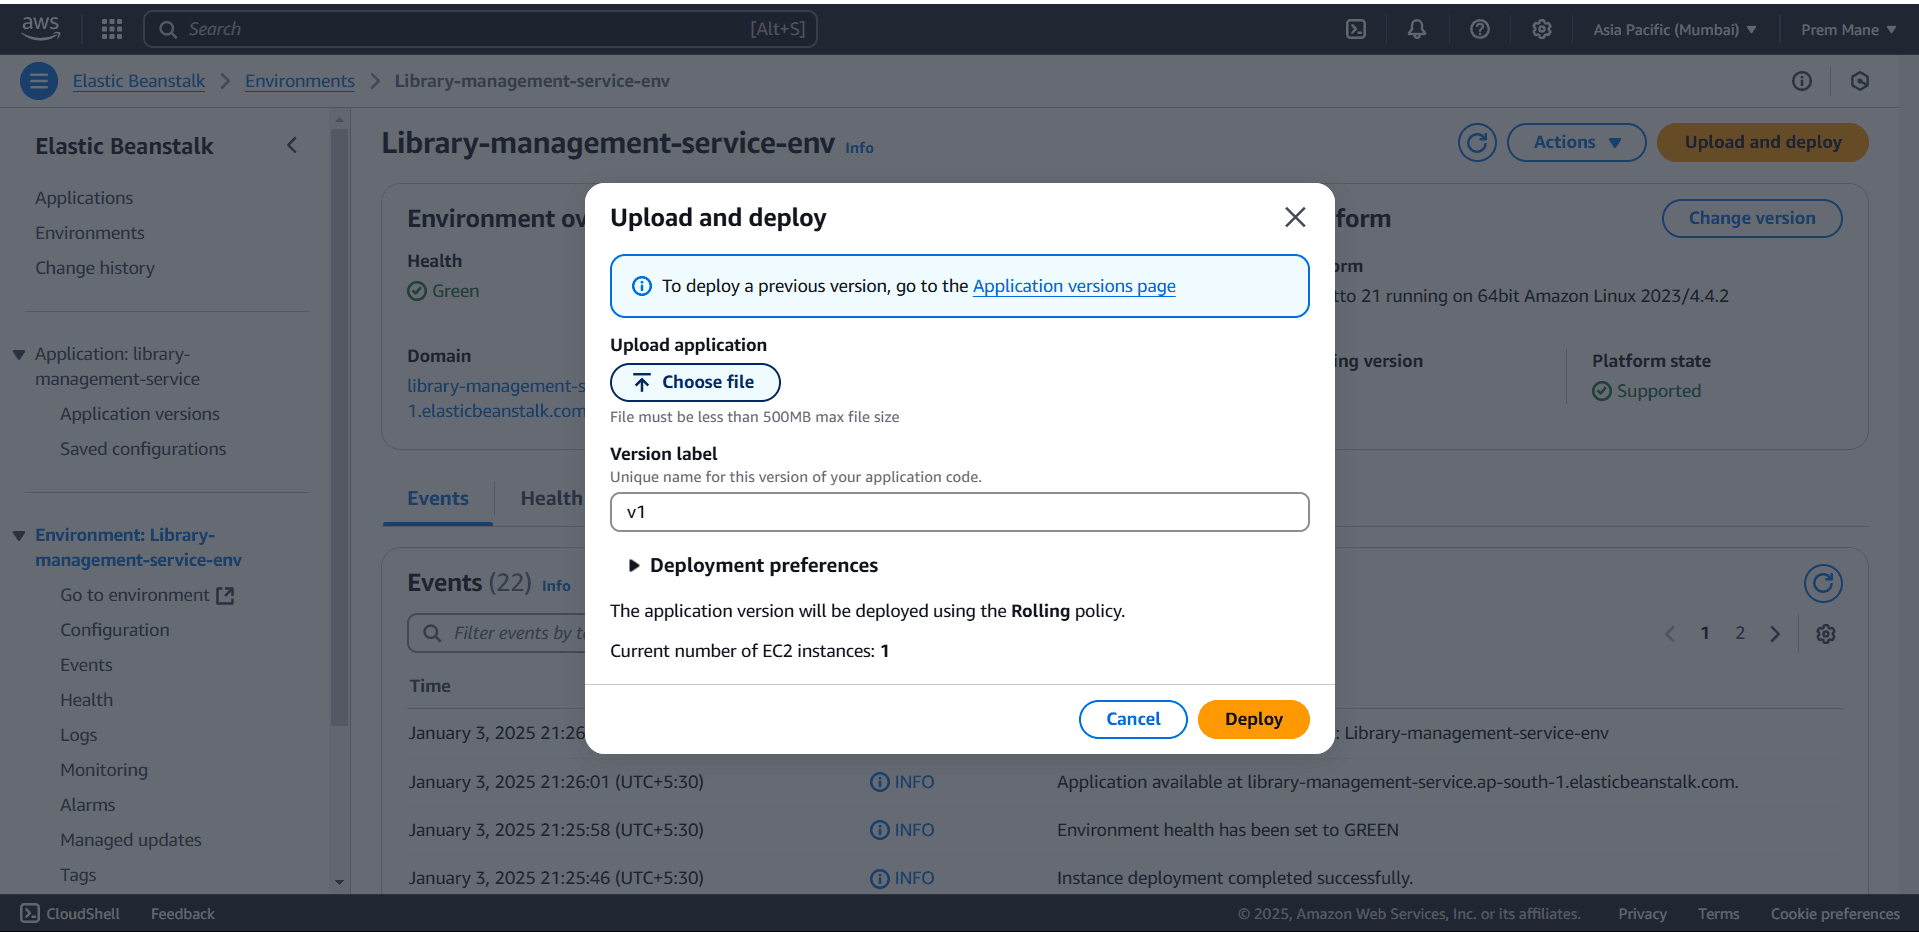
In the version label give v1 and you can edit the deployment preferences, but we will keep the default one “Rolling” and click on deploy button.
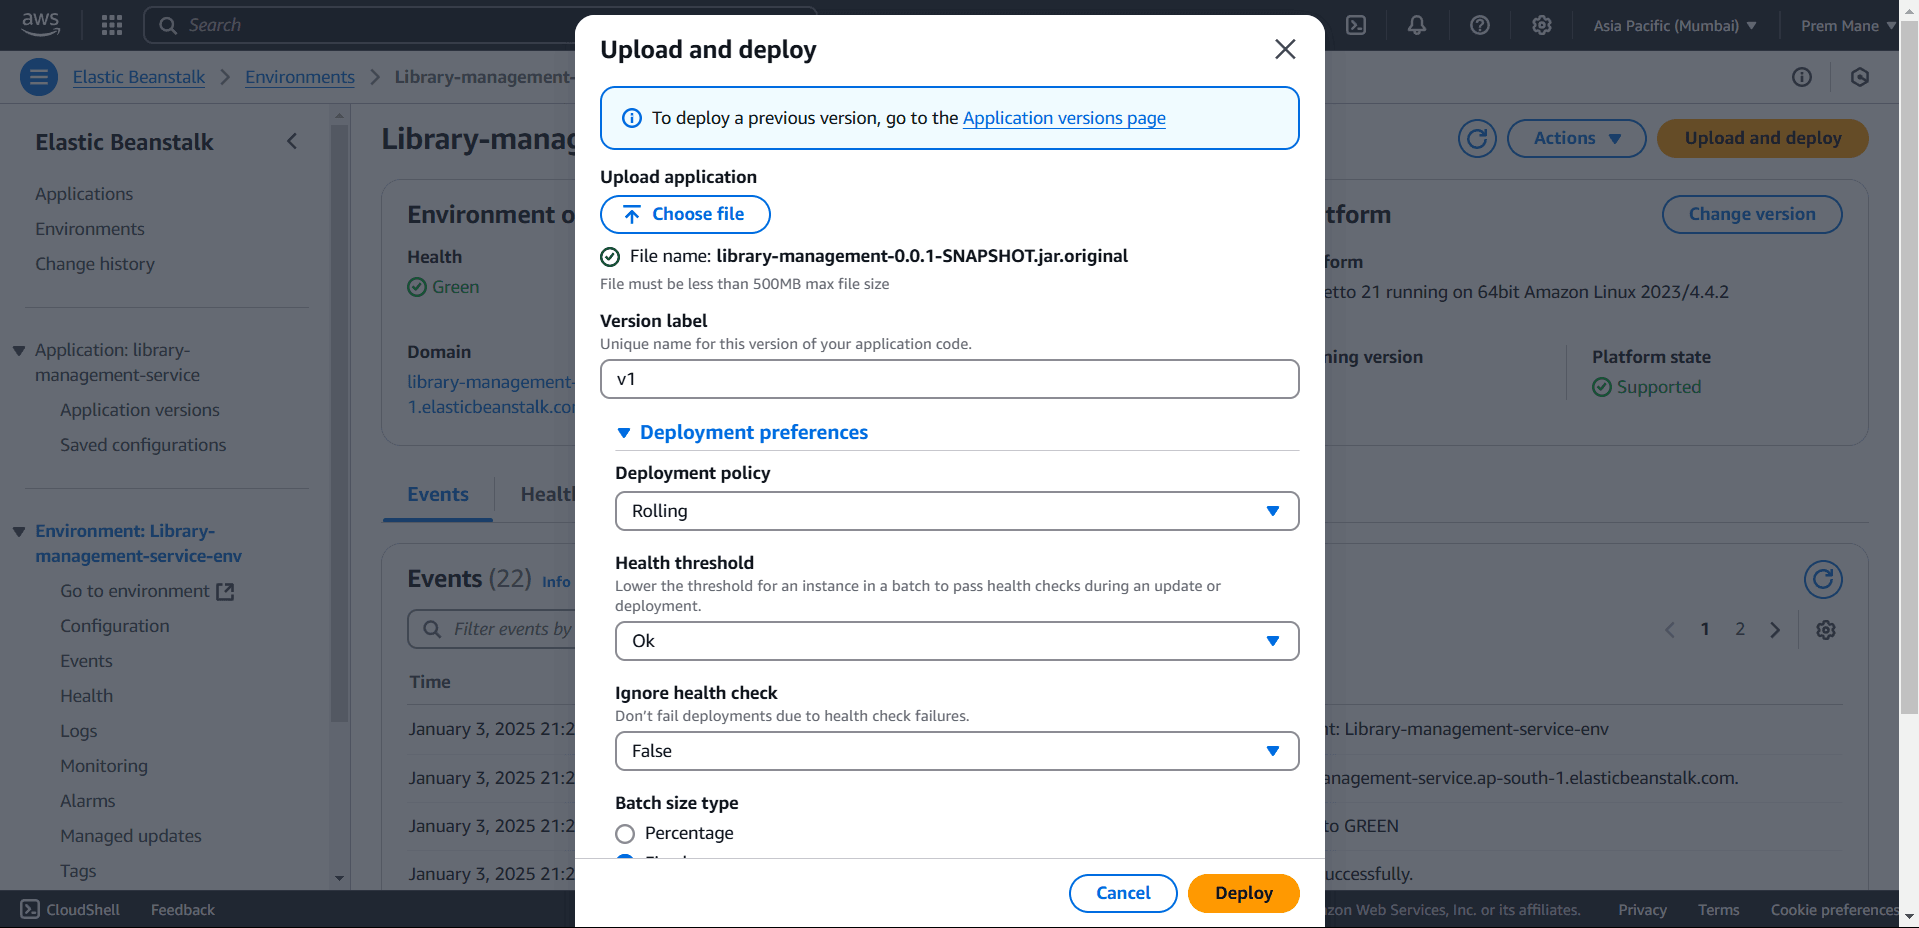
After few minutes elastic beanstalk will deploy your spring boot application to ec2 instances.
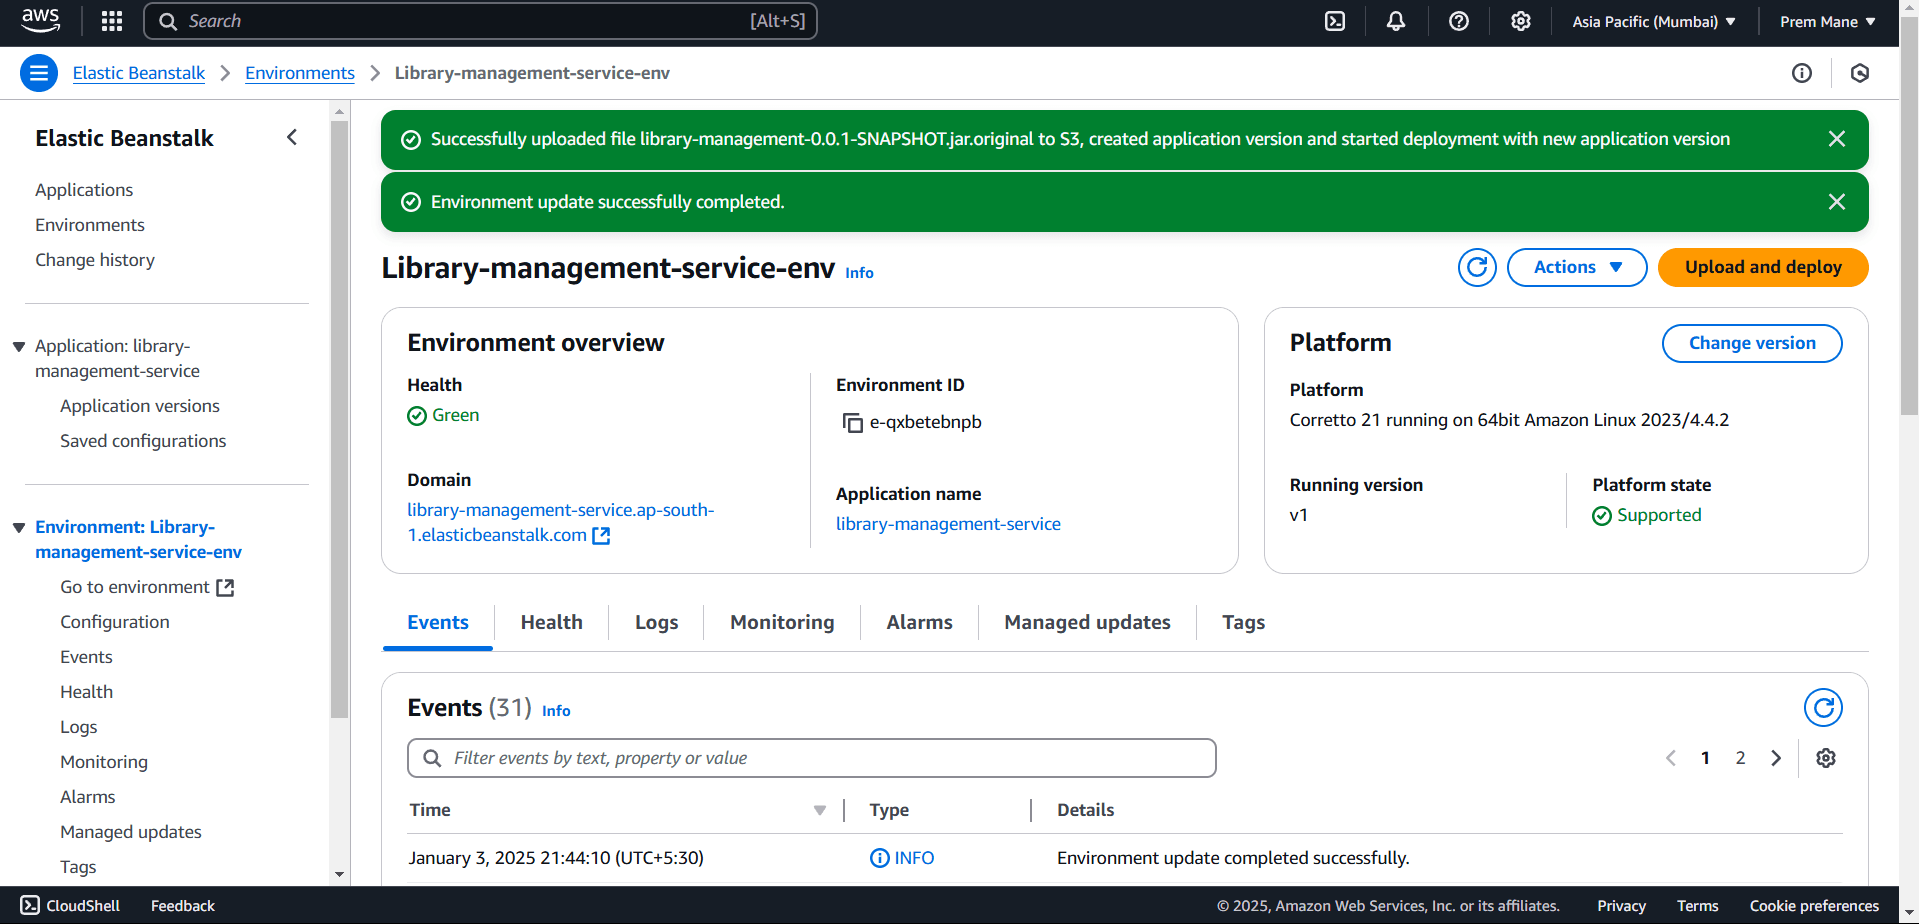
After successful deployment, you will be able to access the application by simply pasting the domain URL in browser and you will get the OK response from the Health Controller.

Conclusion#
Deploying a Spring Boot application on AWS Elastic Beanstalk is a streamlined process that abstracts much of the complexity of infrastructure management. By following the steps outlined, you can set up a robust and scalable environment to host your application. AWS Elastic Beanstalk not only simplifies deployment but also offers flexibility in scaling and monitoring, making it an excellent choice for developers looking to focus on building applications rather than managing servers. With your application now live, you can leverage AWS's features to enhance performance and reliability as your needs grow.
Want to Master Spring Boot and Land Your Dream Job?
Struggling with coding interviews? Learn Data Structures & Algorithms (DSA) with our expert-led course. Build strong problem-solving skills, write optimized code, and crack top tech interviews with ease
Learn more