Spring Security is Really Not that Hard. Internal working of Spring Security

    Spring Security is Really Not that Hard. Internal working of Spring Security

    This blog simplifies the inner workings of Spring Security, explaining key concepts like authentication, authorization, and filters. It covers the default behavior when adding spring-boot-starter-security, the role of DaoAuthenticationProvider, and the authentication flow, including how user credentials are validated and secured using JWT.

    default profile

    Santosh Mane

    January 06, 2025

    12 min read

    When it comes to securing applications, Spring Security is often considered a complex and intimidating framework. However, once you understand how it works under the hood, you'll realize it's not as hard as it seems. This blog will break down the internal workings of Spring Security in a simple and approachable way. We will understand what happens internally when you enter a username and password and how it validates that it is really you.

    The Core Concepts of Spring Security#

    Before diving into its internal workings, let’s clarify some core concepts:

    • Authentication: Verifying the identity of a user (e.g., checking username and password).
    • Authorization: Determining what resources or actions a user is allowed to access.
    • Filters: Intercepting requests and applying security logic before they reach the application.
    • Security Context: Holding security-related information for the current user, such as their identity and roles.

    Let’s understand the working of spring security#

    Once you add the spring-boot-starter-security dependency in the pom.xml file Spring boot auto-configured the security with sensible defaults defined in WebSecurityConfiguration class.

    <dependency> <groupId>org.springframework.boot</groupId> <artifactId>spring-boot-starter-security</artifactId> </dependency>
    @Configuration @EnableWebSecurity @RequiredArgsConstructor @EnableMethodSecurity(securedEnabled = true) public class WebSecurityConfig { private final JwtAuthFilter jwtAuthFilter; private final OAuth2SuccessHandler oAuth2SuccessHandler; private static final String[] publicRoutes = { "/error", "/auth/**" }; @Bean SecurityFilterChain securityFilterChain(HttpSecurity httpSecurity) throws Exception { httpSecurity .authorizeHttpRequests(auth -> auth .requestMatchers(publicRoutes).permitAll() .anyRequest().authenticated()) .csrf(csrfConfig -> csrfConfig.disable()) .sessionManagement(sessionConfig -> sessionConfig .sessionCreationPolicy(SessionCreationPolicy.STATELESS)) .addFilterBefore(jwtAuthFilter, UsernamePasswordAuthenticationFilter.class) return httpSecurity.build(); } @Bean AuthenticationManager authenticationManager(AuthenticationConfiguration config) throws Exception { return config.getAuthenticationManager(); } @Bean PasswordEncoder passwordEncoder() { return new BCryptPasswordEncoder(); } }

    In a Spring Boot application, SecurityFilterAutoConfiguration automatically registers the DelegationFilterProxy filter with the name springSecurityFilterChain.
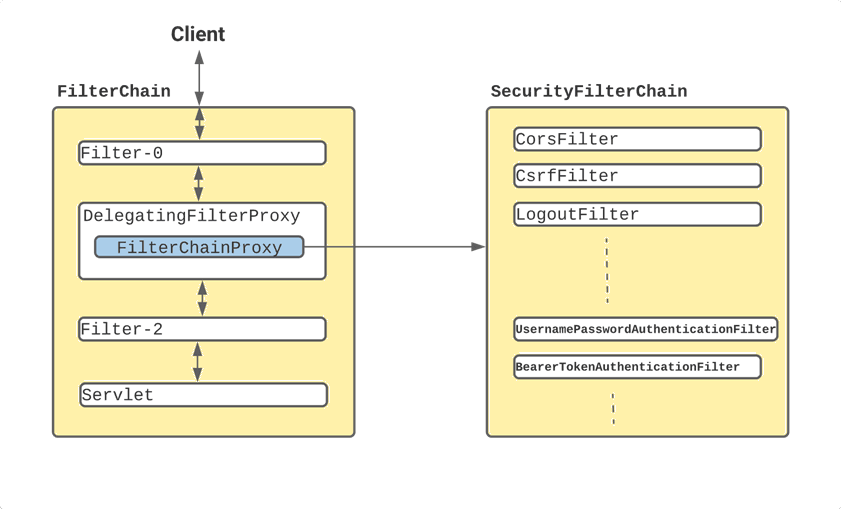
    Spring Security Filter Chain

    From the above image you can understand that when client or user makes a request the request has to go through lot of filters as shown in above image before it reaches the Dispatcher servlet and from there to controllers.

    So Once the request reaches to DelegatingFilterProxy, Spring delegates the processing to FilterChainProxy bean that utilizes the SecurityFilterChainProxy bean that utilizes the SecurityFilterChain to execute the list of all filters to be invoked for the current request.

    So basically when you add the spring-boot-starter-security dependency it do’s the following things:

    1. Creates a bean named springSecurityFilterChain. Registers the filter with a bean named springSecurityFilterChain with the Servlet container for every request.
    2. HTTP basic authentication for authenticating requests made with remoting protocols and web services.
    3. Generate a default login form.
    4. Creates a user with a username of user and a password that is logged to the console.
    5. Protect the password storage with BCrypt.
    6. Enables logout feature.
    7. Enables other features such as protection from CSRF attacks and session fixation.

    So this is all that you get by default when you add spring-boot-starter-security dependency.

    Now Let’s Understand the internal working of spring security#

    When user login at that time In order to authenticate the user against the user present in database or not with correct credentials, we need to make use of DaoAuthenticationProvider which is one of the AuthenticationProvider.

    And for that we need to create the bean of AuthenticationManager in Confiuration class also we have to create bean for passwordEncoder with this we will be able to encode the user password during authentication process and will be used by DaoAuthenticationProvider.

    @Configuration @EnableWebSecurity public class WebSecurityConfig { @Bean AuthenticationManager authenticationManager(AuthenticationConfiguration config) throws Exception { return config.getAuthenticationManager(); } @Bean PasswordEncoder passwordEncoder() { return new BCryptPasswordEncoder(); } }

    Once we do this, we need to make our User entity class implement the UserDetails interface and override methods like getPassword() and getUsername(). This is necessary because Spring Security requires an implementation of UserDetails to understand which fields in the User entity should be used for authentication (e.g., username and password). Additionally, the UserDetails interface helps specify which field in the entity will hold the roles or authorities of the user, enabling Spring Security to manage authorization effectively.

    @Getter @Setter @Entity @NoArgsConstructor @AllArgsConstructor @ToString @Builder public class User implements UserDetails { @Id @GeneratedValue(strategy = GenerationType.IDENTITY) private Long id; @Column(unique = true) private String email; private String password; private String name; @ElementCollection(fetch = FetchType.EAGER) @Enumerated(EnumType.STRING) private Set<Role> roles; @Override public Collection<? extends GrantedAuthority> getAuthorities() { Set<SimpleGrantedAuthority> authorities = new HashSet<>(); roles.forEach( role -> { authorities.add(new SimpleGrantedAuthority("ROLE_"+role.name())); } ); return authorities; } @Override public String getPassword() { return this.password; } @Override public String getUsername() { return this.email; } }

    Next we have to create a UserService class which is going to be implemented by UserDetailsService and we have to override a method loadUserByUsername(String username).

    Implementing UserDetailsService and overriding loadUserByUsername(String username) is the standard way to integrate Spring Security with your user database. This method is invoked during authentication to fetch the user details by the provided username (or email in our case).

    @Service @RequiredArgsConstructor public class UserService implements UserDetailsService { private final UserRepository userRepository; private final ModelMapper modelMapper; private final PasswordEncoder passwordEncoder; @Override public UserDetails loadUserByUsername(String username) throws UsernameNotFoundException { return userRepository.findByEmail(username) .orElseThrow(() -> new BadCredentialsException("User with email "+ username +" not found")); } }

    During Login we will be providing the new object of UsernamePasswordAuthenticationToken, here the implementation class of AuthenticationManager is ProviderManager which will iterates through its configured AuthenticationProviders. It finds a Provider that supports the type of Authentication object it received (in this case, DaoAuthenticationProvider usually supports UsernamePasswordAuthenticationToken).

    @Service @RequiredArgsConstructor public class AuthService { private final AuthenticationManager authenticationManager; private final JwtService jwtService; private final UserService userService; private final SessionService sessionService; public LoginResponseDto login(LoginDto loginDto) { Authentication authentication = authenticationManager.authenticate( new UsernamePasswordAuthenticationToken(loginDto.getEmail(), loginDto.getPassword()) ); User user = (User) authentication.getPrincipal(); String accessToken = jwtService.generateAccessToken(user); return new LoginResponseDto(user.getId(), accessToken); } }

    Now Let’s understand how DaoAuthenticationProvider works and helps us to Authenticate the User#

    After the ProviderManager finds that DaoAuthenticationProvider supports the provided authentication object it will call the authenticate method of DaoAuthenticationProvider .

    Now DaoAuthenticationProvider calls the UserDetailsService's loadUserByUsername() method, passing the username from the Authentication object. The UserDetailsService queries the database and returns a UserDetails object containing the user's information (username, encoded password, authorities).

    The DaoAuthenticationProvider uses the configured PasswordEncoder to compare the password provided by the user in the Authentication object with the encoded password retrieved from the UserDetails. If the passwords match and the user is valid , create a fully authenticated Authentication object and If authentication fails (wrong password, user not found, etc.), throw an AuthenticationException.

    Understanding the Complete Authentication flow with diagram#

    Following image shows the complete authentication flow when user login.
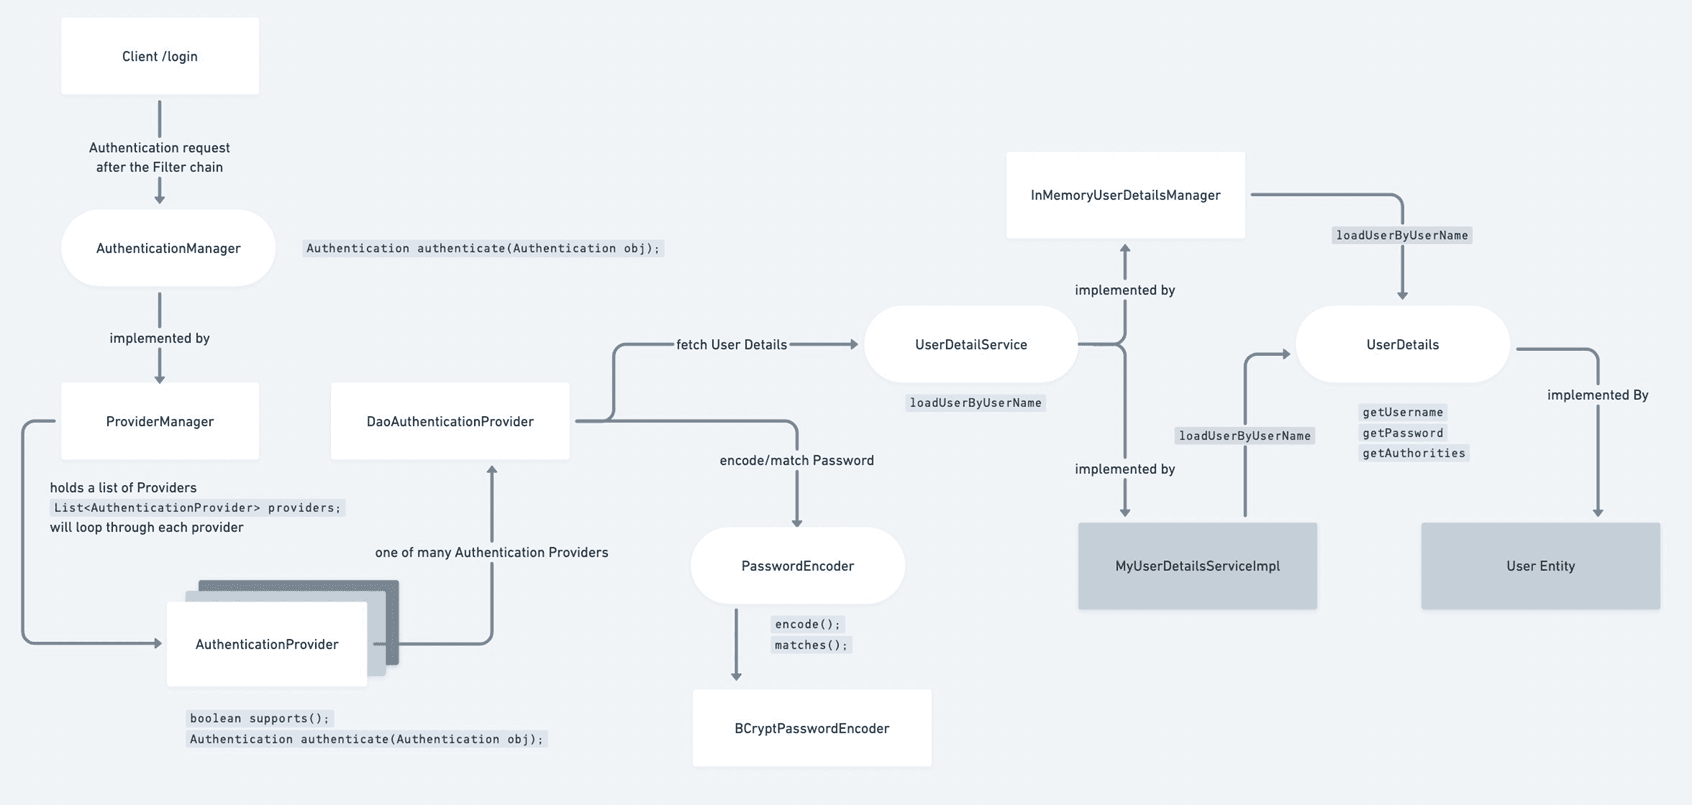
    Authentication Flow Diagram

    When user or client makes login request at that time we will call the AutheticationManager authenticate method by passing the Authentication object UsernamePasswordAuthenticationToken with principal as email and credentials as password.

    Authentication authentication = authenticationManager.authenticate( new UsernamePasswordAuthenticationToken(loginDto.getEmail(), loginDto.getPassword()) );

    Now the ProviderManager which is the ****implementation of AuthenticationManager will loop throug the list of AuthenticationProviders, this AuthenticationProvider Interface has two methods support and authenticate, all the implementation classes of AuthenticationProvider overrides this two methods.

    package org.springframework.security.authentication; import org.springframework.security.core.Authentication; import org.springframework.security.core.AuthenticationException; public interface AuthenticationProvider { Authentication authenticate(Authentication authentication) throws AuthenticationException; boolean supports(Class<?> authentication); }

    One of the AbstractClass called AbstractUserDetailsAuthenticationProvider implements the AuthenticationProvider interface and this abstract class is extended by DaoAuthenticationProvider

    This DaoAuthenticationProvider's authenticate method is invoked and it calls UserDetailService’s (which delegates controll to UserService) loadUserByUsername method by passing the username from the Authentication object. The UserDetailsService queries the database and returns a UserDetails object containing the user's information (username, encoded password, authorities).

    The DaoAuthenticationProvider uses the configured PasswordEncoder to compare the password provided by the user in the Authentication object with the encoded password retrieved from the UserDetails. If the passwords match and the user is valid, create a fully authenticated Authentication object and If authentication fails (wrong password, user not found, etc.), throw an AuthenticationException.

    public class DaoAuthenticationProvider extends AbstractUserDetailsAuthenticationProvider { private static final String USER_NOT_FOUND_PASSWORD = "userNotFoundPassword"; private PasswordEncoder passwordEncoder; private volatile String userNotFoundEncodedPassword; private UserDetailsService userDetailsService; private UserDetailsPasswordService userDetailsPasswordService; private CompromisedPasswordChecker compromisedPasswordChecker; public DaoAuthenticationProvider() { this(PasswordEncoderFactories.createDelegatingPasswordEncoder()); } public DaoAuthenticationProvider(PasswordEncoder passwordEncoder) { this.setPasswordEncoder(passwordEncoder); } protected void additionalAuthenticationChecks(UserDetails userDetails, UsernamePasswordAuthenticationToken authentication) throws AuthenticationException { if (authentication.getCredentials() == null) { this.logger.debug("Failed to authenticate since no credentials provided"); throw new BadCredentialsException(this.messages.getMessage("AbstractUserDetailsAuthenticationProvider.badCredentials", "Bad credentials")); } else { String presentedPassword = authentication.getCredentials().toString(); if (!this.passwordEncoder.matches(presentedPassword, userDetails.getPassword())) { this.logger.debug("Failed to authenticate since password does not match stored value"); throw new BadCredentialsException(this.messages.getMessage("AbstractUserDetailsAuthenticationProvider.badCredentials", "Bad credentials")); } } } protected void doAfterPropertiesSet() { Assert.notNull(this.userDetailsService, "A UserDetailsService must be set"); } protected final UserDetails retrieveUser(String username, UsernamePasswordAuthenticationToken authentication) throws AuthenticationException { this.prepareTimingAttackProtection(); try { UserDetails loadedUser = this.getUserDetailsService().loadUserByUsername(username); if (loadedUser == null) { throw new InternalAuthenticationServiceException("UserDetailsService returned null, which is an interface contract violation"); } else { return loadedUser; } } catch (UsernameNotFoundException var4) { UsernameNotFoundException ex = var4; this.mitigateAgainstTimingAttack(authentication); throw ex; } catch (InternalAuthenticationServiceException var5) { InternalAuthenticationServiceException ex = var5; throw ex; } catch (Exception var6) { Exception ex = var6; throw new InternalAuthenticationServiceException(ex.getMessage(), ex); } } protected Authentication createSuccessAuthentication(Object principal, Authentication authentication, UserDetails user) { String presentedPassword = authentication.getCredentials().toString(); boolean isPasswordCompromised = this.compromisedPasswordChecker != null && this.compromisedPasswordChecker.check(presentedPassword).isCompromised(); if (isPasswordCompromised) { throw new CompromisedPasswordException("The provided password is compromised, please change your password"); } else { boolean upgradeEncoding = this.userDetailsPasswordService != null && this.passwordEncoder.upgradeEncoding(user.getPassword()); if (upgradeEncoding) { String newPassword = this.passwordEncoder.encode(presentedPassword); user = this.userDetailsPasswordService.updatePassword(user, newPassword); } return super.createSuccessAuthentication(principal, authentication, user); } } private void prepareTimingAttackProtection() { if (this.userNotFoundEncodedPassword == null) { this.userNotFoundEncodedPassword = this.passwordEncoder.encode("userNotFoundPassword"); } } private void mitigateAgainstTimingAttack(UsernamePasswordAuthenticationToken authentication) { if (authentication.getCredentials() != null) { String presentedPassword = authentication.getCredentials().toString(); this.passwordEncoder.matches(presentedPassword, this.userNotFoundEncodedPassword); } } public void setPasswordEncoder(PasswordEncoder passwordEncoder) { Assert.notNull(passwordEncoder, "passwordEncoder cannot be null"); this.passwordEncoder = passwordEncoder; this.userNotFoundEncodedPassword = null; } protected PasswordEncoder getPasswordEncoder() { return this.passwordEncoder; } public void setUserDetailsService(UserDetailsService userDetailsService) { this.userDetailsService = userDetailsService; } protected UserDetailsService getUserDetailsService() { return this.userDetailsService; } public void setUserDetailsPasswordService(UserDetailsPasswordService userDetailsPasswordService) { this.userDetailsPasswordService = userDetailsPasswordService; } public void setCompromisedPasswordChecker(CompromisedPasswordChecker compromisedPasswordChecker) { this.compromisedPasswordChecker = compromisedPasswordChecker; } }

    Using JWT Token for Authentication#

    Once the authentication is done by DaoAuthenticationProvider we create the jwt access token with the help of jwt service. During jwt token creation we will set the userId as the subject and add the remaining details like email and roles in claims. The roles that we added will be used during authorizing the user.

    @Service public class JwtService { @Value("${jwt.secretKey}") private String jwtSecretKey; private SecretKey getSecretKey() { return Keys.hmacShaKeyFor(jwtSecretKey.getBytes(StandardCharsets.UTF_8)); } public String generateAccessToken(User user) { return Jwts.builder() .subject(user.getId().toString()) .claim("email", user.getEmail()) .claim("roles", user.getRoles().toString()) .issuedAt(new Date()) .expiration(new Date(System.currentTimeMillis() + 1000*60*10)) .signWith(getSecretKey()) .compact(); } public String generateRefreshToken(User user) { return Jwts.builder() .subject(user.getId().toString()) .issuedAt(new Date()) .expiration(new Date(System.currentTimeMillis() + 1000L *60*60*24*30*6)) .signWith(getSecretKey()) .compact(); } public Long getUserIdFromToken(String token) { Claims claims = Jwts.parser() .verifyWith(getSecretKey()) .build() .parseSignedClaims(token) .getPayload(); return Long.valueOf(claims.getSubject()); } }

    Note:- You have to add the following dependencies in the pom.xml file to use jwt token in spring boot application.

    <dependency> <groupId>io.jsonwebtoken</groupId> <artifactId>jjwt-api</artifactId> <version>0.12.6</version> </dependency> <dependency> <groupId>io.jsonwebtoken</groupId> <artifactId>jjwt-impl</artifactId> <version>0.12.6</version> <scope>runtime</scope> </dependency> <dependency> <groupId>io.jsonwebtoken</groupId> <artifactId>jjwt-jackson</artifactId> <version>0.12.6</version> <scope>runtime</scope> </dependency>

    Requests made for signup and login will be permitted and not be authenticated, but all othe requests that user will make after login by sending the accessToken in the header will go through securityFilterChain for authentication.

    @Configuration @EnableWebSecurity @RequiredArgsConstructor @EnableMethodSecurity(securedEnabled = true) public class WebSecurityConfig { private final JwtAuthFilter jwtAuthFilter; private final OAuth2SuccessHandler oAuth2SuccessHandler; private static final String[] publicRoutes = { "/error", "/auth/**" }; @Bean SecurityFilterChain securityFilterChain(HttpSecurity httpSecurity) throws Exception { httpSecurity .authorizeHttpRequests(auth -> auth .requestMatchers(publicRoutes).permitAll() .anyRequest().authenticated()) .csrf(csrfConfig -> csrfConfig.disable()) .sessionManagement(sessionConfig -> sessionConfig .sessionCreationPolicy(SessionCreationPolicy.STATELESS)) .addFilterBefore(jwtAuthFilter, UsernamePasswordAuthenticationFilter.class) return httpSecurity.build(); } @Bean AuthenticationManager authenticationManager(AuthenticationConfiguration config) throws Exception { return config.getAuthenticationManager(); } @Bean PasswordEncoder passwordEncoder() { return new BCryptPasswordEncoder(); } }

    Authenticating the user with the provided accessToken in the header.#

    So far we have seen that when user makes the login request after signup user will get an accessToken and that accessToken will be passed in the next requests made by user to access any content or resource from database.

    @Component @RequiredArgsConstructor public class JwtAuthFilter extends OncePerRequestFilter { private final JwtService jwtService; private final UserService userService; @Autowired @Qualifier("handlerExceptionResolver") private HandlerExceptionResolver handlerExceptionResolver; @Override protected void doFilterInternal(HttpServletRequest request, HttpServletResponse response, FilterChain filterChain) throws ServletException, IOException { try { final String requestTokenHeader = request.getHeader("Authorization"); if (requestTokenHeader == null || !requestTokenHeader.startsWith("Bearer")) { filterChain.doFilter(request, response); return; } String token = requestTokenHeader.split("Bearer ")[1]; Long userId = jwtService.getUserIdFromToken(token); if (userId != null && SecurityContextHolder.getContext().getAuthentication() == null) { User user = userService.getUserById(userId); UsernamePasswordAuthenticationToken authenticationToken = new UsernamePasswordAuthenticationToken(user, null, user.getAuthorities()); authenticationToken.setDetails( new WebAuthenticationDetailsSource().buildDetails(request) ); SecurityContextHolder.getContext().setAuthentication(authenticationToken); } filterChain.doFilter(request, response); } catch (Exception ex) { handlerExceptionResolver.resolveException(request, response, null, ex); } } }

    Let’s breakdown the code for JwtAuthFilter to understand ut

    The JwtAuthFilter class is a custom Spring Security filter used to validate JWT (JSON Web Token) authentication in an application. Here’s what the filter does, step-by-step:

    1. Extract the Token:
      • It checks the Authorization header of the incoming HTTP request for a token. If the header is missing or does not start with "Bearer", it skips further processing and lets the request proceed to further filter that is UsernamePasswordAuthenticationFilter which will throw Authentication exception as it will not get the authentication object.
    2. Validate and Parse the Token:
      • If a token is found, it extracts the token value and uses JwtService to decode and extract the user ID embedded in the token.
    3. Set Authentication:
      • If the user ID is valid and the SecurityContextHolder does not already have an authentication object:
        • The filter fetches the corresponding user details using UserService.
        • It creates a UsernamePasswordAuthenticationToken with the user’s details and authorities.
        • The token is stored in the SecurityContextHolder, marking the request as authenticated for the next filter i.e UsernamePasswordAuthenticationFilter will find that authentication object is present in security context so no need to perform authentication and it will simply pass the request to next filter in chain and from here the request is now send to dispatcher servlet and from dispatcher servlet to controller.
    4. Handle Exceptions:
      • Any exceptions during the process are resolved using the HandlerExceptionResolver, ensuring proper error handling and response generation.
    5. Continue the Filter Chain:
      • After processing, the filter calls filterChain.doFilter() to pass the request to the next filter in the chain and the request is passed to UsernamePasswordAuthenticationFilter.
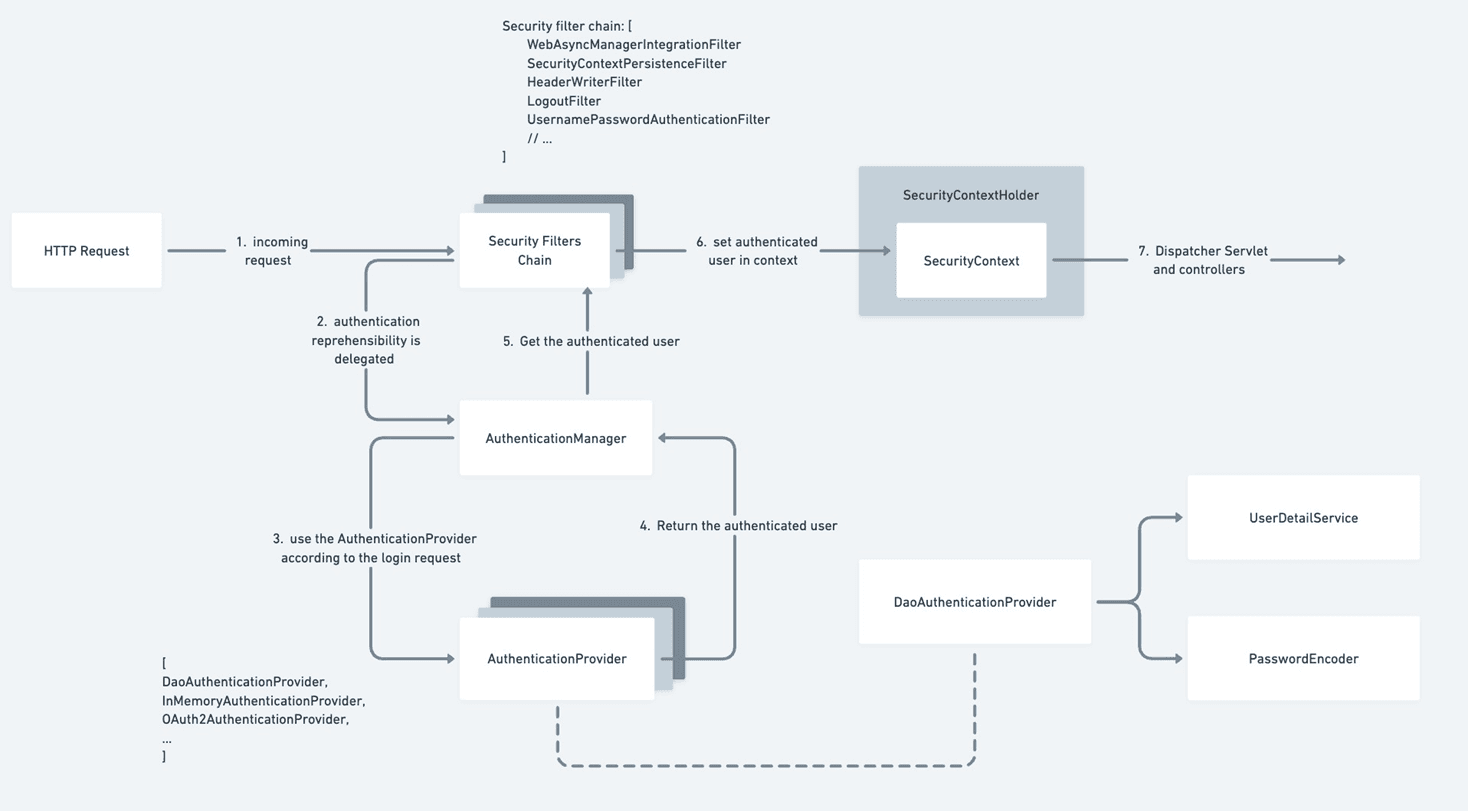
    Authenticating Client Request Flow

    The above image shows the complete flow that we have discussed so far.

    Conclusion#

    So, as we've seen, Spring Security can seem a bit intimidating at first glance. But once you get a handle on how it works behind the scenes the filters, the AuthenticationManager, DaoAuthenticationProvider, and the UserDetailsService it all starts to make sense. You can actually configure and tweak your app's security pretty confidently. It's a powerful tool, and honestly, it's not as tough as it looks.

    Spring Boot
    Spring
    Spring Security
    Spring Security Internal Working
    Spring Security Advance

    More articles