Instantly Deploy Spring Boot with Docker Compose — Step-by-Step Guide
Learn how to containerize a Spring Boot application and its dependencies using Docker Compose. This blog covers creating a simple Spring Boot project with PostgreSQL, writing a Dockerfile for containerization, configuring docker-compose.yml for multi-container orchestration
Santosh Mane
December 14, 2024
6 min read
Introduction#
Docker Compose simplifies running multi-container Docker applications by managing services through a single configuration file. For a Spring Boot application, it helps containerize the application and its dependencies, like a database, for seamless deployment. This guide walks you through setting up Docker Compose for a basic Spring Boot application.
Steps#
Step-1 Create Simple Spring boot project#
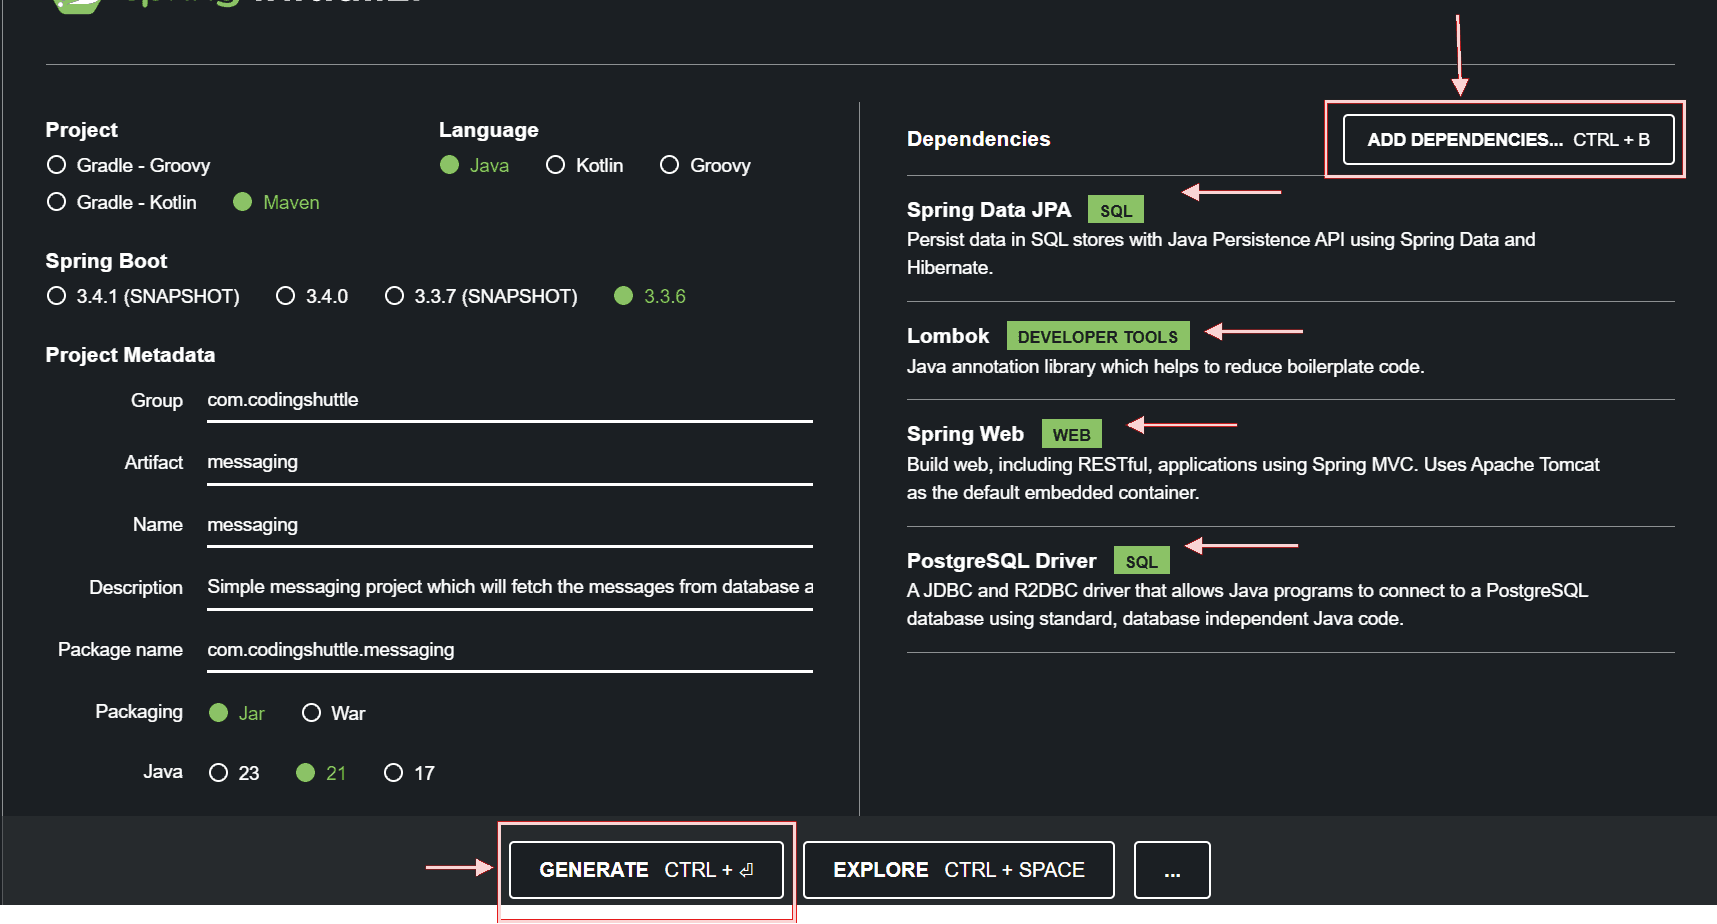
- Visit https://start.spring.io/ and create the basic spring boot project, we will create a basic messaging project which will store text messages in postgreSQL database

- Add the dependencies as shown in above figure and generate the zip folder, after generating the zip folder extract the folder and open the project in Intellij or any other editor you prefer.
Step-2 Project Structure#
Create the Controller Endpoints, Service and Repository for the project, we will be creating simple messaging app which will allow us to create message and store them in postgres DB and fetch all the messages.
- Entity class
- Repository
- Service
- Controller
Application properties
Configure database related configuration in application.properties file
Note:- Here messaging-db is the container name in which the postgres is running.
Step-3 Docker Installation#
- Visit https://docs.docker.com/desktop/setup/install/windows-install/ to install docker desktop on windows.
- Visit https://docs.docker.com/desktop/setup/install/mac-install/ to install docker on mac system.
- After installing docker on your machine start docker engine.
Step-4 Creating Docker file#
- We have to create a Dockerfile and place it at a root directory of our project, with the help of this docker file we can build the docker image of our project.
- Dockerfile
- Understanding the Dockerfile
This Dockerfile creates a Docker image for the Spring Boot application. It uses Maven as the build tool and ensures all dependencies are resolved before running the application. Let’s explore each line: -
- Base Image:
- Uses the official Maven Docker image (
maven:3.9.4-eclipse-temurin-21-alpine) as the foundation. - This image is lightweight (
alpine) and includes: - Maven version
3.9.4for building the application. - Java Development Kit (JDK) version
21(Temurin), compatible with Spring Boot.
- Uses the official Maven Docker image (
- Setting the Working Directory - WORKDIR /app
- Sets the working directory for the image to
/app. - All subsequent commands will run inside this directory.
- Sets the working directory for the image to
- Copy Maven Wrapper Files
COPY .mvn/ .mvn
COPY mvnw pom.xml ./.mvn/andmvnw: The Maven Wrapper files allow the project to use a specific Maven version without requiring Maven pre-installed on the host.pom.xml: The Maven Project Object Model file containing dependency and build configurations.
- Download Dependencies - RUN ./mvnw dependency:go-offline
- Downloads all project dependencies and plugins required for the build.
- Ensures the container can build the application without accessing the internet later, improving speed and reliability.
- Copy Application Source Code - COPY src ./src
- Copies the entire src directory from the local machine into the /app/src directory inside the container.
- Start the Application - CMD ["./mvnw", "spring-boot:run"]
- CMD - Defines the command to run the Spring Boot application using the Maven Wrapper.
- spring-boot:run : Launches the Spring Boot application directly from the source, ideal for development environments.
Step-5 Creating Docker-compose file for your spring boot project#
- Create docker-compose.yml file and place it at the root dir of your project
- docker-compose.yml file
Before moving forward let's understand the docker-compose file#
Breaking Down the docker-compose.yml File for Messaging App. This docker-compose.yml file defines a multi-container setup for the Messaging App, which includes a Spring Boot application (messaging-app) and a PostgreSQL database (messaging-db). Let's walk through each section to understand its purpose.
- Version version: '3.8’ - Specifies the Docker Compose file format version. Version
3.8is the latest supported version for modern Docker setups, ensuring compatibility with features like custom networks. - Services: The
servicessection defines the containers that make up the application.
- build:
- Specifies the build context (
.refers to the current directory) and theDockerfileused to containerize the application.
- Specifies the build context (
- ports:
- Maps port
8080on the host machine to port8080in the container, making the application accessible locally athttp://localhost:8080.
- Maps port
- depends_on:
- Ensures the
messaging-dbservice (PostgreSQL database) starts before themessaging-appservice.
- Ensures the
- networks:
- Connects the
messaging-appcontainer to themessaging-networkfor isolated communication between services.
- Connects the
- environment:
- Overrides database configuration in the Spring Boot application:
SPRING_DATASOURCE_URL: Points to themessaging-dbservice atmessaging_db, the alias provided by the Docker Compose network.SPRING_DATASOURCE_USERNAMEandSPRING_DATASOURCE_PASSWORD: Credentials for the PostgreSQL database.
- Overrides database configuration in the Spring Boot application:
- image:
- Specifies the PostgreSQL Docker image version
15.
- Specifies the PostgreSQL Docker image version
- container_name:
- Assigns the container a fixed name (
postgres_db) for easier identification in commands and logs.
- Assigns the container a fixed name (
- environment:
- Configures the PostgreSQL instance:
POSTGRES_USER: Database username.POSTGRES_PASSWORD: Database password.POSTGRES_DB: Creates a default database namedmessaging_db.
- Configures the PostgreSQL instance:
- ports:
- Maps port
5432on the host to port5432inside the container, enabling local access to the database.
- Maps port
- volumes:
- Defines a persistent volume (
db_data) to store PostgreSQL data, ensuring data is not lost when containers are restarted.
- Defines a persistent volume (
- networks:
- Connects the database to the same
messaging-networkfor seamless communication with the application.
- Connects the database to the same
- Volumes
- Creates a named volume (
db_data) to persist PostgreSQL data outside the container lifecycle. - Stored data survives container restarts or removal, making it ideal for production setups.
- Creates a named volume (
- Networks
- Defines a custom Docker network (
messaging-network) for themessaging-appandmessaging-dbservices. - Ensures isolated and secure communication between the containers, preventing interference from other Docker networks.
- Defines a custom Docker network (
Step-6 Run Docker Compose#
Run command
- Open a terminal in your project directory.
- Run the following command to build and start the containers:
Verify:
- Your Spring Boot app should be accessible at http://localhost:8080.
- PostgreSQL is running at localhost:5432.
Step-7 Testing#
- Test your endpoints using tools like Postman or CURL.
- logChecks to ensure the services are communicating:
Step-8 Clean Up#
To stop and remove containers, use:
Conclusion#
Using Docker Compose, you can streamline development by creating isolated environments for your Spring Boot application and its dependencies. This setup ensures consistency, scalability, and ease of deployment.
Want to Master Spring Boot and Land Your Dream Job?
Struggling with coding interviews? Learn Data Structures & Algorithms (DSA) with our expert-led course. Build strong problem-solving skills, write optimized code, and crack top tech interviews with ease
Learn more