Best Way To Master Spring Boot - A Complete Roadmap in 2025
This blog is a complete roadmap to mastering Spring Boot, breaking down complex concepts into simple, structured phases. Whether you're a beginner or someone struggling with overwhelming documentation, this guide will help you navigate Spring Boot efficiently and build real-world applications with confidence.
Santosh Mane
January 31, 2025
16 min read
When I first heard about Spring Boot, I didn’t know what the buzz was all about. People kept saying it was the tool for building Java applications, but when I opened the documentation for the first time, I’ll be honest it felt overwhelming. There were annotations everywhere, configuration options I’d never heard of, and concepts like microservices that seemed way out of reach.
But here’s the thing: once I found a clear path to learning Spring Boot, it all started making sense. I realized it wasn’t about trying to understand everything at once but about taking it step by step. Now, having worked with Spring Boot on real-world projects, I’ve put together a roadmap to help others avoid the same confusion I had.
If you’re ready to master Spring Boot without wasting time on unnecessary detours, let me guide you through the process. This roadmap is based on what actually works not just theory. Let’s jump in!
What You Should Know Before Diving into Spring Boot#
- Java and OOP Basics: Since Spring Boot is built on Java, you'll need a solid grasp of Java and its object-oriented principles. Things like classes, objects, inheritance, polymorphism, and interfaces are a big part of how everything works. If you’re also comfortable with collections, exception handling, and generics, you’ll have a much smoother time.
- Databases and SQL: A basic understanding of relational databases (like MySQL or PostgreSQL) and SQL will really come in handy when you're dealing with Spring Data JPA and how Spring Boot interacts with databases.
- Web Development Basics: It’s helpful to have a basic understanding of how web apps run. Things like how browsers communicate with servers (HTTP), what REST APIs are all about, and how data moves around the web will make learning Spring Boot a lot easier.
Before We Dive into the Spring Boot Roadmap#
Let’s pause for a second. You’re probably wondering, “If Spring is already there, why do we even need Spring Boot?” That question crossed my mind too when I first heard about it.
Here’s the deal: Spring is amazing, no doubt about it. It gives you all the tools to build powerful Java applications. But let me be honest: when I started with Spring, it felt like I spent more time configuring things than actually building anything. Setting up XML files, managing dependencies, and figuring out how to wire everything together was a lot.
That’s why Spring Boot is such a game-changer. It takes all the complexity of Spring and simplifies it. For example, you don’t need to set up an external server anymore it gives you one built-in. It also auto-configures a lot of stuff so you can hit the ground running. Think of it like upgrading from a basic toolkit to a power tool—it doesn’t replace Spring, but it makes using it so much smoother and faster.
Once I started working with Spring Boot, I realized how much time it saved. It’s honestly one of the reasons I didn’t give up on Java during those early days!
Now that we’ve got that cleared up, let’s get into the actual roadmap.
Complete Roadmap to master Spring Boot#
When I first started learning Spring Boot, I had no idea what topics I actually needed to understand to build a simple Spring Boot application. Well, over time, I figured out the essentials that made everything click. It wasn’t about knowing everything right away but focusing on the key areas that really matter. If you’re starting out or feeling lost in the details, don’t worry here’s the roadmap I wish I had when I was getting into it.
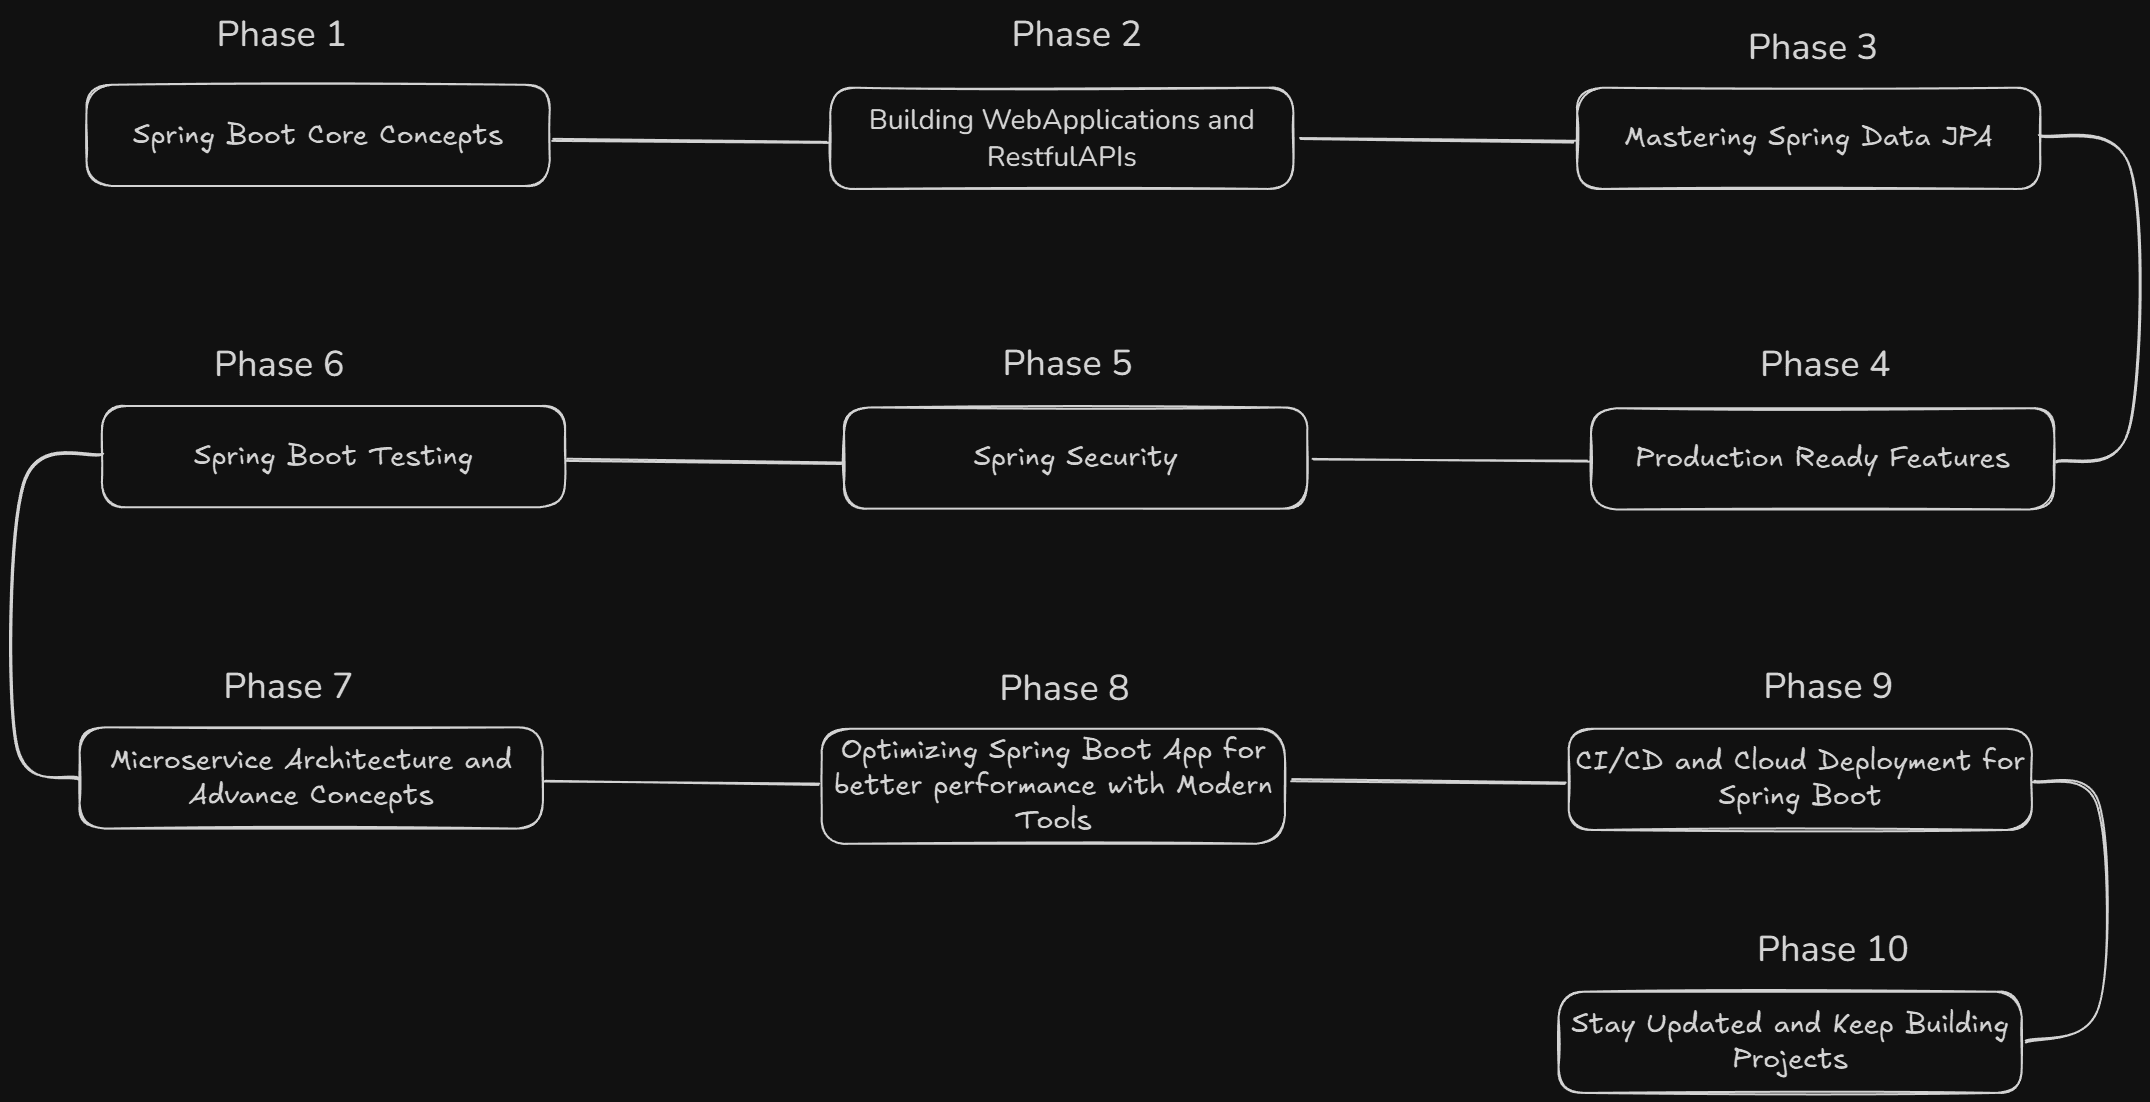
The roadmap is divided into 10 phases:

Phase 1: Understand Spring Boot Core Concepts#
When I first started learning Spring Boot, it felt like there was a mountain of stuff to figure out. But honestly, once I broke it down and started with the basics, everything started to make sense. In this first phase, I want to help you get familiar with the core stuff that’ll make everything else easier down the line. Don’t stress about knowing it all right away—just focus on getting comfortable with these key concepts.
1. Spring Architecture
You’ll start by understanding how Spring Boot fits into the larger Spring ecosystem and what makes it stand out for building Java apps.
2. Spring IOC Container
Learn how Spring Boot manages your application’s objects using the IOC container, which takes care of things like creation, configuration, and dependency management.
3. Create Your First Spring Boot Project
Using Spring Initializr, you’ll quickly spin up your first project, setting the stage for everything you’ll build later.
4. Spring Boot Application Properties
You’ll need to know where and how to manage your application’s settings—like server ports and database info—through the application.properties or application.yml file.
5. Understand Spring Beans
Get to know Beans the building blocks of your Spring Boot app and how Spring manages them automatically.
6. Dependency Injection
A big part of Spring Boot is Dependency Injection (DI), which helps you keep things neat and organized by automatically injecting dependencies into your classes.
7. Spring Context
The Spring Context is where all your Beans live. It helps tie everything together, so understanding how it works is crucial for structuring your app.
8. Spring Boot Annotations
Spring Boot relies on some key annotations (like @SpringBootApplication) to set things up automatically, so getting familiar with them will save a lot of time.
9. Spring Boot Auto Configuration
One of Spring Boot’s biggest features is Auto Configuration, which takes care of a lot of the setup for you—like configuring your database or web server just by adding the right dependencies.
Phase 2: Building Web Applications and RESTful APIs#
Coming to the next phase, In this phase, we’re going to start building actual web applications and APIs. Don’t worry, we’ll keep it simple and focus on the core things that’ll make your app run.
1. Understand Spring MVC Architecture
First, get the gist of Spring MVC. It's how Spring Boot handles your requests and sends them where they need to go. Once you get how it works, it’ll make the rest of building your app so much easier.
2. Learn About Controllers
Now, controllers. These are crucial they take requests and send them to the right place in your app. Learn how to set them up, and you’ll be able to route the requests properly to the respective methods.
3. Start Building RESTful APIs
You’ll need to know how to build RESTful APIs. These are basically the bridges between your app and the outside world. It’s how other apps can interact with yours, so you’ll need to learn how to set up these endpoints and get data in and out.
4. Binding and Validating Data
As users interact with your app, they’ll be sending data. Learn how to bind that data to your models and make sure it’s legit before processing it. If there’s something wrong, you want to catch it early.
5. Handling Exceptions and Custom Error Pages
Things will break. But instead of showing a generic error page, you can make it more user-friendly by handling exceptions and showing custom error pages. It’s a small thing, but it makes a big difference.
6. Using Interceptors
Interceptors might sound like a lot, but really, they’re just tools that help you do things like logging or checking if someone’s logged in before hitting your controller. They're super helpful for making sure everything flows smoothly behind the scenes.
Phase 3: Mastering Spring Data JPA#
Here’s where things start to get real with databases. If you’ve been wondering how to get your app to talk to a database without losing your mind, this is the phase for that. When I started with Spring Data JPA, I had no idea what “repositories” or “entities” even meant. But the more I worked with it, the clearer it became.
1. Understand Spring Data JPA
Start by getting a solid understanding of what Spring Data JPA is and why it’s so useful. It’s the framework that simplifies working with databases, and once you get it, you’ll wonder how you ever did things without it.
2. Learn About JPA Repository Interface
JPA repositories are one of the main building blocks of Spring Data JPA. Understanding how they work will make things like querying and managing data super easy.
3. Master Entity Mapping
Learn how to map your Java objects to database tables using entity mapping. It’s all about making sure your Java classes and database tables talk to each other correctly.
4. Explore Fetching Strategies
Learn about the different fetching strategies and how they affect the performance of your application. It’s all about getting the data you need, without overloading your app.
5. Get to Know Repositories and Query Methods
You’ll want to dig deeper into repositories and how to create custom query methods to fetch exactly the data you need. This is where things get more dynamic and flexible.
6. Set Up MySQL with Spring Data JPA
Setting up a MySQL database to work with Spring Data JPA is an essential skill. It’s a little setup work, but once it’s done, you’ll be able to manage your data like a pro.
7. Learn JPQL and Native Queries
JPQL (Java Persistence Query Language) and native queries let you write custom queries for more control. These will come in handy when you need something more specific than the default methods Spring gives you.
8. Understand Paging and Sorting
When your data grows, you’ll need ways to paginate and sort it efficiently. This is essential for performance, especially when dealing with large datasets.
9. Understand Locking
Learn about optimistic and pessimistic locking to ensure that data is handled safely when multiple users or processes are trying to access it at the same time.
10. Master Transactions
Finally, get familiar with transactions. Understanding how to manage them is key to making sure your data is consistent and reliable, especially when things go wrong.
Phase 4: Use Spring Boot Production-Ready Features#
This phase is all about getting your app ready for the real world. It’s not just about making it work; it’s about making sure it can handle the chaos of production. This is where you’ll learn to add the extra touches that make your app reliable and easier to manage once it’s live.
Here’s what you’ll want to explore:
- Dev Tools: These tools are a lifesaver during development—they make testing and debugging faster with auto-reload and other handy features.
- Auditing with Hibernate: Learn how to track changes in your database, like knowing who updated what and when.
- RestClient: If your app needs to talk to another API, this is how you’ll make it happen.
- Logging: Trust me, you’ll thank yourself later when you have proper logs to figure out why something broke.
- Actuator: This helps you monitor your app’s health and performance once it’s running in production.
- Swagger: Make your APIs user-friendly by documenting them so others can understand and use them easily.
Phase 5: Spring Security#
The next phase is all about understanding security. It is going to be hard for the first time to understand, but trust me, once you start getting into it, it’s not as complicated as it seems.
- How Spring Security Works: Before you jump into setting things up, it’s useful to know the basics of how security works in Spring Boot.
- JWT (JSON Web Tokens): This is the magic behind modern app security. You’ll see why JWT is such a big deal and how it helps keep your app safe.
- User Signups and Logins with JWT: Setting up a secure login and signup system is key. With JWT, this becomes a lot smoother.
- Authenticating Requests with JWT: Once you have users signing in, you need a way to make sure that every request is coming from someone who’s properly authenticated. JWT helps you do that.
- OAuth2 Client Authentication: If you want users to log in with their Google, Facebook, or other social accounts, OAuth2 is how you do it.
- Role-Based Access: You’ll want to make sure only certain users can access specific parts of your app. This is where role-based access comes in.
- Handling Security Exceptions: Let’s face it, errors will happen. But handling them correctly, especially security-related ones, is super important.
Phase 6: Spring Boot Testing#
Testing might not be the most exciting thing, but trust me, it's one of the most important skills you can learn. In this phase, you'll get hands-on with testing to ensure your Spring Boot apps are solid.
1. Understanding JUnit and AssertJ
Start by learning JUnit for writing test cases and AssertJ for fluent assertions that make your tests more readable.
2. Unit Testing the Persistence Layer
Learn how to test your database interactions to ensure data is being saved and retrieved correctly from your database.
3. Understanding Mockito
Dive into Mockito for mocking external dependencies in your tests, so you don’t have to worry about real database connections or third-party services.
4. Unit Testing the Service Layer
Test the logic in your service layer, ensuring that your business logic works as expected without connecting to a real database.
5. Integration Testing the Presentation Layer
Wrap it all up by testing the presentation layer (controllers) to ensure that your APIs and web interfaces are functioning correctly together.
Phase 7: Microservice Architecture and Advanced Microservice Concepts#
Alright, now we're diving into the world of microservices. This phase is all about breaking your application into smaller, independent services that can scale and work together. It's a game-changer for building flexible, maintainable apps. Here's the path you'll follow:
1. Microservice Architecture
Get a solid grasp of what microservices are all about. You’ll see how breaking an app into smaller, self-contained services can make it more scalable and easier to manage.
2. Service Discovery with Eureka
Service discovery with Eureka will help your services find and communicate with each other automatically, so you don’t have to hardcode any URLs.
3. Spring Cloud API Gateway
Set up an API Gateway that acts as the traffic cop for your microservices, directing requests to the right service while adding an extra layer of security.
4. API Gateway Filters and Authentication with Custom GatewayFilters
Customize how requests pass through the API Gateway, adding filters for things like authentication and monitoring to keep things secure and efficient.
5. OpenFeign Microservice Communication
OpenFeign simplifies the communication between microservices. Instead of manually handling HTTP requests, you can just call methods, and OpenFeign takes care of the rest.
6. Circuit Breaker, Retry, and Rate Limiter with Resilience4J
Keep your app running smoothly even when things go wrong. Resilience4J helps you add retries, circuit breakers, and rate limiting to prevent system failures.
7. Centralized Configuration Server using GitHub
You don’t want to manage configuration for each service separately. With GitHub as your centralized config server, you can store all your configurations in one place and make life easier.
8. Distributed Tracing using Zipkin and Micrometer
Tracing is crucial when you’re dealing with multiple microservices. Zipkin and Micrometer let you track requests as they travel across services, helping you debug and keep everything running smoothly.
9. Centralized Logging with the ELK Stack
Centralized logging is a lifesaver when you’re working with microservices. The ELK stack lets you collect logs from all your services in one place, making it easier to monitor and troubleshoot.
Phase 8: Optimizing Spring Boot App for better performance with Modern Tools#
Now we’re entering a phase that’s all about making your Spring Boot application faster, more efficient, and ready for production. This isn’t just about writing more code—it’s about using the right tools and techniques to ensure that your app can handle real-world loads with ease. Here’s what you need to focus on:
1. Caching with Redis
If your application has lots of data that doesn't change often, repeatedly fetching it from the database can slow things down. That's where Redis comes in. It’s an in-memory data store that lets you cache frequently accessed data. This means your app doesn’t need to keep hitting the database, resulting in faster response times. By using Redis for caching, you’ll reduce the load on your database, speed up your app, and deliver a better experience for your users.
2. Apache Kafka
As your app grows, managing communication between different services can get tricky. Apache Kafka helps solve this problem by enabling event-driven architecture. Kafka allows your services to communicate asynchronously through messages or events. Instead of tightly coupling your services together, you can publish messages to Kafka, and other services can subscribe to those messages. This decoupling makes your app more scalable and flexible, allowing different parts of your system to operate independently, making it easier to manage as it grows.
Phase 9: CI/CD and Cloud Deployment for Spring Boot#
Our next phase focuses on getting your Spring Boot app ready for real-world deployment. This is where you’ll dive into automating your deployment process with CI/CD tools and take your app to the cloud. Here’s what you’ll cover:
1. CI/CD Concepts
Learn the basics of Continuous Integration and Continuous Deployment to streamline your workflow.
2. Setting up Jenkins
Set up Jenkins to automate builds, tests, and deployments for your Spring Boot app.
3. Git Version Control
Use Git to manage your code and integrate it into your CI/CD pipeline.
4. Automated Testing in CI
Automate unit and integration tests to ensure your app is stable before deployment.
5. Dockerizing Your Spring Boot App
Learn how to containerize your Spring Boot app with Docker for consistent deployment.
6. Deploying to the Cloud
Deploy your Dockerized app to cloud platforms like AWS, Azure, or Google Cloud.
7. Using Kubernetes for Scaling
Learn and Use the Kubernetes engine to manage and scale your Spring Boot app in production.
8. Cloud Monitoring and Logging
Set up monitoring tools like Prometheus and Grafana to keep an eye on your app’s performance in the cloud.
Phase 10: Stay Updated and Keep Building Projects#
Alright, here’s the deal: Now that you’ve got a solid handle on Spring Boot, it’s time to take things to the next level. The truth is, no matter how much you learn, there’s always more to discover and more projects to build. This phase is all about keeping that momentum going and continuing to learn.
- Stay Updated: Spring Boot evolves constantly. You’ll want to keep an eye on the latest updates and new features. That way, you’re always in the know and ready to implement the best practices. Keep an eye on the Spring blog, follow devs on Twitter, and watch for new tutorials.
- Build Real Projects: The more you build, the more you learn. Take on personal projects that interest you, and try to solve problems that you’ve personally faced. Build things that challenge you and make you grow. Nothing beats the learning you get from creating something real.
- Contribute to Open Source: If you feel confident enough, try getting involved in open-source projects. It’s a great way to contribute to the community, learn from others, and tackle real-world problems. Even small contributions can teach you a ton.
- Join Developer Communities: Whether it’s on Slack, Reddit, or at a local meetup, joining a community can do wonders. You’ll meet other developers, share knowledge, and get feedback on your work. There’s always something new to learn from others.
Conclusion#
Mastering Spring Boot is all about taking it step by step and focusing on the key concepts. Keep building real-world projects, stay updated, and embrace the learning process. With persistence, you'll confidently create powerful applications in no time.
Want to Master Spring Boot and Land Your Dream Job?
Struggling with coding interviews? Learn Data Structures & Algorithms (DSA) with our expert-led course. Build strong problem-solving skills, write optimized code, and crack top tech interviews with ease
Learn more

